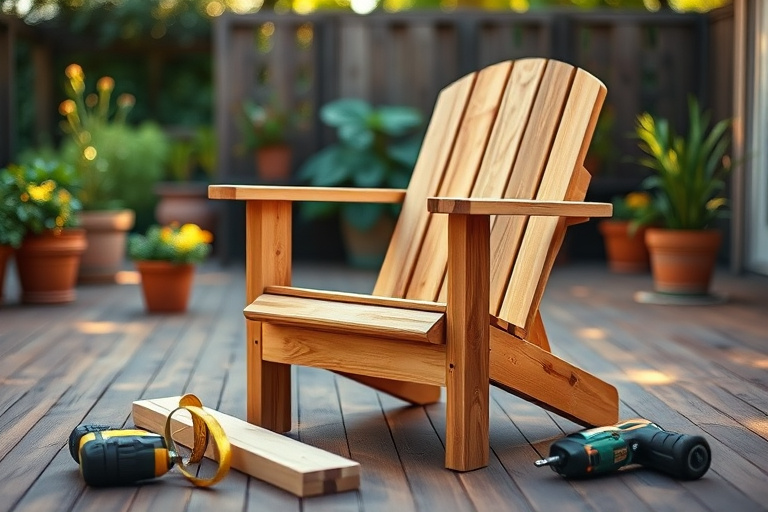
Building durable, comfortable seating for your outdoor spaces often starts with the right plan and the right materials. If you’re exploring how to create your own outdoor furniture, you’ll frequently see projects labeled as 2×4 outdoor chair plans. This approach leverages common, affordable lumber to yield sturdy chairs that can withstand sun, rain, and everyday use. In this guide, we’ll walk you through practical 2×4 outdoor chair plans that balance simplicity with durability, along with smart finishing and maintenance tips to keep your chairs looking great for years.
Why choose 2×4 lumber for outdoor chair plans
2×4 lumber is a staple in many DIYers’ shops because it’s inexpensive, widely available, and surprisingly versatile for outdoor projects. When you design 2×4 outdoor chair plans, you’re taking advantage of a few key advantages:
In addition to the practical benefits, embracing 2×4 outdoor chair plans fits well with a broader woodworking mindset—start simple, build confidence, then scale up. If you’re exploring plan libraries or want to compare different chair styles, consider exploring design resources and plan collections from well-known sources such as Ted’s Woodworking to see how plans vary and what details matter most in outdoor furniture design.
Planning your 2×4 outdoor chair plans
Successful build starts with thoughtful planning. Before you pick up a saw, map out your design, dimensions, and joinery. Here we’ll cover design considerations and a practical materials list to keep you on track.
Design considerations
A comfortable chair seat is typically around 16-18 inches high. For outdoor seating, some prefer a slightly wider seat to accommodate cushions or lounging angles. A gentle recline (about 100-110 degrees) provides comfort without requiring a complex shaping technique. A backrest height around 12-16 inches above the seat is common for a casual outdoor chair. A broader base with diagonal braces or cross supports prevents tipping on uneven ground. Plan for sealing, staining, or painting with an outdoor finish to extend life. If you’ll store chairs seasonally, design for easy disassembly or lightweight portage.
When you’re weighing design options, it’s helpful to review a library of plans. For inspiration and a broad view of how different chair forms handle joinery and ergonomics, many builders turn to trusted plan collections, including those found in curated woodworking resources such as woodworking books that compile techniques and project exemplars.
Materials list
Below is a practical, starter-friendly list for a basic 2×4 chair project. Adjust quantities based on your exact design and chair size.
- 2×4 boards (quality exterior-grade or pressure-treated for outdoor use) – estimate 6-8 boards for a single chair depending on design
- Wood screws (in the 2-1/2 to 3-inch range) or corrosion-resistant fasteners
- Wood glue suitable for outdoor use
- Sandpaper (60/120 grit) or a random orbital sander
- Outdoor sealant or exterior-grade stain/paint with UV protection
- Optional: cable ties or metal corner braces for added stability
- Finishing supplies: brushes or rags, rags for wipe-on finishes
Remember, the exact material requirements depend on your chosen plan. If you’re exploring variations or additional features, such as armrests or a wider seat, your lumber needs may increase. For those who want a broader set of options, a comprehensive plan library like Ted’s Woodworking provides variations across many outdoor furniture styles, which can be helpful for matching a specific aesthetic.
Tools you’ll need
Preparing the right toolkit ensures your 2×4 outdoor chair plans come together cleanly. Here’s a practical starter list:
- Measuring tape, carpenter’s square
- Table saw or miter saw for clean crosscuts
- Cordless drill with driver bits and a countersink bit
- Clamps to hold parts during assembly
- Sander (orbital or palm) or sanding block
- Sawhorse or workbench for stable cutting
- Safety gear: goggles, hearing protection, dust mask
With the right tools, you’ll be able to execute precise cuts and tight joints that contribute to a long-lasting piece of outdoor furniture. If you’re new to this kind of project, you may also want to check a curated library of plans for technique notes and best practices. Some builders rely on online resources to complement their hands-on experience and to gain deeper insight into joinery and finishing techniques.
Step-by-step build guide
Below is a straightforward, beginner-friendly walkthrough for assembling a sturdy 2×4 chair. Adjust the measurements to fit your chosen plan. It’s perfectly fine to start with a simpler version and upgrade later as you gain confidence.
Step 1: Cut parts
Begin by laying out your cut list from the plan. Cut all seat rails, back slats, legs, and braces from 2×4 boards. Use a table saw or miter saw for clean edges. If you’re new to cutting, take extra time to verify each piece against the plan and label parts to avoid mix-ups. Sand edges lightly to minimize splinters before assembly.
Step 2: Assemble base and legs
Start with the base frame. Use pocket holes or traditional butt joints with glue and screws, depending on your comfort level and the plan’s recommendations. Add cross braces for stability. Ensure the base is square by measuring from opposite corners; if the measurements don’t match, adjust until true. Once the base is square, attach the legs. Level all four feet to prevent wobble on uneven ground. If your plan uses bracing diagonals, install them now to lock the frame in place.
Step 3: Attach seat and backrest
Position the seat rails parallel to each other and secure the seat boards, leaving small spaces between boards for drainage and expansion. Attach the backrest supports at the desired angle, then mount the back slats. Check that the backrest is comfortable and doesn’t pinch when you lean back. Recheck all joints for tightness and apply glue to any additional joins to maximize strength.
Step 4: Sand and finish
Sand the entire chair progressively with finer grits (60, then 120, then 180) to achieve a smooth surface. Wipe off dust, then apply your chosen finish. For outdoor furniture, a penetrating stain or an exterior sealant provides better protection than interior finishes. Apply at least two coats, following the manufacturer’s instructions for drying times. If you live in a humid or rainy climate, consider extra protective steps such as a weather-resistant sealant or a topcoat with UV blockers.
Finishing options for durability
Protecting your chair from the elements is as important as building it. In addition to choosing a robust finish, consider the following strategies:
Use a waterproof glue and painter’s tape to seal exposed joints after assembly. Opt for finishes with UV inhibitors to prevent color fading and wood drying out in the sun. - Maintenance schedule: Reapply sealant every 1-2 years depending on climate and exposure.
- Storage considerations: Store chairs in a sheltered area during heavy rains or winter to prolong life.
Durable finishes and proper maintenance can dramatically extend the life of your 2×4 outdoor chair plans, ensuring your DIY seating remains inviting for years. If you’re curious about other finishes or want to explore different styles, a curated library of woodworking resources can be a valuable companion. For example, you can explore curated woodworking books that cover outdoor furniture construction and finishing techniques at this resource: woodworking books: the ultimate guide.
Safety and protective practices
Outdoor projects are gratifying but require attention to safety. Proper protective practices reduce the risk of injuries and exposure to dust or solvents. Here are a few essential tips to keep in mind as you work on your 2×4 outdoor chair plans:
- Wear safety glasses and hearing protection when cutting or sanding.
- Use a dust mask or respirator when sanding old or treated wood.
- Read and follow the instructions on any finishes or sealants you apply, and work in a well-ventilated area.
- Keep your work area organized to avoid slips and trips with tools and lumber around you.
For more nuanced guidance on safe DIY practices and protective techniques, you can explore a dedicated article on toxic woods and protective practices linked here: toxic woods demystified: safe DIY tips and protective practices. This resource helps you understand how to handle different wood types safely and how Ted’s Woodworking inspiration can align with protective practices in real-world projects.
How to choose the right plan and resources
When you’re ready to pick a specific plan, consider how you intend to use the chair, your available space, and your comfort with different joinery techniques. A broad plan library can help you compare options, but selecting a plan that aligns with your skill level is equally important. If you want to see a wide range of plan styles—ranging from simple, stackable chairs to more elaborate designs—explore curated resources that compile best practices and project galleries. A well-regarded option is Ted’s Woodworking, which provides a vast collection of woodworking plans for outdoor furniture. You can explore these plans here: Ted’s Woodworking.
Additional resources and learning
Beyond the plan itself, expanding your knowledge helps you scale your woodworking projects with confidence. Two practical resources are especially helpful for DIY enthusiasts looking to improve technique and broaden their project repertoire. First, a curated guide to woodworking books can be a fantastic reference as you refine decorative details and joinery methods. Second, a broader exploration of safe handling practices and protective techniques can prevent common mistakes when working with outdoor timber. See the woodworking books guide linked above for curated recommendations, and keep safety at the forefront as you tackle future 2×4 outdoor chair plans.
Conclusion
2×4 outdoor chair plans offer a balanced combination of affordability, accessibility, and durability, making them an excellent entry point for DIY furniture projects. By planning carefully, selecting reliable materials, and following a clear build process, you can create comfortable, long-lasting seating for your patio or garden. Remember to apply an outdoor finish and maintain your chairs to maximize their lifespan. If you’re looking for additional inspiration or a broader library of plans, exploring a well-known plan collection like Ted’s Woodworking can be a practical next step. And if you want to pair your build with more learning resources, the woodworking books guide is a helpful companion to consult as you plan your next project. For safety considerations and protective practices, the toxic woods guide provides practical tips while you explore inspiration from Ted’s Woodworking.
Ready to take your project to the next level? Check out the curated plans and start your build today. With the right plan, precise cuts, and proper finishing, your 2×4 outdoor chair plans will deliver reliable seating and bring a tangible sense of accomplishment to your outdoor space.