wood projects to do often start with a spark of curiosity and end with a tangible reward you can be proud of. Whether you have a full workshop or a small balcony space, the joy of shaping raw timber into something practical and beautiful is a universal lure. In this guide, we’ll explore why wood projects to do are accessible to beginners and rewarding for experienced builders alike, how to plan smartly, and where to look for trusted resources that keep you moving forward. By the end, you’ll feel equipped to pick your first project, assemble the right tools, and hit the workshop with confidence.
Why wood projects to do are perfect for every skill level
Woodworking is a hands-on craft that scales with your ambition. The same basic skills—measuring, marking, cutting, and finishing—apply whether you’re making a simple shelf or a complex custom bedframe. The phrase wood projects to do is a reminder that every project, no matter how small, adds to your toolkit and your confidence. The payoff is immediate: a completed piece that is useful, personal, and uniquely yours.
Beyond the satisfaction of completion, wood projects to do offer practical benefits: you can tailor furniture to fit your space, you learn to plan within a budget, and you develop problem-solving skills that transfer to other DIY tasks. Even if you choose modest projects at first, you’ll build a robust foundation for bigger ventures—like a full set of outdoor furniture, a custom storage unit, or a bespoke coffee table that matches your decor. A structured approach to these projects also makes it easier to manage time and costs, which is essential for consistency and long-term motivation.
Choosing the right wood projects to do for your space and budget
Assess your workspace and tools
Start by taking stock of what you have and what you’ll need. A well-organized workspace reduces frustration and speeds up your progress. Consider the size of your workshop or balcony, the type of materials you can handle, and the level of finish you desire. If you’re working in a compact space, focus on small, portable projects such as wall shelves, a mail sorter, or a sturdy stool. For larger spaces, you can plan more ambitious builds like a coffee table, a garden bench, or a small bookcase. A reliable set of basic hand tools—measuring tape, combination square, miter box, handsaw, plane, and a cordless drill—will cover most beginner to intermediate projects, and you can expand as you grow more confident.
Project ideas by skill level
When you’re new to wood projects to do, start with simple, highly functional items that teach fundamental techniques without overwhelming you. Intermediate projects can introduce joinery, refine finishing, and require better material planning. Advanced projects push your precision, your ability to read plans, and your patience for longer build times. Here are ideas to fit each level:
- Beginner: a wall-mounted wine rack, a small bookshelf, a plant stand, or a basic bench.
- Intermediate: a coffee table with dowel or pocket-hole joinery, a garden planter with a built-in drainage system, or a mango-wood bookcase with decorative panels.
- Advanced: a dining table with through-doten joinery, a Shaker-style bed frame, or a multi-drawer storage cabinet with a smooth finish.
As you grow, you’ll learn to select projects that balance aesthetic goals with the realities of your workspace and budget. A practical approach to wood projects to do is to pace yourself so you finish each project with a sense of accomplishment rather than fatigue.
Estimating materials and costs
Before you buy lumber, it helps to sketch a simple cut list and rough bill of materials. This prevents the common trap of buying too much or too little, which can delay your project and inflate costs. For most beginner projects, you’ll need a few standard board sizes (such as 1×6, 1×8, 2×4) and a handful of hardware items (screws, brackets, wood glue, and sandpaper). As you advance, you’ll learn to read lumber grades and choose species that match your finished look and weather tolerance if the project sits outdoors. Keeping a running cost estimate also motivates you to choose projects that align with your budget while still delivering a satisfying result.
A starter kit: tools and safety for wood projects to do
Essential tools you need
Starting with a curated set of tools is more important than chasing every new gadget. A solid starter kit includes a measuring and marking setup (tape measure, combination square, marking gauge), a stable saw (a backsaw or a beginner hand saw), a cordless drill with driver bits, a random-orbit sander, clamps, a chisel set, and a hammer. A small router or palm sander can be added later as you tackle more complex shapes. As you build confidence, you’ll naturally discover additional tools that fit your style and the kinds of wood projects to do you enjoy most.
Safety practices and setup
Woodworking is rewarding, but safety matters. Always wear eye protection, hearing protection if you’re using loud power tools, and a dust mask for sanding. Keep your work area clean to prevent slips and miscuts. Secure your workpiece with clamps, use push sticks for tricky cuts, and unplug tools when changing blades. It’s worth investing in a simple dust collection setup or a good shop vacuum to keep air quality high and your workspace clear. Good habits now translate into smoother, faster progress on more complex wood projects to do in the future.
Step-by-step: a sample project you can start this weekend
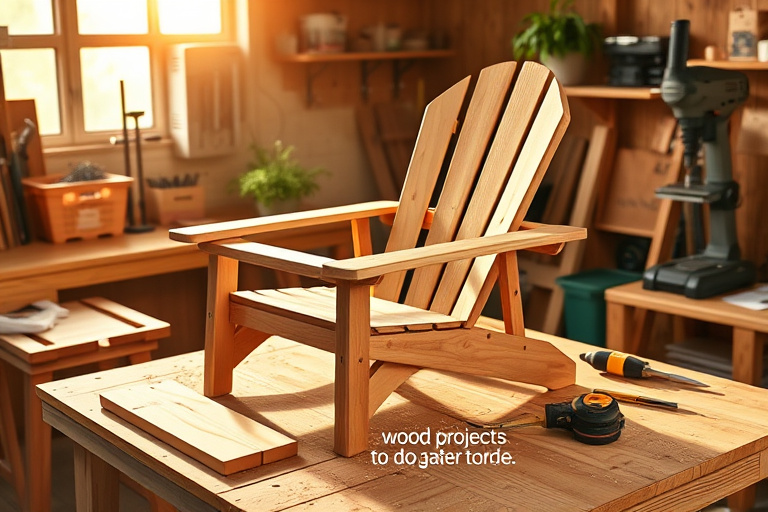
Adirondack chair plan and how to adapt it for your space
A classic Adirondack chair is a perfect weekend project: simple geometry, comfortable seating, and a timeless look. If you’re after this specific plan, you’ll find a detailed, printable Adirondack chair plan that’s designed for builders who want clear instructions and scalable results. This resource fits well within your broader exploration of wood projects to do, and it often sparks ideas for painting, staining, or customizing to match your outdoor space. For a comprehensive, printable guide that includes patterns and assembly steps, check the ultimate Adirondack chair plan in this curated resource: the ultimate Adirondack chair guide.
As you work through the Adirondack chair, you’ll notice how measurements, cut lists, and joinery choices shape the final piece. If you’re new to woodworking, starting with a straightforward project like this gives you a solid sense of progress and a successful entry into more complex tasks. If you’re curious about patterns and variations as you advance, exploring different patterns can expand your repertoire and make future projects even more efficient. A practical resource on wood patterns can be a great companion on this journey: wood furniture patterns.
Building a small, functional stool or garden bench
Another approachable project that reinforces essential carpentry skills is a simple stool or a compact garden bench. Such projects teach you how to optimize material usage, drill and pocket-hole joinery cleanly, and finish a piece so it withstands weather if placed outdoors. A well-executed stool is not only useful but also a visual reminder of your growing capability. The key is to plan precisely, cut to size, and test-fit joints before final assembly. The process is straightforward but rewarding, and it poses an opportunity to practice sanding and finishing techniques that will carry over to future wood projects to do with more complex designs.
How Ted’s Woodworking can help you level up
Why curated plans matter for consistent results
One of the biggest accelerators in wood projects to do is access to reliable patterns and plans. Ted’s Woodworking has built a vast library of patterns, plans, and instructions that help you translate ideas into buildable steps. Rather than guessing measurements or hunting for compatible joinery methods, curated plans give you a proven path from rough cut to finished piece. This keeps frustration down and success rate high, especially when you’re juggling multiple ideas at once and trying to decide which project to tackle next.
Choosing plans that fit your space and budget
Different plans are suited to different spaces and budgets. If you’re working with limited square footage, choose projects that are compact and modular. If your goal is to add outdoor seating, look for weather-resistant woods and finishes that stand up to sunlight and rain. Ted’s Woodworking often offers options that balance size, complexity, and finish, helping you pick plans that align with your current setup. Including a few flexible patterns in your library means you can adapt based on the materials you already have or the space you’re aiming to fill.
Printable Adirondack chair plans and other resources
For builders who prefer a structured, printable format, resources like the Adirondack chair guide mentioned earlier can be a great resource when paired with broader plan libraries. If you’re exploring how such plans can fit into a growing DIY portfolio, you might also consider an offer that consolidates many woodworking plans in one place. This type of affiliate resource can provide ongoing access to new patterns and ideas, helping you keep wood projects to do fresh and exciting. If you’re curious about this kind of option, you can explore an exclusive offer here: exclusive Ted’s Woodworking offer.
Finishing touches and maintenance for durable results
Finishes, coatings, and weather-proofing
The finish you choose can dramatically alter the look and longevity of wood projects to do. For indoor pieces, a clean polyurethane or water-based finish can provide a durable, clear coat that highlights the grain. Outdoor projects demand weather-resistant finishes such as spar urethane or penetrating oils designed for exterior use. Sand to a smooth surface and apply multiple light coats rather than a single heavy coat to avoid runs. Always sand between coats with progressively finer grits to achieve a polished, professional look that stands up to daily use.
Maintenance tips to extend life of your wood projects to do
Maintenance is part of the cycle. Regular cleaning, occasional re-coating, and prompt repairs extend the life of your furniture. For pieces left outdoors, consider a yearly refresh, re-sealing joints, and inspecting for any signs of moisture damage. Recording the date of finishing and the type of finish used can help you track wear over time and plan future refurbishments. With consistent care, your wood projects to do remain both functional and beautiful for years to come.
Turn your hobby into a habit: next steps and community tips
Creating a project calendar and routine
Turning woodworking from a sporadic weekend activity into a regular habit requires a plan. Start by listing 3–5 projects you’d like to complete in the next 2–3 months. Break each project into stages: design, material shopping, rough cutting, joinery, sanding, finishing, and final assembly. Schedule time blocks on your calendar and treat them as non-negotiable appointments. Consistency beats bursts of heavy activity, and over time you’ll accumulate a portfolio of wood projects to do that you’re genuinely proud of.
Sharing progress and learning from others
Learning is amplified when you share progress. Consider writing a brief post about each completed project, including materials used, costs, and a photo gallery. Engaging with a local makerspace, online forums, or a small community of woodworkers can provide inspiration, feedback, and practical tips. The social aspect of woodworking keeps motivation high and helps you stay connected to your craft as you build more complex pieces.
FAQs about getting started with wood projects to do
Do I need expensive tools to start?
Not necessarily. Many beginners find that a few versatile tools and a solid workbench are enough to begin. As your needs grow, you can add specialized tools that suit your preferred styles and projects. The most important investment is in learning: understanding measurements, joints, grain direction, and finishes. As you gain confidence, you’ll naturally justify upgrades that improve accuracy and efficiency while still maintaining a focus on practical, enjoyable wood projects to do.
How long does a typical DIY woodworking project take?
Timeline varies by complexity. A simple wall shelf might take a couple of hours, while an Adirondack chair could require a weekend of careful work if you’re new to joinery and finishing. Planning, preparation, and patience are the real time-savers; rushing often leads to avoidable mistakes. With a clear plan and steady progress, you’ll be surprised at how quickly you move from idea to finished piece in the world of wood projects to do.
Conclusion and next action
Wood projects to do can start small and expand into a fulfilling hobby that brings real satisfaction and practical results. Start with a clear space, assemble essential tools, and choose a beginner-friendly project that offers a quick win. As you gain momentum, explore curated plans and patterns to broaden your repertoire, and consider adding a trusted resource like Ted’s Woodworking to your kit. If you’re ready to explore a robust collection of plans and patterns, you can access a targeted offer here: exclusive Ted’s Woodworking offer. For additional inspiration and practical patterns, don’t miss the Adirondack chair guide and wood patterns resources linked above. Happy building, and may your next wood project to do be your most satisfying yet.