What are outdoor chair plans and why they matter
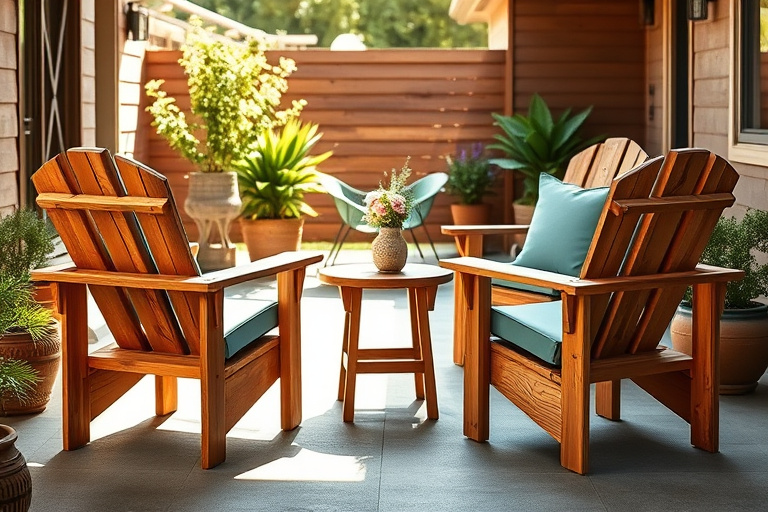
Outdoor chair plans are the blueprints that guide you through building sturdy, comfortable seating designed for patios, decks, gardens, or any outdoor space. When you search for outdoor chair plans, you’re looking for detailed cut lists, dimensions, joinery instructions, and finishing recommendations that ensure your chairs perform well in sun, rain, and seasonal temperature shifts. Building your own chairs is not just about saving money; it’s also about customizing size, style, and comfort to fit your space perfectly. With the right plans, you can create a set that withstands weather, looks cohesive with existing furniture, and offers the ergonomic support you need for hours of outdoor relaxation.
Quality outdoor chair plans take the guesswork out of project design. They typically include a materials list tailored for outdoor use (think rot-resistant woods such as cedar, redwood, or treated pine, plus hardware that won’t rust). They also address important details like seat height, back angle, and armrest width so that your chairs are both comfortable and practical for real people—whether you’re lounging with a book, sharing conversations with friends, or supervising little ones at play.
Key considerations when choosing outdoor chair plans
Materials, durability, and weather resistance
Outdoor seating lives outdoors, so selecting materials that resist moisture, UV exposure, and temperature swings is essential. Cedar and teak are popular for outdoor furniture due to their natural oils and rot resistance, but properly treated pine or composite materials can also work well if you seal and maintain them. Your chosen plans should specify a wood type or offer alternatives—along with finish recommendations such as penetrating oil, exterior-grade varnishes, or deck sealants—to maximize longevity. If you’re working with budget constraints, look for plans that include a stout frame with cross-bracing to reduce wobble in windy conditions.
Comfort, ergonomics, and sizing
Comfort is more than a soft cushion. A well-designed outdoor chair plan considers seat height (usually around 16 to 18 inches for adults), backrest angle (often 100 to 110 degrees for a relaxed recline), and armrest placement. If you’re tall, short, or hosting a family with varied body types, you’ll appreciate plans that offer adjustable or alternative dimensions. Cushions add comfort but also require seat depth and width that accommodate standard outdoor cushions. The best plans clearly label the precise dimensions and offer tips for customizing height or depth without compromising structural integrity.
Storage, maintenance, and portability
Many outdoor chairs live on a porch or deck seasonally and must be stowed away when weather shifts. Plans that include knock-down joinery, removable slats, or simple disassembly features can make storage easier. Consider whether you want a stackable or modular design, especially if you’re building several chairs for a dining set or a lounge arrangement. Maintenance-wise, plans that pair with a maintenance schedule—such as annual sanding, sealing, and reapplication of protective finishes—will help you keep chairs looking great for years.
Where to find reliable outdoor chair plans
Free vs paid plans
You’ll find a wide range of options online. Free plans can be a terrific way to practice basic joinery and design, but paid plans often come with more detail, better cut lists, and additional variations that you can customize. If you’re new to woodworking, a paid plan might offer clearer instructions and a more polished end result, saving you time and reducing the risk of mistakes. When choosing plans, look for clear drawings, a complete cut list, and step-by-step assembly instructions that match your skill level and shop setup.
Evaluating plan quality (cut lists, dimensions, joinery)
The most helpful outdoor chair plans include a complete cut list with board feet estimates, precise dimensions for every part, and the recommended joinery method (such as pocket screws, dowels, or mortise-and-tenon). Plans that show exploded-view diagrams or photographs of each stage help you visualize the assembly and avoid miscuts. If you value customization, good plans also indicate which parts can be altered (for example, backrest height or armrest width) without compromising strength.
Integrating Ted’s Woodworking into your project
What Ted’s Woodworking offers for outdoor furniture
Ted’s Woodworking is a well-known library of woodworking plans that spans a broad range of projects, including outdoor furniture. For someone building a set of outdoor chairs, a plan from Ted’s collection can provide organized drawings, material lists, and guidance on joinery and finishes. The benefit of a resource like Ted’s Woodworking is not just access to individual plans, but a curated approach to woodworking—from selecting the right wood to finishing with weather-resistant coatings. If you’re aiming for professional-looking results, this library can be a practical companion to your outdoor chair plans journey.
Practical tips for selecting a plan within the Ted’s Woodworking library
When browsing within Ted’s Woodworking, look for plans that align with your preferred wood species and your climate. Check for: clear cut lists, labeled parts, recommended hardware, and a finishing guide suitable for exterior exposure. Some projects also include alternative dimension sets to accommodate different chair sizes. If you’re unsure which plan to start with, reading through a few sample pages or viewing layout diagrams can help you gauge the level of detail and clarity before purchasing. For more context and related resources, you can explore free and practical guides to woodworking that discuss Ted’s Woodworking materials and how to apply them effectively: free furniture plans and woodworking with Ted’s Woodworking.
To broaden your scope beyond a single chair, Ted’s Woodworking also offers a range of shop projects and practical guides that show how different furniture pieces relate to each other in a coordinated outdoor space: Shop Projects Master DIY woodworking with Ted’s Woodworking and practical guides.
Step-by-step approach: from plan to finished chair
Prep work and workspace setup
Begin by selecting an outdoor chair plans that matches your space and procurement capabilities. Set up a clean, well-lit workspace with ample room for cutting and assembly. Have your safety gear on hand—eye protection, hearing protection, and proper clamps are essential. Organize your hardware in labeled containers and lay out your boards according to the plan’s cut list so you’re not scrambling mid-project.
Measuring, cutting, and assembling
Accurate measuring is the backbone of a solid chair. Use a sharp saw, a square, and a marking gauge to ensure parts are cut to the exact dimensions called for. When assembling, start with a sturdy frame and work outward. Many outdoor chair plans use a combination of screws and glue along with corner braces to create a rigid structure that resists wobble. Dry-fit components before final fastening to verify alignment and balance. If you’re new to joinery, consider a plan that favors screw-fastened joinery with pre-drilled pockets—the mistake resistance is higher for beginners.
Finishing options for weather resistance
Finish is where your chair truly becomes weather-ready. Options include penetrating oil or varnish for natural wood, weather-resistant exterior paints, and composite finishes that resist UV damage. A well-chosen finish stops moisture from entering the wood and helps prevent cracking as temperatures shift. If you’re using natural wood, a yearly maintenance ritual of sanding light, re-sealing, and cleaning will extend life. If cushions are part of your plan, ensure fabrics and foam are outdoor-rated to avoid mildew and fading.
Finishing touches and long-term care
Stains, paints, sealers, and cushions
Stains highlight the grain while providing a base layer of UV protection. Paints offer color versatility and barrier protection, but some woods benefit from a natural finish with protective oil. Sealers should be compatible with your chosen topcoat and ideally offer water repellency without forming a slick surface. Cushions should be chosen to withstand sun and moisture; look for fast-drying cushions with water-resistant covers and UV-resistant fabrics. When selecting cushion dimensions, pair them with the chair’s seat depth and width to avoid crowding or sliding.
Maintenance routines to extend life
Outdoor furniture benefits from a simple annual routine: inspect joints for looseness, re-tighten screws, reapply protective finish as needed, and clean surfaces with a mild soap solution. A quick wipe-down after rain helps reduce mold and mildew buildup. Keeping chairs off the ground or on a small platform can extend their life by reducing direct contact with wet soil or damp decks.
Scaling up: building a coordinated set of outdoor chairs
Matching styles for patios, decks, and gardens
One of the joys of DIY outdoor chair plans is creating a coherent look across your space. If you’re building several chairs, choose a plan that can be reproduced in multiple sizes or can be adapted to build a full dining set, lounge chairs, and matching side tables. Consistency in wood species, finish, and hardware will give your outdoor area a polished, professional feel that invites guests to linger and enjoy.
Cost, time, and budget considerations
Estimating materials and tools
Before you begin, tally the components: wood, fasteners, finishes, and cushions (if included). Add a small contingency for mistakes or resin pockets in wood. Tools needed typically include a saw, drill/driver, measuring tools, clamps, and sanding equipment. If you’re starting small with just one chair, your initial investment is significantly lower than committing to a full dining set, but you’ll still benefit from precise plans to minimize waste.
Conclusion and quick-start resources
Outdoor chair plans empower you to customize and optimize your seating for weather, comfort, and space. A well-chosen plan helps you select the right materials, execute accurate cuts, and apply finishes that endure. Whether you’re new to woodworking or expanding your repertoire, starting with solid plans is the fastest path from inspiration to a durable, comfortable chair you’ll enjoy for years to come. If you’d like to explore more resources and practical guides related to woodworking with Ted’s Woodworking, you can check out free and practical guides here: free furniture plans and woodworking with Ted’s Woodworking. For a broader collection of plans and master guides, visit Shop Projects Master DIY woodworking with Ted’s Woodworking and practical guides. And if you’re looking for a comprehensive resource that pairs with these plans, consider this exclusive offer from a well-known plan library: Ted’s Woodworking – Complete Plan Library.
With the right outdoor chair plans, you’ll craft seating that’s not only functional but also a lasting feature of your outdoor living space. Take your time to compare plans, consider comfort and durability, and don’t be afraid to customize within the plan’s safe parameters. The result: a set of chairs that invites you to linger longer, season after season.