Introduction to elevated bed diy
Elevated bed diy projects have surged in popularity for good reason. They fuse practicality with style, transforming a simple bed into a multi-functional centerpiece. Whether you’re in a compact apartment, a compact studio, or a family home with limited closet space, an elevated bed diy solution can free up floor area for storage, create easier cleaning access, and elevate the overall vibe of your room. The concept is straightforward: build a sturdy frame that lifts the mattress off the ground, leaving room beneath for drawers, shelves, or simply air circulation that keeps the space feeling open and airy.
In this guide, you’ll see how to approach an elevated bed diy with a practical mindset, practical dimensions, and a finish that stands up to daily use. You’ll also discover how to blend form and function, selecting materials and finishes that suit your budget while ensuring a robust, long-lasting build. If you’re aiming to expand your woodworking knowledge or leverage your craft commercially, there are well-trodden paths that can help you grow—whether through learning plans, selling ideas, or building more complex furniture. For broader ideas, you might explore resources like this practical guide to turning handmade items into profit and this practical DIY woodworking guide on furniture plans.
As you plan an elevated bed diy, you’ll often find that a trusted woodworking resource makes a big difference. Some builders reserve a special place for a comprehensive plan library, such as Ted’s Woodworking to help jumpstart projects with proven designs and measurements. While you don’t need to purchase immediately, the idea of having a curated set of plans can help you move from concept to completion with confidence.
Why an elevated bed diy makes sense
Space, comfort, and storage advantages
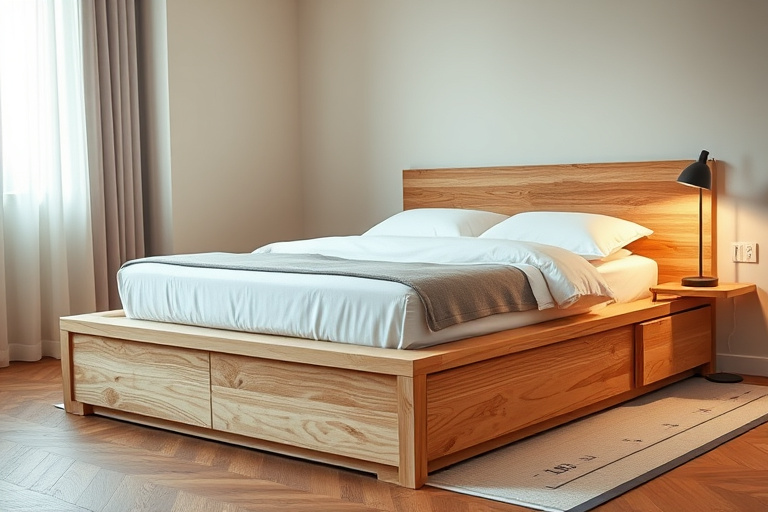
An elevated bed diy arrangement maximizes floor space. It creates a defined sleeping area while freeing up room beneath for drawers, bins, or a small air-dry storage zone. If you live in a small apartment or a room with limited closet space, this approach can be a game changer. The elevated design also improves air circulation around the mattress and, depending on the finish you choose, can help regulate humidity and temperature in the sleeping area.
Design versatility and room aesthetics
From rustic farmhouse to sleek modern, the elevated bed diy concept adapts to any interior. You can integrate built-in storage drawers, a ladder, or even a small seating area on the footboard. The key is to frame the project around your room’s dimensions and your daily routines. A well-planned elevated bed diy can become a focal point that reinforces your color palette and woodworking skill, rather than a simple necessity.
Planning your elevated bed diy
Size, height, and purpose considerations
Start with practical questions: Where will this bed live? What’s the ceiling height? Do you need storage beneath, or would you prefer a clean, minimalist platform? Common heights range from 12 to 24 inches off the floor, with thicker mattresses sometimes requiring more clearance. If you’re tall, aim for at least 18 inches of vertical clearance beneath the mattress to avoid brushing knees against a low frame when getting in and out of bed. If storage is a priority, you can design drawers that run the full length of the bed and maximize the use of vertical space under the platform.
Materials, fasteners, and finish choices
For a durable elevated bed diy, choose pine for a budget-friendly option, or go with hardwoods like oak or maple for enhanced strength and a premium look. For a rustic vibe, reclaimed wood offers character and sustainability. Plywood can form the platform base, while solid lumber frames the structure. Stainless steel or coated screws provide rust resistance, especially in moisture-prone rooms. Finishes—clear polyurethane, tinted stains, or paint—should protect the wood while highlighting its grain. If you’re new to woodworking, consider a finish that’s easy to apply and forgiving of beginner sanding errors. The goal is a well-sealed, smooth surface that’s comfortable to the touch and easy to clean.
Safety, weight, and durability tips
Follow basic safety practices: all joints should be secure, the mattress platform must distribute weight evenly, and you should account for dynamic loads like a person bouncing or moving around. Use corner braces or metal L-brackets at critical joints and ensure your legs are sturdy and evenly spaced. If you plan to add storage drawers beneath, design the frame so weight isn’t concentrated on any single support. A well-executed elevated bed diy will last for years, becoming a reliable centerpiece in your room.
Tools and learning resources
Essential tools you’ll need
Depending on your current toolkit, you’ll want a track saw or circular saw for accurate cuts, a power drill with driver bits, a countersink, a square and measuring tape, clamps to hold pieces during assembly, and a sander (orbital or detail) to achieve a smooth finish. A good glue such as wood glue, along with quality screws and fasteners, will help you achieve strong joints. If you’re just starting, you can begin with simpler cuts and basic joinery, then gradually add biscuited or doweled connections as you gain confidence.
Learning resources: practical guides and plans
Building confidence through solid plans is a smart path for an elevated bed diy. Consider reviewing architectural or woodworking guidelines, and don’t be afraid to refer to established guides for inspiration. If you’re curious about monetizing woodworking or expanding your plan library, explore this practical guide to turning handmade items into profit. It can help translate skill into a sustainable hobby or small business. To deepen your knowledge of building furniture plans and applying practical DIY woodworking concepts, check out this practical guide on furniture plans.
Incorporating learning with Ted’s Woodworking
If you’re looking for a curated set of plans and inspiration, Ted’s Woodworking offers a wide range of project plans, including platform beds and storage solutions. While you don’t need to purchase immediately, exploring a reputable library can help you understand joinery, cut lists, and project sequencing. Some builders find it valuable to study a few select plans to accelerate their own elevated bed diy projects and to cross-pollinate ideas for other furniture pieces. Remember to evaluate plans for your specific dimensions and material availability; you can always adapt off-the-shelf ideas into a customized elevated bed diy that fits your space and style.
Step-by-step build guide (overview)
Step 1 – design the frame and cut list
Begin by finalizing the overall dimensions: length, width, and height. Create a simple cut list with the exact board lengths and thicknesses you’ll need. A common approach is to use a rectangular frame with evenly spaced cross supports and legs. Drafting a small sketch or using simple CAD-like software can help you visualize the frame and ensure your mattress will fit comfortably within the dimensions. Double-check for any obstacles in the room, such as baseboards or doorways, that might affect assembly or transit of materials.
Step 2 – assemble the frame and legs
Assemble the main frame on a flat, clean surface. Start with the outer rectangle, then add the cross supports. Attach legs squarely to each corner, ensuring they’re plumb and evenly positioned. If you’re adding integrated storage, consider pocketed or pull-out drawers that run beneath the frame and don’t interfere with leg alignment. Use glue and screws, driven at shallow angles, to ensure strong joints without splitting the wood.
Step 3 – add cross supports and mattress platform
Fit the cross supports to provide even weight distribution across the platform. The mattress needs a solid, flat surface, so you may opt for plywood or a solid panel cut to size as the primary platform. If you plan to use a box spring or a thicker mattress, adjust the height accordingly. Sand edges to remove sharp corners and create a smooth transition between the bed and the room’s floor.
Step 4 – optional built-in storage and finishing
Under-bed storage can dramatically improve function without compromising aesthetics. You can build shallow drawers or open cubbies that slide on guides. If you choose drawers, consider using plywood for the box and solid wood for the fronts to balance weight and cost. Finish with stain or paint, sealing all surfaces to protect against humidity and wear. A simple, clean finish often looks best with elevated bed diy projects, letting the wood grain or color statement shine through.
Finishing touches and maintenance
Sanding, sealing, and color options
Sand all surfaces progressively with finer grits to achieve a silky feel. Apply a water-based sealant or polyurethane to protect the wood. For a natural look, choose a clear finish that enhances the grain. If you want a bolder aesthetic, a solid or tinted stain can complement the room’s color palette. Prioritize smooth edges to prevent snags or splinters in daily use, especially around the mattress edge and any storage components beneath.
Maintenance and safety considerations
Periodically check all screws and joints for looseness, especially after moves or rearrangements. Clean the platform and drawers to avoid dust buildup that can degrade slides or reduce drawer life. If you’ve built a storage system, ensure that any heavy items are evenly distributed and that drawers glide smoothly. A well-maintained elevated bed diy remains a centerpiece for years, combining safety with continuous aesthetic appeal.
Getting inspired and expanding your project
Integrating storage and seating options
One common upgrade is adding integrated seating on the footboard or along the side, using the same wood type as the bed frame. A bench with hidden compartments or a bookcase headboard can dramatically increase function. When you design with storage in mind, consider using soft-close hardware for drawers to reduce noise and wear. This approach keeps your elevated bed diy both practical and inviting.
How to scale an elevated bed diy for different spaces
Scalability is a core strength of the elevated bed diy concept. For a compact dorm room or studio, you can build a compact frame with narrow drawers. In a larger bedroom, a longer frame with deeper storage and a stylish headboard can create a bold focal point. The design principles—stability, accessibility, and clean finish—remain constant, while the dimensions adapt to your space and lifestyle.
Additional resources and affiliate offers
Practical guides for turning woodworking into profit
As you deepen your skill, you may want to explore ways to monetize woodworking projects. A practical starting point is exploring guides that discuss selling handmade items and turning woodworking know-how into profit. This can help you justify the time invested in an elevated bed diy and other ongoing projects. For an in-depth resource, see this practical guide to turning handmade items into profit.
Furniture plans and DIY woodworking guidance
To broaden your understanding of how plan libraries work and how to adapt designs to real-world spaces, check out this practical guide on furniture plans. It’s a helpful companion when you’re translating a concept like elevated bed diy into a structured project with precise cut lists and assembly steps. If you find yourself seeking a broader set of ideas and templates, exploring these resources can be a smart move while you refine your own approach.
Conclusion: turning a simple concept into a lasting feature
An elevated bed diy project is more than a clever space-saver. It’s an opportunity to practice planning, joinery, finishing, and bespoke storage design in a single, cohesive project. By defining purpose, selecting durable materials, and following a sensible build sequence, you can create a bed that is comfortable, stylish, and built to last. If you’re curious about more comprehensive plans or want to explore curated building projects, remember that you can reference trusted resources like Ted’s Woodworking as a source of inspiration and practical details. The journey from concept to completion for an elevated bed diy is rewarding, and with good planning, you’ll enjoy a furniture piece that boosts both function and style for years to come.