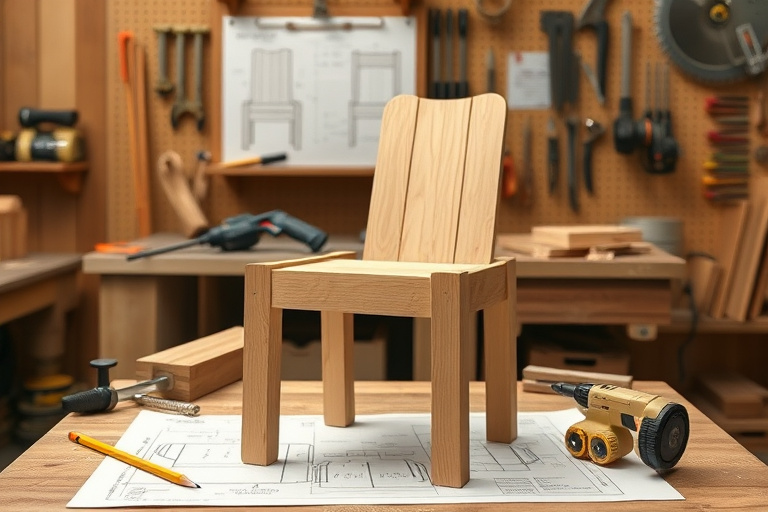
2 x 4 chair plans are a fantastic entry point into practical woodworking. These plans use common, affordable stock to create sturdy seating that’s suitable for a dining nook, porch, or workshop corner. If you’ve been browsing for a reliable, beginner-friendly project, you’re in the right place. The goal here is to help you understand the essentials of planning, cutting, and assembling a chair that can support daily use, while keeping the process approachable and fun. And yes, you can learn a lot from a solid set of 2 x 4 chair plans—whether you’re building one chair or a small fleet for a busy workshop or classroom.
When people search for 2 x 4 chair plans, they often want to know what makes these designs so approachable. The simple stock, straightforward joinery, and forgiving tolerances make it easier to achieve a strong result with minimal specialty tools. That doesn’t mean the project is boring—it means you can focus on getting the basics right: square cuts, proper fasteners, and a comfortable fit for the sitter. As you read through this guide, you’ll see how a few fundamental principles translate into a practical, attractive chair that lasts for years.
Why 2 x 4 chair plans work for beginners
There are several reasons why 2 x 4 chair plans are especially friendly to new woodworkers:
- Availability and cost: 2 x 4 boards are inexpensive and widely stocked at any lumberyard, making it easy to buy in small quantities for practice runs.
- Forgiving material: Wood isn’t perfect, and the design tolerances in a simple chair allow for minor discrepancies without compromising strength or comfort.
- Modularity: The same basic frame can be adapted to different styles—no arms, with arms, or with back slats—by swapping a few components.
- Clear cut lists and standard joints: Most 2 x 4 chair plans rely on basic joints like butt joints, pocket holes, or simple mortise-and-tenon variants, which are well within reach for beginners.
These factors make 2 x 4 chair plans a practical stepping stone toward more ambitious projects. If you’re curious about broader woodworking concepts, you can explore a comprehensive overview here: comprehensive woodworking guide.
Key design principles
To build a chair that’s both comfortable and durable, consider these design principles:
- Proportions: The seat height generally falls around 17 inches from the floor, with a seat width around 16 to 18 inches. Backrest height can range from 12 to 18 inches above the seat, depending on the style.
- Stability: A solid base requires square joints and a broad stance. Ensure the legs are perpendicular and the seat rails sit flush to the legs for maximum stability.
- Strength path: The load path should flow from the seat through the legs to the floor. Reinforce corners with screws or pocket-hole joinery and consider a lower crossbar for added rigidity.
- Comfort: Slightly rounded edges, smooth surfaces, and a well-supported seat will dramatically improve comfort. Don’t skip the sanding and a quality finish to reduce snagging and wear.
When you’re ready to dive deeper into plans and variations, you may also find outdoor-friendly versions appealing. For a practical guide that covers both indoor and outdoor builds, refer to this resource: outdoor builds guide.
Tools, materials, and safety
Before you cut a single piece of lumber, assemble a short list of tools and materials. You’ll find that the right tools save time and help you achieve cleaner, safer joints.
- Tools: measuring tape, square, combination square, hand saw or miter saw, cordless drill/driver, wood glue, clamps, a sander (or sanding block with 120–220 grit), and a few screwdrivers. If you’re investing in tools, a basic drill/driver and a compact saw will cover most 2 x 4 chair plans.
- Materials: standard 2 x 4 boards (kiln-dried if possible for stability), plywood or solid thin slats for the seat (optional but recommended for comfort), wood screws or pocket-hole screws, wood glue, sandpaper, and a finish of your choice (stain, sealant, or paint).
- Safety: wear eye protection and hearing protection when cutting; clamp workpieces securely; keep fingers away from cutting edges; work on a clean, stable surface; and follow the manufacturer’s safety instructions for power tools.
With the basics in mind, you can start by selecting a specific 2 x 4 chair plan. If you want a curated library of plans that covers many chair styles, consider exploring a specialized woodworking resource. It’s a great way to expand your repertoire after you’ve completed your first project. And if you’re looking for a broader catalog, Ted’s Woodworking offers an extensive collection of plans that can help you scale up your projects over time. You can learn more here: Ted’s Woodworking.
Step-by-step building guide
Here’s a practical, beginner-friendly approach to bringing your 2 x 4 chair plans to life. This guide emphasizes a straightforward process and uses common joinery that’s accessible to most hobbyists.
Cutting list and planning
Start with a simple plan that defines the main components: four legs, two side rails, a back support strip (if you’re adding a back), a front cross rail, a seat frame, and the seat surface. A typical, uncomplicated setup might include the following components:
- Legs: four pieces cut from 2 x 4 stock (approximately 1.5 inches by 3.5 inches nominal dimension after planing).
- Seat frame: two long side rails and two shorter front/back rails to form a rectangle that sits beneath the seat surface.
- Back supports (optional): one or two vertical back slats or a solid back panel if you prefer a backrest.
- Seat surface: a plywood sheet or a set of evenly spaced slats to form the chair seat.
Measure twice, cut once. Mark all pieces with a light pencil line before you cut, and dry-fit the assembly to confirm alignment before applying glue and screws.
Assembly steps
Follow a logical sequence to minimize misalignment and maximize strength:
- Build the seat frame first: join the side rails to the front and back rails using pocket holes or traditional screws with glue. Clamp tightly and let the glue cure per the manufacturer’s instructions.
- Attach the legs to the seat frame: ensure that all four legs are square to the seat frame. A simple method is to use corner blocks or metal angle brackets to keep the legs perpendicular while you fasten them.
- If you’re adding a back, install back supports or slats after the seat frame and legs are secure. The backrest should tilt slightly for ergonomic comfort or be upright based on your design preference.
- Fit the seat surface: secure the seat surface with screws or nails, taking care not to split the wood. If you’re using a plywood seat, predrill holes to prevent tear-out.
- Final checks: test the chair for wobble and adjust as needed. A light sanding round over the seat edges and back edges improves comfort and finish longevity.
As you gain confidence, you can explore more advanced joinery or a slightly more complex shape. If you’d like a curated library of plans that includes both beginner-friendly and more intricate options, consider a trusted resource like Ted’s Woodworking, which aggregates an extensive catalog of plans. Check it out here: Ted’s Woodworking.
Finishing touches
Finishing is not cosmetic luxury; it protects the wood and extends the life of your chair. Sand through the grits (120, 180, 220) for a smooth surface. Wipe away dust between grits and apply a finish that suits your environment. For indoor chairs, a clear polyurethane or a stained finish can highlight the wood grain. For outdoor use, consider exterior-grade finishes or paint for added protection against moisture and UV exposure. A well-sealed chair also resists moisture, reducing the risk of warping over time.
Design variations and customization
While your starting point might be a basic 2 x 4 chair plan, there are many ways to customize and tailor the design to your space and taste. Here are a few ideas:
- Armrests: Add simple armrests by extending shorter rails from the seat frame and attaching vertical supports to the front legs. A rounded profile on the armrests feels more comfortable and visually appealing.
- Back options: If you prefer a modern look, use a back panel with a single vertical slat or a curved backrest for ergonomic support. For a rustic vibe, try evenly spaced wood slats with a slight arch.
- Seat styles: A solid plywood seat offers a clean look and minimal maintenance, while slatted seats provide classic charm and better airflow.
- Finish styles: A natural oil finish enhances the wood’s character, while a bold paint color can make the chair a focal point in a room or outdoors on a porch.
As you experiment, remember that the basic mechanics—squared legs, level seat, and stable joints—are the core of every good chair. The 2 x 4 chair plans you start with can evolve into a small furniture line as your skills grow, especially if you combine them with broader project resources. For broader woodworking inspiration, this is a good starting point: outdoor builds guide.
Resources and plans
If you’re actively collecting plans or want a broader library, consider several reputable resources that cater to different skill levels. For general woodworking fundamentals, you can consult the comprehensive guide linked earlier. If your interests extend to outdoor and garden projects, the practical guide to mastering DIY woodworking and outdoor builds offers extended ideas and strategies you can apply to 2 x 4 chair plans and beyond.
Ted’s Woodworking
For builders who want a broader catalog of chair plans and related projects, Ted’s Woodworking is a well-known resource that aggregates a large collection of PDFs and digital plans. This can be a valuable companion as you progress from a single chair to a full set of matching seating for a dining area or workshop. To explore the possibilities, you can use the affiliate link here: Ted’s Woodworking.
Related reading
Beyond Ted’s Woodworking, consider exploring practical articles that discuss foundational woodworking techniques, material selection, and project planning. For a broader context on mastering DIY woodworking and outdoor builds, the outdoor builds guide is a useful companion to the 2 x 4 chair plans you’re implementing now: outdoor builds guide.
Maintenance and care
To keep your chair looking good and performing well, follow a simple maintenance routine. Regularly inspect fasteners and joints for looseness, re-tighten as needed, and reapply protective finishes every few years or when you notice wear. If you use the chair outdoors, re-seal or repaint surfaces exposed to the elements. A light coat of wax or mineral oil on the seat can also help guard against moisture, while keeping the wood’s natural character intact.
Next steps
Now that you understand the core ideas behind 2 x 4 chair plans, it’s time to turn ideas into a tangible project. Gather your materials, pick a plan that matches your space, and begin with a dry run. Remember to measure carefully, join components securely, and spend time on finishing to maximize durability and comfort. As you gain confidence, you can expand into additional seating designs or workshop furniture, turning your small projects into a cohesive set of home-made pieces. If you’re ready to broaden your plan library, consider exploring Ted’s Woodworking for a wider range of chair designs and related projects.
For additional context on the broader scope of DIY woodworking, you may want to explore the following resources: comprehensive woodworking guide and outdoor builds guide.