Building a chair from scratch starts with a single, powerful idea: a detailed wood chair blueprint. Whether you’re a weekend warrior or an aspiring craftsman, a well-thought-out blueprint guides every cut, joint, and finish. In this guide, you’ll learn how to transform a concept into a functional, beautiful chair—and you’ll discover how treasures like Ted’s Woodworking can complement your project with trusted designs and practical layouts. If you’re exploring the best way to approach a chair project, keep reading to uncover a practical method that balances creativity, accuracy, and efficiency.
Why a Wood Chair Blueprint Matters
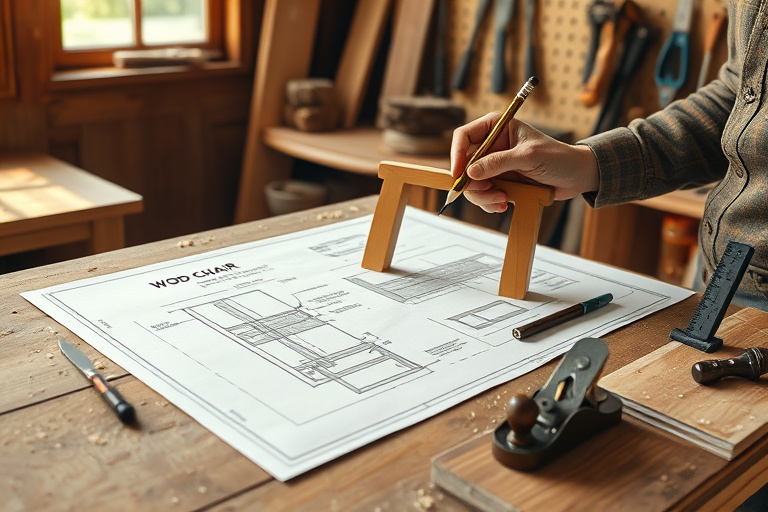
A wood chair blueprint is more than a rough sketch. It’s a scaled plan that translates your design into measurable steps. The blueprint details dimensions for the seat height, seat depth, backrest angle, leg length, and the precise locations for joints and fasteners. Having this blueprint reduces trial-and-error work, minimizes material waste, and helps you visualize how the finished chair will function in real life. In short, a solid wood chair blueprint aligns your design intentions with the actual woodworking process, turning an idea into a sturdy, comfortable piece of furniture.
What You Need to Build a Wood Chair
Before you lay out a single cut, gather the essentials. The right tools and materials influence not only the quality of your chair but also the ease with which you can translate a blueprint into a finished product.
Tools
Having the correct toolkit is essential for accuracy and efficiency. A well-stocked workshop enables clean, precise cuts and strong joints. If you’re building a wood chair blueprint from scratch, consider consulting a comprehensive tool guide to ensure you have the essentials. For a thorough overview of what every beginner should own, see the tool-oriented guide linked here: tool list for woodworking shop—the essential guide to tools tips and ted’s woodworking.
Materials
Wood choice profoundly affects both aesthetics and durability. Common options include oak for strength, maple for a light, clean look, and cherry for a warm, rich finish. Your wood selection should be informed by the chair’s intended use (indoor vs. outdoor), weight-bearing requirements, and the joinery you plan to use. The blueprint will specify the dimensions for each component, but deciding on grain direction, moisture content, and board selection is a key step before you begin cutting.
As you plan your chair, you might want a structured approach to equipment and materials. If you’re building from a complete plan, you might also enjoy a curated list of essential tools and tips offered in a smart starter pack—another excellent internal resource to consider as you set up your workspace: carpentry equipment list essential tools tips and a smart starter pack.
Step-by-Step: From Sketch to Chair
Turning a paper blueprint into a tangible chair involves careful planning, precise cutting, and solid assembly. Here is a practical framework to guide you through the journey from sketch to finished piece.
Planning and Design
Start with a clear concept. A wood chair blueprint should translate your design into numbers. Decide on overall dimensions: seat height (typically 17–19 inches for average adult comfort), seat width, depth, backrest height, and leg spread. Consider ergonomics: a slight curvature to the backrest and a comfortable seat angle. Create or refine your blueprint with measurements for each component: seat rails, legs, back slats, and any decorative elements. If you want inspiration or pre-made templates, Ted’s Woodworking can be a source of reliable design references and templates that fit various aesthetics and skill levels. If you’re exploring ready-made plans, you can access a curated offer here: exclusive Ted’s Woodworking plans.
Cutting and Joinery
Accuracy is everything. Use a sharp blade and maintain consistent blade height when using a router or saw. The blueprint will tell you where to place joints. Mortise-and-tenon joints are a classic choice for chairs because they are strong and forgiving for a novice with careful work. If your design uses dowels or screws, align holes carefully to avoid misalignment that can ruin the final fit. For wood chair blueprint projects, precise marking and test-fitting before final assembly are essential to ensure every component aligns correctly. If you’re building your workshop and want to ensure you have the right tool setup, refer back to the essential guides for tools that suit this kind of project: tool list for woodworking shop and the carpentry starter list mentioned earlier know-how.
Assembly and Finishing
Dry-fit all parts first to check for gaps and fit. Then assemble using appropriate joinery methods—glue, clamps, and, when needed, mechanical fasteners. Sand progressively with grits from rough to fine, ensuring that edges are smooth and comfortable to the touch. Finishing choices depend on the wood and use case: oil finishes highlight grain; polyurethane provides durability; wax gives a soft, satin feel. A well-executed finish not only enhances aesthetics but also protects the wood from moisture and wear. If you’re ever tempted to skip the finishing step, remember that a good finish is part of the overall blueprint’s promise: a long-lasting, comfortable chair that looks great for years to come, even in high-use environments.
Leveraging Ted’s Woodworking Plans
For builders looking to accelerate progress or to study proven construction methods, Ted’s Woodworking offers a broad collection of plans that cover everything from seating to full furniture sets. While this guide focuses on the fundamentals of a wood chair blueprint, many hobbyists appreciate the value of having a vetted plan as a reference point. The plans can provide reliable joinery details, cut lists, and finish recommendations that complement your own blueprint. If you want direct access to plans and resources for woodworking projects including chairs, you can visit this exclusive link: Ted’s Woodworking plans.
Budget, Time, and Workflow Tips
One of the core benefits of using a wood chair blueprint is the ability to estimate material usage and time more accurately. Start with a cut list derived from the blueprint, then calculate board feet to minimize waste. Create a simple project calendar that allocates time for design, rough cutting, joinery, assembly, and finishing. If you’re new to the craft, consider a staged approach: complete the plan, gather tools, build a small practice piece, and then apply what you’ve learned to the final chair. The two internal resources linked earlier can help you assemble a well-rounded toolkit and a starter pack that keeps costs reasonable while ensuring you have the essentials for a project like this.
Common Pitfalls and How to Avoid Them
Even experienced woodworkers can fall into a few traps when working from a wood chair blueprint. Here are practical tips to stay on track:
- Rushing the layout: take time to transfer each dimension from the blueprint accurately to the stock. Small errors amplify as you cut more parts.
- Ignoring grain direction: plan grain orientation to maximize strength and minimize tear-out during cutting and sanding.
- Underestimating finishing steps: a good finish extends life and improves comfort. Don’t skip sanding and proper sealing.
- Skipping test fits: dry-fitting joints helps ensure a clean assembly without forcing pieces together.
By treating the wood chair blueprint as a compact, repeatable plan, you’ll build muscle memory and confidence that translate to cleaner joints and a more polished final product.
Where to Learn More (Internal Resources)
Expanding your knowledge with structured tool and equipment guides can smooth the learning curve for any woodworking project. For a deeper dive into essential tools and how they support chair-building projects, explore the first linked resource: tool list for woodworking shop—the essential guide to tools tips and ted’s woodworking.
If you want a curated starter checklist that helps you assemble a complete carpentry setup without guesswork, consult the second internal link: carpentry equipment list essential tools tips and a smart starter pack.
Conclusion
A wood chair blueprint is the backbone of a well-executed chair project. It translates design ideas into actionable measurements, guiding every cut, joint, and finish. By combining careful planning with a solid toolkit, you can create a chair that is not only sturdy and comfortable but also a source of pride for years to come. If you’re looking for additional design inspiration or ready-to-build plans that align with your woodworking journey, Ted’s Woodworking offers a broad spectrum of options that many hobbyists find helpful. Access to these plans is available through the affiliate link above, and it can complement your own blueprint with tested templates and professional guidance.
Ready to start your chair-building journey today? Gather your blueprint, select wood with care, and begin turning your concept into a tangible, enduring seat.