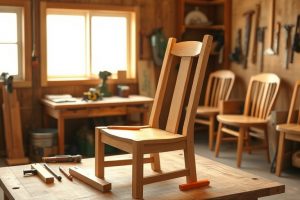
Creating an outdoor retreat starts with the right seating, and nothing captures classic casual comfort like an Adirondack chair. If you’re curious about the best way to realize this timeless piece in your own workshop, you’ll want reliable Adirondack chair design plans that balance aesthetics with durability. In this guide, we’ll explore what makes Adirondack chair design plans effective, how to select the right materials, and how you can leverage proven plans to streamline your build. Whether you’re an absolute beginner or a weekend woodworker, following a cohesive plan helps you avoid common mistakes and finish with a chair you’ll enjoy for years.
What Are Adirondack Chair Design Plans?
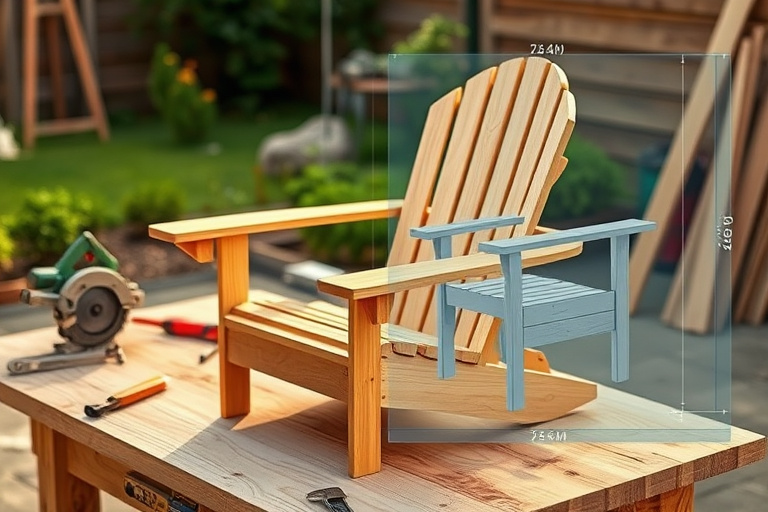
Adirondack chair design plans are blueprints or step-by-step instructions that detail every cut, angle, and assembly step needed to construct an Adirondack chair. The classic design features a broad, slatted back, a wide seat, and gently angled legs for a comfortable recline. When you study design plans, you’ll see precise measurements for each piece of wood, including the curved back slats, the wide armrests, and the seat supports. These plans also specify screws, dowels, and any hardware required to ensure the chair can withstand weather exposure over time.
Key features of the classic style
While there are many variations, most Adirondack chair design plans emphasize these hallmarks:
- Sloped back with horizontal slats for airflow and comfort
- Wide, sturdy armrests for resting a book, a drink, or a laptop in a comfortable posture
- Low, broad seat with a slightly reclined angle to support long hours of lounging
- Simple, durable construction that can be repaired or refinished with minimal effort
Variations you can consider
Design plans can be adapted for different needs and spaces. You might choose a taller back for extra head support, a deeper seat for tall users, or even a folding variant to store more compactly in winter months. If you’re designing for a waterfront deck or a sunroom, you may want a moisture-resistant finish or a lighter wood for easier handling. The core geometry, however, remains recognizable—the back slats, the seat slats, and the strong, generous armrests are the anchors of any Adirondack chair design plans.
Why Start with Plans?
Going straight from rough sketches to finished boards can be risky for a chair that needs to hold up to the elements. Adirondack chair design plans provide a tested framework that helps you predict material usage, avoid miscuts, and finish with a professional look. When you follow a plan, you benefit from optimized cut lists, precise angles, and a clear assembly sequence that minimizes waste and errors.
Benefits of using proven designs
- Better material planning: fewer scraps, fewer trips to the sawmill
- Consistent results: chairs that sit and stack similarly for a cohesive outdoor set
- Faster builds: a clear order of operations keeps you focused and reduces downtime
- Improved longevity: plans often specify joints and hardware that endure weather exposure
How design plans save time and reduce waste
With a well-laid out plan, you’ll have a complete cut list and a layout that minimizes offcuts. It’s common to see people optimize their boards to run multiple components from a single length, which reduces waste and speeds up assembly. If you’re assessing options for Adirondack chair design plans, seek plans that provide exact measurements, a clear bill of materials, and a logical assembly flow. If you’re new to woodworking, you might also benefit from additional beginner-friendly guidance, such as the essential starter guide to tools and techniques.
Materials and Tools You’ll Need
Your choice of wood sets the tone for the chair’s weather resistance and finish. Adirondack chair design plans usually call for sturdy, outdoor-friendly woods that can tolerate sun, rain, and humidity. Cedar, redwood, and certain types of treated pine are popular choices because they resist decay and accept finishes well. For a higher-end look, consider teak, ipe, or other tropical hardwoods, though they require specialized tools and maintenance. Either way, you’ll need a reliable sanding routine to achieve a smooth surface that takes finish evenly.
Choosing the right wood
Wood selection is a balance between durability, weight, and budget. Cedar offers natural rot resistance and a pleasant aroma, which helps when you’re building multiple chairs for a patio set. Redwood shares similar rot resistance with a warmer hue. If you’re aiming for longevity and are okay with a higher upfront cost, tropical hardwoods deliver outstanding weather resistance and a refined finish. Whatever you choose, ensure the stock is straight, free of major knots, and dimensionally consistent to minimize finish work later in the project.
Fasteners, finishes, and protective coatings
Use stainless steel or galvanized fasteners to avoid corrosion over time. Exterior-grade wood glue helps reinforce joints without compromising flexibility. Finishes matter as much as the wood itself. Consider an exterior polyurethane, marine varnish, or a penetrating oil with UV blockers to reduce color fading and surface cracking. A two-coat or three-coat finish can dramatically extend the chair’s life while preserving the wood’s natural beauty.
Essential tools for a smooth build
A well-equipped workshop speeds up production and reduces mistakes. Key tools include a table saw or miter saw for precise cross-cuts, a band saw or jigsaw for curved components, a drill/driver with a variety of bit sizes, clamps to hold pieces during glue-up, and a random-orbit sander for a flawless finish. If you’re looking for a curated set of plans and project ideas, you can explore Ted’s Woodworking, a popular source for woodworking plans and projects that can complement Adirondack chair design plans with total confidence.
Step-by-Step Guide to Building (From Plans)
While each plan has its own nuances, most Adirondack chair design plans share a common workflow. Here’s a practical sequence to get you from rough lumber to a finished chair. Remember to measure twice and cut once, and always dry-fit joints before applying glue.
Preparing your workshop and stock
Set up a clean, well-lit workspace. Reserve an area for test cuts and layout marks. Lay out the cut list from your chosen Adirondack chair design plans and label boards to avoid mixing parts. A simple square, tape measure, and marking gauge will help you maintain accuracy across all pieces. If you’re unsure about where to start, consult with a comprehensive guide that covers woodworking fundamentals, such as the resources linked in the starter guide above.
Cutting and dimensioning components
Begin with the back slats, seat slats, and armrests. Use a cross-cut sled or a stable miter gauge to ensure uniform angles. Smooth all edges with a fine-grit sander to prevent splinters, especially where arms will rest. If your plan calls for curved back slats, a bandsaw can help shape them precisely. Take care to maintain consistent thickness across boards to ensure a uniform chair surface and comfortable seating geometry.
Assembly sequence and adjustments
Assemble the chair in stages. Start with the back and seat components, joining them with sturdy hardware and wood glue. Secure the armrests to the sides, ensuring the height and angle support a natural resting position for the forearms. Double-check the chair’s alignment and confirm that the seat slope provides a comfortable recline without tipping. If you plan to build multiple chairs, a consistent assembly process ensures uniform results across the batch.
Finishing touches and weatherproofing
Sand the entire chair to a smooth, dust-free surface before applying any finish. Apply a first coat of primer or sealant if you’re using a light-colored wood, followed by two or three coats of exterior finish. Allow ample drying time between coats, and consider applying a water-repellent topcoat for added longevity. A quality finish protects the wood from moisture and UV radiation, keeping your Adirondack chair design plans looking great for years to come.
Designing for Comfort and Longevity
Comfort is central to the Adirondack chair experience. Subtle ergonomic considerations—such as the angle of the back, the depth of the seat, and the height of the armrests—can make a substantial difference in how often you reach for the chair rather than a lounge in your yard. Beyond comfort, longevity depends on wood selection, joinery, and maintenance practices. Consider pairing your chair with weather-protective finishes and a soft cushion that resists outdoor wear, enabling you to enjoy a tranquil afternoon outdoors without constant re-treatment of the wood.
Ergonomic considerations
A well-designed Adirondack chair design plans will specify a back angle in the neighborhood of 100 to 110 degrees and a seat depth around 16 to 18 inches. If you’re taller or shorter than average, look for plans that offer adjustable seats or provide dimensions you can scale. Armrest height is another balancing factor: high enough to support forearms without forcing the shoulders into awkward tension.
Weather exposure and maintenance tips
Outdoor furniture is a long-term investment, so plan for regular maintenance. Clean surfaces annually to remove dirt and mildew, reapply protective finishes every couple of years, and inspect joints for looseness after seasonal changes. A simple approach is to treat the chair with a UV-protective oil every spring and to re-tighten any hardware that has loosened due to wood movement. If you’re curious about complementary outdoor woodworking, consider projects that pair nicely with Adirondack seating—like a matching coffee table or a simple garden bench built from the same wood species and finish.
Where to Find Quality Adirondack Chair Design Plans
Having a reliable source for Adirondack chair design plans makes a big difference in the quality of your final piece. Some builders prefer to purchase a complete set of plans that includes a cut list, diagrams, and a step-by-step assembly guide. If you’re exploring ready-to-build options, you may find a curated collection of woodworking plans that suit your goals. For broader inspiration and a wide range of designs beyond chairs, you might also explore the resources linked in this guide. In particular, the beginner-friendly guide on essential tools and methods can be very helpful for anyone starting a woodworking journey. The essential starter guide is a solid starting point for understanding the basics that underpin Adirondack chair design plans.
Using Ted’s Woodworking for ready-to-build options
For readers who want professionally vetted plans, Ted’s Woodworking offers a broad library of plans and project ideas that can complement your Adirondack chair design plans. While you’ll want to choose plans that align with outdoor use and your preferred wood species, the platform can provide inspiration and a structured approach to building furniture, including seating and garden accents. If you’re not sure where to start, pairing your own in-depth design with a curated collection from Ted’s Woodworking can be a practical path to a polished result.
Additional sources and resources
Beyond plans from Ted’s Woodworking, there are many reputable sources for design inspiration and technique tutorials. If you’re pursuing additional projects that share a workshop rhythm with Adirondack chair design plans, you might explore connected outdoor builds such as simple raised garden beds or elevated outdoor spaces—projects that improve your overall backyard experience. For example, an elevated bed DIY article provides a blueprint for constructing raised beds that integrate well with a porch or deck setup. Learn more about that approach in the elevated bed guide linked here: elevated bed DIY for comfort, storage, and style.
Related Projects and Cross-Fertilization
As you plan Adirondack chair design plans, consider how a cohesive outdoor ensemble can elevate your backyard. A simple raised-bed project nearby, for instance, helps you create a unified outdoor space that’s both aesthetically pleasing and functional. By coordinating with other woodworking tasks—whether building a matching outdoor stool, a coffee table, or a storage bench—you can leverage the same materials and finishes for a consistent look. If you’re exploring further learning or a broader project portfolio, the guidance in the starter guide is an excellent resource to build confidence for these parallel tasks.
Practical Tips for Beginners
New woodworkers should approach Adirondack chair design plans with attention to safety, workspace organization, and budget discipline. Start with smaller practice pieces if you’re unfamiliar with certain joints or finishing techniques. Keep a clean workspace, label cut pieces clearly, and work in stages to avoid overwhelming yourself. Budget wisely by estimating material costs from the cut list and setting aside funds for protective finishes. A patient, methodical approach yields the best long-term results and makes the process enjoyable rather than stressful.
Safety and workspace organization
Wear eye and ear protection, keep a clear floor area around the saw, and use clamps liberally to hold workpieces firmly while cutting or sanding. A dust collection setup can make a big difference in keeping your workshop comfortable and navigable, especially as you work with multiple projects that require finishing steps. A clean, well-ordered workspace reduces mistakes and speeds up the assembly process.
Budgeting and time management
Before you start, create a simple project plan that includes material costs, tool rental or purchase estimates, and an expected timeline. Adirondack chair design plans are particularly forgiving for DIYers, but a little planning goes a long way. If you’re evaluating plan options, check if the plan includes a full cut list and a single-page layout that can be pinned to your workbench for quick reference during the build.
Conclusion and Next Steps
Adirondack chair design plans empower you to craft a timeless piece that complements your outdoor space while giving you an opportunity to practice essential woodworking skills. By selecting solid plans, choosing the right outdoor-ready materials, and following a careful assembly sequence, you’ll create a chair that looks and feels premium without compromising on practicality. If you’d like a broader library of professional plans to complement your DIY journey, the Ted’s Woodworking platform offers an extensive range of options you can explore, including designs for other outdoor furniture and related projects. For beginners seeking foundational guidance, don’t overlook the essential starter guide and its practical project ideas to build your confidence and capabilities in the shop. And if you’re thinking about how woodworking fits into a larger outdoor setup, consider pairing this project with other ideas like an elevated bed DIY and related garden enhancements to create a cohesive, stylish space that’s enjoyable year-round.
Happy building, and may your adirondack chair design plans lead to many relaxing afternoons in your own crafted outdoor haven. If you’re ready to explore ready-made plans or expand your project repertoire with curated designs, check out Ted’s Woodworking through the affiliate link above and see how a professional collection can complement your woodworking journey.