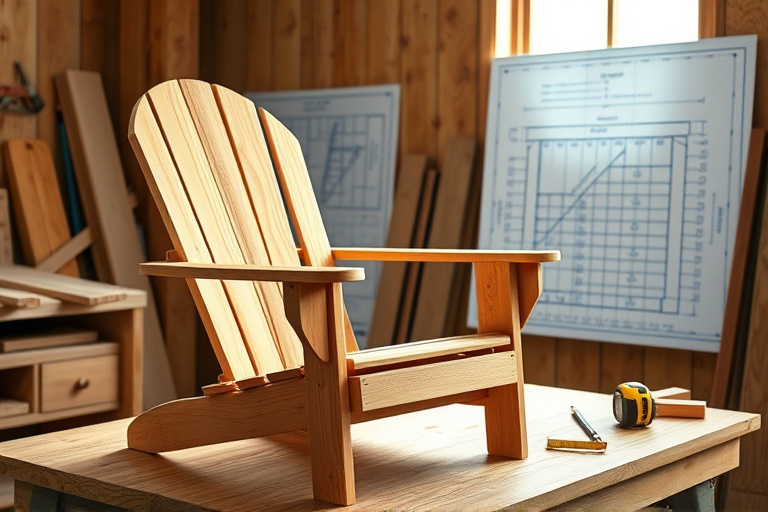
adirondack chair design plans are a timeless entry point for DIY woodworkers who want durable, comfortable outdoor seating that ages beautifully with time. In this guide, we’ll unpack the core design principles behind an Adirondack chair, discuss material choices, and outline a practical, step-by-step approach to turning a plan into a finished piece you’ll be proud to show off on a porch or patio. If you’re interested in expanding your toolkit with a broader library of plans, check out Master your craft with 16000 woodworking plans PDF, a practical resource that dives into Ted’s Woodworking and more, helping you grow from basic projects to complex builds.
Before you start, it’s helpful to have a solid understanding of what makes an Adirondack chair design plans effective. The chair’s distinctive features—wide armrests, slanted back, roomy seat, and sturdy legs—come together through careful proportions and reliable joinery. The goal is a chair that looks classic, feels comfortable, and stands up to weather year after year. If you want a curated collection of patterns, consider exploring other patterns and projects via the free woodworking patterns catalog your ultimate guide to DIY projects with Ted’s Woodworking.
Why this design remains popular
The Adirondack chair design plans have endured for decades because they strike a balance between form and function. The low seating position invites relaxation, the generous backrest provides comfortable lumbar support, and the broad arms give you a natural place to rest a book or a cold drink. As an aspiring woodworker, you can adapt the basic silhouette to your space, choose weather-resistant woods, and tailor the dimensions to your body. This adaptability is exactly why many hobbyists start with a simple plan and gradually customize over time.
Key elements of a quality Adirondack chair design
Seat angle, backrest slope, and armrest height
The hallmark of a successful Adirondack chair design plans is proportional comfort. The seat should have a gentle incline of about 15 to 20 degrees, while the backrest tilts at roughly 15 degrees from vertical to create a relaxed recline. Armrests typically sit at a height that allows your forearms to rest comfortably without lifting the shoulders. When drafting the plan, sketch a scale model or print your dimensioned drawing to confirm how these angles translate in real size. Even small tweaks to the backrest angle or seat depth can dramatically affect comfort and posture over long sessions in the sun.
Proportions and ergonomics for comfort
Beyond angles, proper ergonomics ensure the user can sit back without feeling cramped. Typical seat width ranges from 20 to 24 inches, with a seat depth of 18 to 22 inches. The backrest height often falls between 28 and 34 inches from the ground, depending on whether you want a more upright or laid-back feel. A solid Adirondack chair design plans will include these ranges with exact measurements for your chosen wood thickness. If you’re new to woodworking, start with a modest, standard size and adjust after a test sit in your workshop or yard.
Materials, tools, and prep
Wood choices and joinery options
When selecting materials, the most durable Adirondack chairs use either cedar or pressure-treated pine for homestead-grade outdoor use. Cedar resists moisture and rot naturally, while pressure-treated pine is a budget-friendly option with long-term durability. Teak and redwood are premium choices for coastal environments or where weather exposure is intense. The joinery should be robust but simple to execute in a home workshop: mortise-and-tenon joints or strong dowel joints paired with exterior-grade glue perform well. A well-planned Adirondack chair design plans will indicate the preferred joinery method for each connection, alongside recommended fasteners and glue types for exterior use.
Cutting list and planning tips
Before you cut a single board, finalize a concise cutting list. Common pieces include two front legs, two rear legs, a seat board, a back slat assembly, armrests, and the back support slats. In most plans, the seat slats are cut slightly wider than the distance between the front and rear legs to prevent sag. A simple tip: label and number each piece as you cut, and maintain a dry-fit session before applying glue. This reduces the risk of warping or misalignment once you assemble the chair.
Step-by-step overview: turning plan into a finished chair
Measuring, cutting, and dry-fit
Begin by transferring all dimensioned lines from your Adirondack chair design plans onto your stock. A sharp table saw or circular saw with a straightedge helps you achieve clean, accurate cuts. After cutting, perform a thorough dry-fit: lay out all parts without glue to confirm that the backrest aligns with the seat angle, the armrests rest at the intended height, and the legs contact the ground evenly. If the dry fit reveals any minor gaps or misalignments, adjust before final assembly. This step saves material and frustration in later stages.
Assembly sequence and alignment tips
Assemble in a logical order: start with the seat frame, then attach the back slats, followed by the backrest support and finally the armrests. Use temporary clamps to hold pieces in alignment as you test fit. When you’re satisfied with the dry fit, apply builder’s glue to the joints, insert exterior-grade screws or dowels, and clamp until fully cured. A common pitfall is shifting during glue-up; keep a straightedge or level handy to verify the backrest remains true to the intended angle as glue sets. A steady, patient approach will yield a chair that not only looks right but also feels evenly balanced when you sit down.
Finishing touches and weatherproofing
Weatherproofing is essential for longevity. Sand the assembled chair to remove sharp edges and create a smooth surface for finish. Apply a protective finish suitable for outdoor use, such as an Oil-based penetrating finish or a waterborne polyurethane sealant. Some woodworkers prefer exterior-grade spar varnish for its elasticity in changing weather conditions. If you live in a climate with heavy rainfall or intense sun, consider a two-coat system with a recoat interval that aligns with the product’s guidelines. Your Adirondack chair design plans should include finish recommendations tailored to the wood species you chose, ensuring the chair ages gracefully while preserving comfort and aesthetics.
Troubleshooting common issues
Squeaks, wobble, and fit adjustments
Even a well-built chair may develop squeaks or wobble over time. Check all fasteners and joints after the first season, especially the armrests and seat slats. If gaps appear, re-tighten or re-glue joints. Consider adding a small shim or adjusting the way back slats sit against the backrest supports to restore a snug, secure feel. Regular maintenance—tightening screws and reapplying sealant—will extend the life of your Adirondack chair and keep it looking showroom-fresh year after year.
Customization ideas and upgrade paths
Wood types and finishes for different climates
While cedar and pine are common, you can tailor your Adirondack chair design plans by introducing woods with higher durability ratings in your region. For hot, dry climates, consider woods with natural resistance to cracking and warping. For coastal dampness, select rot-resistant options and apply multiple protective coats to maximize longevity. You can also customize the color of the finish or implement a two-tone look by painting the base and staining the slats for contrast. The design remains flexible, letting your creativity shape the final piece without compromising structural integrity.
Lightweight or oversized variants
If you’re crafting for smaller spaces or for grown-up comfort with generous proportions, adjust the seat height and armrest width while preserving the same essential geometry. The two front legs can be slightly longer for a taller seat, or you can widen the seat to accommodate larger frames. Your Adirondack chair design plans will guide you through these tweaks, ensuring that modifications stay balanced and functional rather than visually disproportionate.
How to access reliable plans and patterns
Ted’s Woodworking and why it matters for adirondack chair design plans
Having access to a wide range of woodworking plans can dramatically speed up your learning curve and improve your outcomes. Ted’s Woodworking is a popular resource among hobbyists, offering a broad library of patterns, including Adirondack chair designs and related outdoor seating projects. If you’re evaluating resources to expand your plan library, a broader program can provide you with an assortment of plan styles, cut lists, and finish recommendations that complement your own Adirondack chair design plans. For more information and a deeper look at Ted’s Woodworking, you can explore the guide mentioned above or browse related resources in this article.
To explore additional patterns and patterns catalogues curated for DIY projects, see this resource: free woodworking patterns catalog your ultimate guide to DIY projects with Ted’s Woodworking.
Practical tips for success and next steps
Starting with a clear Adirondack chair design plans is half the battle. The other half is patience, precise measurement, and a thoughtful finishing regimen. Begin with a simple build, document the process, and refine your technique with every project. As your confidence grows, you can tackle variations—perhaps a two-tone variant with a contrasting wood grain or a lighter-weight version designed for easy storage. The key is to keep the project enjoyable and repeatable, so you can replicate or scale your approach to other outdoor seating designs in the future.
If you’re ready to unlock a broader library of woodworking plans that can accelerate your progress on adirondack chair design plans and many other outdoor builds, consider this trusted resource: Ted’s Woodworking affiliate access. It’s designed for hobbyists who want reliable, tested plans and practical guidance to bring projects from concept to completion. For more curated inspiration and patterns, don’t miss the internal guides linked earlier in this article.
Closing thoughts
Adirondack chair design plans offer a rewarding blend of artistry and practicality. With thoughtful proportions, sturdy joinery, and a finish that stands up to the elements, you can enjoy a chair that’s as comfortable as it is iconic. Use the steps and considerations outlined here as a blueprint for your build, and don’t hesitate to explore additional resources and patterns that can expand your woodworking repertoire. Remember, the journey of a thousand cuts begins with a single plan—and the right guidance can turn a simple project into a lasting outdoor favorite.