
Introduction
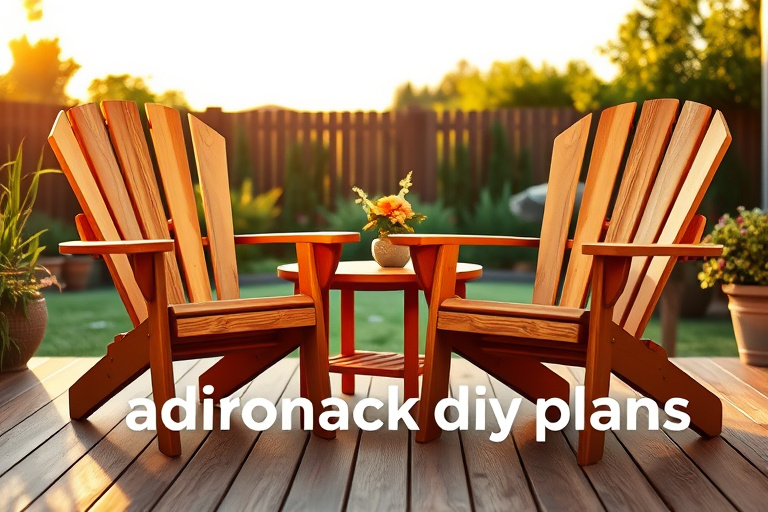
When you think of outdoor living, the image that often comes to mind is a pair of welcoming chairs, a soft breeze, and the warm glow of sunset on natural wood. If you’re chasing that cozy, timeless look, Adirondack DIY plans can be your gateway to craftsmanship that lasts for years. The phrase adirondack diy plans isn’t just about making a chair; it’s about designing an outdoor seating system that fits your space, your posture, and your climate while staying affordable and satisfying to build. In this article, we’ll explore how to approach Adirondack projects from a practical, plan-first mindset and how to leverage trusted woodworking resources to keep you motivated and on track.
Why Adirondack DIY Plans Are Worth It
Adirondack furniture has a long history for good reason: its broad slats, generous back, and reclining comfort make it a favorite for porches, decks, and garden nooks. DIY enthusiasts often start with adirondack diy plans because they offer a clear road map—from cut lists to engineering considerations—so you don’t get stuck staring at a pile of wood and a vague notion of “something that looks like a chair.” By following well-structured plans, you can dial in dimensions that fit your body, your space, and your climate. Durable woods such as cedar or exterior rated plywood, combined with proper finishing, protect your investment against sun, rain, and humidity. If you’re curious about broader project planning and how it connects to Ted’s woodworking resources, you can explore a smart-path overview in this guide: diy-wood-project-plans—the smart path to building more with Ted’s woodworking.
Choosing the Right Adirondack DIY Plans
Every successful Adirondack build starts with selecting the right plan. The best Adirondack diy plans should address ergonomics, materials, and finish, ensuring comfort across different body sizes and climate exposure. Here are the key criteria to look for:
- Ergonomics and Sizing. A good plan includes back angle, seat depth, and seat height that accommodate a wide range of users. If you’re building for a family, consider adjustable features or a chairs-set with consistent depth and tilt that promote relaxed lounging without sacrificing support.
- Materials, Fasteners, and Finishes. Plans should specify wood species, board thickness, and joinery. Cedar, redwood, or pressure-treated lumber are common choices for outdoor furniture. Finishes like marine-grade varnish or UV-resistant deck stains extend life and keep colors vibrant.
- Cut List and Build Timeline. A clear cut list saves trips to the hardware store and reduces waste. A well-structured timeline helps you allocate sessions—especially if you’re balancing weekend woodworking with family time.
To broaden your understanding of plan selection and to see how Ted’s woodworking fits into a larger plan library, you can read this workshop-focused guide: must-have tools for workshop.
Step-by-Step: Building Your Adirondack DIY Plans Chair
Following a solid Adirondack diy plans blueprint makes the process enjoyable and repeatable. Here’s a practical, workmanlike approach you can adapt to most standard plans:
Tools and Prep
Before you start cutting, gather essential tools: a circular saw or track saw, a drill/driver, clamps, measuring tape, a square, and a sander. If you’re building multiple chairs, consider a workbench with a built-in stop so that each piece is consistent across the set. A good prep phase also means milling stock to uniform thickness—this minimizes misalignment later and produces a cleaner final look.
Rough Cutting and Joinery
Follow the cut list precisely. Adirondack plans typically rely on simple, sturdy joinery like screws with glue for the main chair frame and vertical slats. Pocket holes or dowels can be employed for hidden joints on the backrest, provided the plan specifies the joint type. Take care to avoid tear-out on the curved seat slats; a sharp blade and slower feed rate help preserve the wood’s edge. Dry-fit components first to check alignment before final assembly.
Sanding, Finishing, and Curing
Even with a precise cut, some edges will need a light touch-up. Start with 80-grit to knock down rough hand-sand marks, then finish with 120- to 220-grit for a smooth surface that’s comfortable against the skin. When applying finishes, consider a two-coat approach: a penetrative wood sealer followed by a UV-blocking outdoor stain or spar varnish. The goal is to keep moisture out while preserving the natural beauty of the wood grain. Proper curing time between coats ensures durability, reducing the risk of peeling or cracking during seasonal changes.
Expanding Your Set: Tables, Ottomans, and Side Chairs
An Adirondack chair looks great on its own, but a coordinated outdoor seating set elevates your space. After you’re comfortable with a single chair, you can branch out to complementary pieces using the same or slightly adjusted plans for a cohesive look. A small Adirondack coffee table with a slatted top, an ottoman that matches the chair’s slope, and even a side chair with a similar back profile can create a curated feel. The joy of Adirondack diy plans is that you can scale the project according to your yard size and storage capacity, while maintaining the same aesthetic language across every piece.
Ted’s Woodworking: A Trusted Resource
As you broaden your workshop horizons, Ted’s Woodworking offers a substantial library of plans that can inspire new outdoor furniture ideas, including Adirondack-inspired designs. While you don’t need to purchase anything to start, many builders find that a robust plan library accelerates progress and helps with material selection, joinery decisions, and finishing techniques. If you’re ready to explore Ted’s Woodworking more deeply, there’s a broad selection of plans available, and you can access the comprehensive resource through this trusted affiliate link: Ted’s Woodworking plans.
How to Use Ted’s Woodworking Plans
When integrating Ted’s Woodworking into your Adirondack diy plans workflow, aim to use plans as a springboard rather than a strict script. Start with a chair plan that most closely matches your desired dimensions, then adapt to your comfort needs. The advantage of Ted’s library is the breadth of options—from classic Adirondack shapes to modern interpretations—so you can borrow techniques such as slat spacing, backrest curvature, and leg joinery while keeping your signature touch. Remember to compare multiple plans to understand how different builders approach the same silhouette, which can help you optimize for materials you already have on hand and local weather conditions.
For further practical guidance on planning and organization, you can reference this overview that ties together DIY wood project plans with Ted’s woodworking philosophy: diy-wood-project-plans—the smart path to building more with Ted’s Woodworking.
Curating Projects Without Overwhelm
One common pitfall is trying to tackle too many projects at once. Ted’s Woodworking offers a spectrum of plans, from beginner-friendly chairs to more intricate outdoor furniture packages. If your goal is a streamlined, well-built set, focus on a single Adirondack diy plans project first, complete it, and then expand. This approach reduces waste, improves accuracy, and makes the learning curve more manageable. It also helps you budget effectively, since you’ll have a tangible finish to measure against as you tackle the next item in your outdoor furniture lineup.
Maintenance and Care for Outdoor Wood Furniture
Outdoor furniture thrives with a maintenance routine that’s simple yet consistent. After weather exposure, inspect for loose screws or cracked slats. Reapply protective finishes every couple of seasons, depending on sun exposure and rainfall in your area. Cleaning with a mild soap solution and a soft brush keeps dirt and pollutants from embedding into the grain, which helps maintain color and texture. A well-finished Adirondack chair can endure years of use with only periodic touch-ups—precisely why adirondack diy plans are so appealing for DIY enthusiasts who want lasting results.
Bonus: Incorporating the Affiliate Offer
If you’re ready to deepen your project library, consider exploring Ted’s Woodworking in more depth. The program provides access to a wide range of plans that can complement your Adirondack diy plans and other outdoor projects. While exploring the library, you may find that some plans align with your preferred joinery and finishing techniques, offering you valuable insights as you scale your workshop. You can begin with the official resource here: Ted’s Woodworking.
Conclusion and Next Steps
Adirondack diy plans empower you to transform an outdoor space into a warm, welcoming retreat that reflects your craft and your climate. By prioritizing ergonomics, material choice, and finish, you can build chairs and sets that age gracefully while maintaining their comfort and charm. Ted’s Woodworking serves as a practical companion—offering plan variety, design inspiration, and reliable techniques—without overwhelming you with options. Start with a single chair, perfect your method, and then expand into a matching table, ottoman, or additional seating so your outdoor living area becomes a true retreat. Remember, the joy of woodworking is not just in the finished piece but in the process of crafting something with your own hands, one Adirondack diy plans project at a time.


