Introduction
Whether you’re a seasoned hobbyist or just starting your journey in woodworking, american woodworker plans serve as a reliable backbone for turning ideas into solid, finish-ready pieces. These plans translate design concepts into concrete steps, including measurements, cut lists, and safety notes. In the United States, many plans are created with standard inch-based measurements and common stock sizes, which helps you source materials locally and stay on budget. This guide explores how to find, evaluate, and use american woodworker plans effectively, so you can complete projects with confidence and consistency.
What are american woodworker plans?
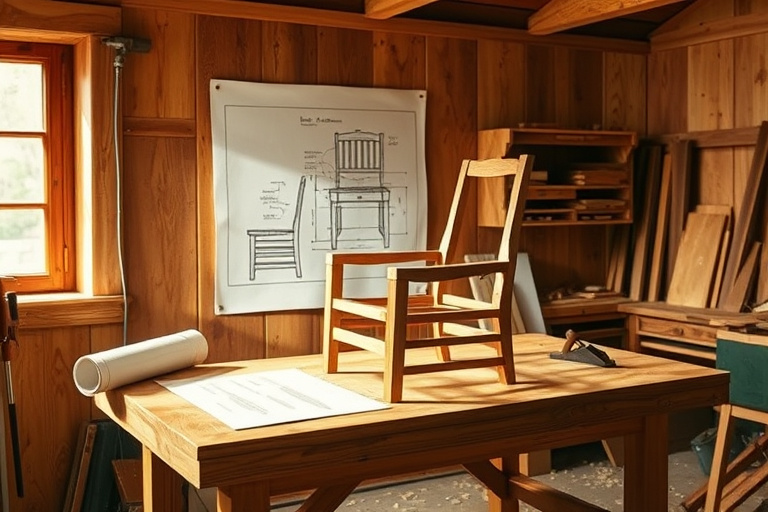
American woodworker plans are a curated set of instructions and drawings that guide you from raw lumber to a finished item—whether it’s a simple bookshelf, a rustic coffee table, or an intricate chair. A good plan should do more than show a pretty image; it should provide a precise cut list, dimensions for each component, an assembly sequence, and notes on materials and hardware. The goal is to minimize waste, reduce mistakes, and keep you safe during every step of the project.
When you encounter american woodworker plans, you’re typically looking for clarity and reliability. Look for plans that include exploded diagrams, clear shading or perspective views, grain direction notes, and a detailed bill of materials. Some plans also offer alternate dimensions or material substitutions to accommodate different toolsets or climate conditions. The best plans become a dependable reference you reuse across multiple projects, gradually expanding your capabilities as you learn which methods work best for you.
Key features to look for in quality plans
A high-quality plan is a time-saver and safety net. Here are the features that separate solid american woodworker plans from the rest:
- Clear measurements and scale: Exact dimensions for every piece, with tolerances noted where necessary. If a plan uses fractional inches or metric conversions, it should be clearly stated and easy to translate to your shop tools.
- Step-by-step construction sequence: A logical order of assembly that minimizes rework and helps you anticipate hidden joints, fastener placement, and alignment issues.
- Cut lists and material specs: A complete list of boards, plywood sheets, hardware, screws, glue, and finishes needed, including suggested stock widths and thicknesses.
- Safety and tool guidance: Warnings about complex joints, power tool usage, dust management, and personal protective equipment.
- Visual aids: Exploded views, isometric drawings, and photos or renders that show how parts fit together and where grain direction matters.
- Options and flexibility: Substitutions for materials, alternative dimensions, or modular designs that let you adapt the plan to your space and budget.
As you become more proficient, you’ll notice that the best american woodworker plans also include tips on refinishing, joinery options, and maintenance—so your project remains sturdy and attractive for years to come.
How to evaluate and pick quality plans
Selecting the right american woodworker plans involves a combination of review, practical testing, and alignment with your current skill level. Here are criteria to consider before you commit to a set of plans:
Clarity, scale, materials, and safety
Start by examining whether the plan clearly states the wood species, board widths, and thicknesses. A good plan will specify how each piece is cut, how many parts there are, and how to sequence the assembly. If measurements appear ambiguous or the diagrams are hard to read, it’s a red flag. Safety notes should cover basic practices like eye and hearing protection, kickback risks with certain joints, and proper clamping techniques.
Tools and skill prerequisites
Every project requires a baseline set of tools. Some plans assume access to a table saw, router, and power drill, while others are designed for more modest setups. Check the required tools and compare them with what you own or are willing to purchase. A plan that assumes specialized equipment may not be practical for beginners, but it can be valuable for more experienced woodworkers who want to stretch into new techniques.
When evaluating plans, also assess whether the project’s skill level is labeled clearly—beginner, intermediate, or advanced. This helps you pick plans that align with your current abilities while leaving room for growth.
Format and accessibility
Plans come in various formats: printable PDFs, interactive online builders, or downloadable CAD files. Choose a format that fits your workflow. Some carpenters prefer printable sheets they can annotate; others rely on digital files that synchronize with a tablet or laptop in the workshop. A well-presented plan also includes high-quality images or diagrams at multiple angles, which reduces guesswork when you’re cutting and assembling pieces.
Matching plans to your skill level
One of the advantages of american woodworker plans is their wide range of difficulty. Here’s how to align your choice with your experience:
Beginner-friendly paths
If you’re just starting out, look for plans that emphasize simple joints (butt joints with dowels or screws, for example), straightforward cut lists, and fewer parts. A well-chosen beginner project helps you master tool handling, measurement accuracy, and basic assembly without becoming overwhelming. For ideas and a guided path toward beginner-friendly projects, you may find value in the practical beginner resources that cover safe practices and foundational techniques.
As you gain confidence, you’ll appreciate plans that gradually introduce more complex joints (such as dado joints or mortise-and-tenon connections) and more intricate hardware details. This progressive approach keeps motivation high while building real woodworking fundamentals.
Advanced projects
Advanced plans typically include refined joinery, more complex cut lists, and custom finishing instructions. If you’re comfortable with power tools, jigs, and precise alignment, these plans can be a lot of fun and a great way to stretch your capabilities. Always ensure you have the right dust collection, safety measures, and workspace organization to tackle more ambitious builds.
Using this knowledge to complete projects
Putting american woodworker plans into practice involves a repeatable workflow that minimizes waste and maximizes quality. Here’s a practical process you can adapt to most projects:
Step-by-step workflow
1) Read the entire plan first to understand the overall scope and critical joints. 2) Create a cut list and roughly lay out boards to optimize grain and minimize waste. 3) Mark pieces with their exact location and orientation to prevent miscuts. 4) Cut parts with controlled confidence, verifying dimensions as you go. 5) Dry-fit the assembly to check alignment before final assembly. 6) Apply finishes in the recommended order, using a protective sealant or stain as directed. 7) Inspect and test the completed piece for stability and function. This repeatable approach helps you produce predictable results while reducing surprises mid-build.
For many woodworkers, a reliable plan becomes a gateway to more ambitious designs. If you want a curated, comprehensive library of plans to explore, consider resources like Ted’s Woodworking, which aggregates a broad collection of designs to study techniques across different furniture types.
When you’re ready to explore a larger library of designs, you can explore this curated resource that aggregates plans from across the spectrum. Ted’s Woodworking offers access to a diverse set of projects that can complement your own progression with american woodworker plans.
Common pitfalls and how to avoid
Some frequent missteps include skipping a proper plan read, rushing through cuts, and neglecting to account for wood expansion with humidity. Take the time to verify every measurement and to double-check joints before assembly. A simple technique like labeling parts during the cut stage helps you stay organized. Always clamp pieces securely when routing or sanding, and avoid rushing through critical steps. By following a structured approach to using american woodworker plans, you’ll be better prepared to handle unexpected challenges and recover quickly if something doesn’t go as planned.
The role of Ted’s Woodworking as a resource
While a single plan can be invaluable, many woodworkers appreciate having access to a broad library of designs to study patterns, joinery techniques, and finish options. Ted’s Woodworking is a resource that several hobbyists reference as a source of inspiration and instruction. It’s not just about copying plans; it’s about learning methods, adapting dimensions to your space, and refining your own process. When used thoughtfully, a resource like Ted’s Woodworking complements the discipline of following american woodworker plans by broadening your toolbox of techniques and project concepts.
What it offers
In practice, this kind of resource provides example projects, material lists, and assembly steps that illustrate how professionals approach design challenges. You can compare approaches across different plans, study how joints are executed, and notice how grain direction is managed in various pieces. This kind of comparative study can help you interpret your own american woodworker plans more effectively and empower you to make informed substitutions when needed.
How to use it responsibly in your toolkit
Remember that the goal is to increase your understanding and capability, not to copy blindly. Use a plan as a learning aid, then adapt it to your space, toolset, and personal style. Be mindful of licensing and usage terms for any plan you consult, and always credit sources when you publish photos or write-ups of your builds. With the right balance between instruction and originality, american woodworker plans and curated resources like Ted’s Woodworking can work together to accelerate your learning curve.
Practical examples and resources
Beyond general guidance, real-world examples help you visualize how to apply american woodworker plans to your projects. If you’re curious about a classic outdoor project or a beginner-friendly build, these references can be helpful as you plan your own workshop journey.
For a classic outdoor seating project, check out this free Muskoka chair plans guide. It demonstrates how a well-structured plan communicates joinery and assembly steps for a durable outdoor chair. The Muskoka chair is a popular project that sits at the intersection of aesthetics and practicality, offering a manageable challenge that’s well suited for expanding your portfolio of american woodworker plans.
For beginner-friendly projects that help you build confidence and skill, this guide to beginner woodworking projects can be a practical reference. It highlights safe practices, essential tool handling, and project ideas that align with introductory plans. Using these beginner resources in tandem with american woodworker plans creates a smooth progression—from simple builds to more sophisticated designs.
How to integrate affiliate products naturally
As you accumulate plans and complete projects, you’ll want to expand your toolkit with additional resources that broaden your understanding and options. One such resource many woodworkers find valuable is Ted’s Woodworking, a curated library of plans that can complement your own set of american woodworker plans. If you’re curious about expanding your design horizons or looking for new project ideas, you can explore the collection here: Ted’s Woodworking.
Conclusion
American woodworker plans form a cornerstone of a successful DIY journey, guiding you from rough ideas to finished furniture with clarity and reliability. By understanding what makes a plan strong, choosing options that match your skill level, and using them within a structured workflow, you can minimize waste, maximize learning, and produce pieces you’re proud to display or use for years. Remember to explore related resources, such as the Muskoka chair plans and beginner projects guide, to support your learning path. And if you ever want to broaden your library of techniques and project types, Ted’s Woodworking can be a valuable companion to your american woodworker plans—just be sure to use any resource as a learning tool to inform and enhance your own unique builds.