Starting with basic carpentry projects can transform a home and your confidence as a maker. This guide is designed for absolute beginners and for anyone returning to the workshop with fresh motivation. You’ll learn not only what to build, but how to think through each project—from planning and measurement to cutting, assembling, finishing, and safety. The goal is steady progress: you’ll see that basic carpentry projects add up to real skills, and soon you’ll be taking on more ambitious builds with ease.
First, let’s define what counts as basic carpentry projects. These are entry-level woodworking tasks that use common hand tools and small power tools, require simple joinery, and result in functional items you can use around the house. Think small and practical: a birdhouse that keeps the birds happy, a wall shelf for plants or books, or a sturdy plant stand that elevates greenery without wobbles. As you gain experience, you’ll discover you can execute these projects with fewer mistakes, less waste, and more pride in your finished piece.
To stay organized as you begin, it helps to frame each project around a simple five-step process: 1) plan and sketch, 2) cut to size, 3) dry-fit and assemble, 4) sand and finish, 5) clean up and reflect on what to do differently next time. This approach can be applied to any basic carpentry project and acts as your dependable road map for growth.
As you progress, you’ll want a few reliable resources. For inspiration on ideas and low-cost projects you can start today, check out 10 DIY woodworking ideas you can start today. If you’re hungry for more advanced techniques and gorgeous furniture pieces, the companion guide Woodworking furniture master techniques, tools, and projects for gorgeous pieces is a great next step after you’ve built a few simple projects. Note: these internal resources are excellent for expanding your knowledge without overwhelming beginners.
Getting started: essential tools and safety
Before you pick up a tool, establish a safe workspace. Clear a sturdy bench, lay down a non-slip mat, and ensure good lighting. You’ll soon develop a routine that reduces mistakes and keeps you safe. For beginning projects, you don’t need an oversized toolkit; a few versatile tools will cover almost all basic carpentry projects.
- Measuring and marking: a tape measure, a pencil, a carpenter’s square or combination square, and a marking gauge for precise lines.
- Cutting: a handsaw for basic cuts, a backsaw or a miter saw for repeatable angles, and a coping saw for curved cuts.
- Shaping and smoothing: sandpaper (various grits) and a sanding block. A power sander is helpful but not required initially.
- Joining: a hammer, wood glue, a set of clamps, and a few basic nails or screws. A dowel jig is optional but useful for stronger joints.
- Finishing: a polisher or steel wool, wood stain or paint, varnish or polyurethane, and a clean rag or brush.
- Safety: safety glasses, hearing protection when using power tools, dust mask or respirator for fine dust, and a first aid kit nearby.
As you work through basic carpentry projects, you’ll also want to practice safe handling of tools and show patience with measurements. Precision is the backbone of quality results, even in beginner projects. If you’re curious about a broader spectrum of ideas and techniques, the furniture master techniques collection can be a great resource after you’ve built a few starter pieces. And if you’re seeking a structured library of plans and projects to jump-start learning, consider exploring the Ted’s Woodworking catalog, which provides a wide range of project plans and tutorials that align well with basic carpentry projects.
A step-by-step approach to any project
Every basic carpentry project follows a natural sequence. Start with a clear plan, commit to cut lists, and work methodically. Here’s a practical framework you can adapt to most tasks:
- Define the project: What is the item, what’s its purpose, and what are its dimensions? Sketch a rough plan and map out how it will be used daily.
- Make a cut list: Translate the plan into exact parts with lengths and quantities. Double-check your measurements before you cut.
- Prepare materials: Select stock that is straight, free of major defects, and appropriate for the weight and use of the piece.
- Cut and dry-fit: Make the initial cuts, then dry-fit the pieces to verify alignment and fit before you glue anything.
- Join and reinforce: Use glue and clamps for alignment, followed by nails or screws for strength. Consider simple joinery like butt joints or pocket-hole screws for beginners.
- Sand and finish: Smooth edges and surfaces in stages—start with coarse grit and move to finer grits. Apply finish that suits the wood and use-case.
- Evaluate and refine: Inspect the result for wobble, gaps, and finish consistency. Note improvements for future projects.
With this framework, you’ll build consistency and reduce waste—two essential benefits of pursuing basic carpentry projects. If you want to see how others translate a plan into a finished piece, the ideas in the beginner project guide can be especially motivating.
8 beginner-friendly basic carpentry projects
Here are eight practical, beginner-friendly options. Each project includes a concise materials list, step-by-step process, and tips to avoid common mistakes. You can tackle these with minimal tools and gain confidence as the pieces come together. The goal is steady practice that reinforces good habits and clean workmanship.
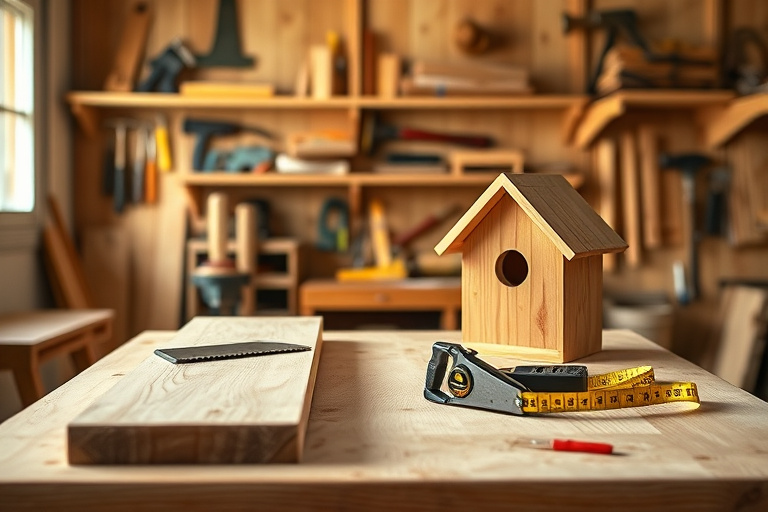
1) Birdhouse
A classic starter project that teaches measuring accuracy and simple box construction. Use untreated hardwood or softwood, a weatherproof finish if you’ll place it outdoors, and basic butt joints with glue and nails. Consider a small hinged roof so you can clean it out next season. Materials: pine or cedar boards, exterior-grade screws, outdoor-safe adhesive, non-toxic paint or stain.
Steps: cut sides, front, back, and roof; assemble a simple rectangular box; attach a perch; seal edges; mount on a post or tree. This project reinforces measuring, joints, and finish prep without requiring complicated joinery.
2) Wall shelf
A wall-floating shelf is a great test for alignment and mounting. Plan the width to suit your space, and select a robust hardwood or pine board. Use a simple bracketless design or concealed brackets for a clean look. Materials: board for shelf, hidden brackets or brackets and screws, wood filler, sandpaper, finish.
Steps: cut the shelf to length, smooth edges, attach brackets or create a wall-cleat, then finish. Mounting requires careful stud location and level checks, but the process is straightforward for basic carpentry projects and yields a practical home upgrade.
3) Plant stand
Plant stands are ideal for practicing precise cutting and clean joints. Build a small, square base with vertical supports and a top surface. Materials: scrap or new lumber, wood glue, small nails or screws, a protective finish.
Steps: cut legs and top, join with simple gussets or a lap joint, sand, and finish. A plant stand also teaches weight distribution and stability—important concepts for future projects.
4) Picture frame
A picture frame introduces miter joints, glass handling, and precise measuring. Start with a simple 8×10 frame project and experiment with finishes. Materials: four frame pieces, mat board, backing, glass (or acrylic), finish.
Steps: cut the frame rails at 45-degree angles, join corners with glue and nails or corner brackets, sand, and finish. This project translates well into more elaborate frames as you advance in basic carpentry projects.
5) Small coffee table
For a beginner-friendly coffee table, aim for a simple rectangular top and four legs. A lite frame or apron under the top can add stability. Materials: table top plank, four legs, screws, glue, finish.
Steps: cut top and legs to size, assemble using pocket-hole screws, attach the top to the base, sand, and finish. This project teaches planarity, squareness, and the importance of a solid finish for daily use.
6) Magazine rack
A magazine rack combines flat panels and narrow supports, making good use of scrap wood. Materials: wooden slats, backing panel, glue, screws, finish.
Steps: cut panels, assemble with minimal hardware, ensure a stable base, and apply finish. The rack offers a practical, decorative accent to any room while reinforcing alignment and joinery basics.
7) Tool caddy or small storage box
A compact box helps you practice precise cutting, dado or rabbet joints (optional for more challenge), and a clean finish. Materials: box sides, bottom, lid, hinges or magnets, finish.
Steps: cut pieces to size, assemble box with glue and nails, add lid and hardware, sand, and finish. Learning to snugly fit a lid teaches tolerance for small gaps and reveals the importance of exact measurements in basic carpentry projects.
8) Simple step stool
A sturdy step stool introduces you to stronger joints and weight-bearing design. Start with a simple three or four-step model using strong stock and reinforced joints. Materials: two side panels, treads, glue, screws, finish.
Steps: cut side rails and steps, join with butt joints or simple rabbet joints, reinforce with cross supports, sand, and finish. This is a slightly more ambitious project, but it remains within the realm of basic carpentry projects with careful execution.
Choosing materials and finishes
Material choice affects both the ease of completion and the durability of your first projects. For beginners, softwoods like pine and poplar are forgiving, inexpensive, and widely available. Hardwoods such as beech or maple require more precise cutting but offer superior wear resistance for pieces you’ll use daily. When you’re just starting, prioritize stable stock with minimal warping, straight grain, and few defects.
Finish matters as much as the structure. A simple sealant or water-based polyurethane can protect surfaces without heavy odor or long curing times. If you’re painting, a latex or acrylic paint with a clear top coat offers a durable, easy-to-clean finish. As you gain confidence in basic carpentry projects, exploring different finishes will help you tailor each project to its intended environment.
Learning from the masters: resources and techniques
Learning is a cumulative process. While practicing basic carpentry projects at home provides hands-on experience, expanding your knowledge with curated guides can accelerate mastery. The beginner-friendly guides linked earlier are excellent starting points for ideas and technique walks-throughs. They can help you think through the nuances of beam orientation, grain direction, and finishing strategies that elevate any simple project. If you’re the kind of learner who loves a larger library of plans and step-by-step tutorials, consider a resource bundle like Ted’s Woodworking. It aggregates numerous project plans, which can complement your hands-on practice and help you scale complexity as you progress.
Whether you’re just starting or returning to the workshop after a break, a structured library can save time and inspire consistent growth. If you’re curious about broader project options and advanced techniques in furniture assembly, you’ll find the detailed guides in the furniture master collection valuable as a next step after you’ve completed a handful of basic carpentry projects.
Ted’s Woodworking and the affiliate toolkit
For makers who want a larger, well-organized catalog of project ideas, Ted’s Woodworking offers a comprehensive library of blueprints, cut lists, and technique explanations that pair well with the discipline of basic carpentry projects. While you don’t need every plan to start building, having quick access to varied layouts and step-by-step instructions can help you stay motivated and avoid plateaus. If you’re interested, you can explore the toolkit here: Ted’s Woodworking. This affiliate link supports ongoing development of practical, beginner-friendly content like what you’ve just read, while giving you a broad library to reference as your skill grows.
When you’re ready to widen your scope, you can draw inspiration from practical guides like the ones mentioned earlier and use Ted’s Woodworking to bridge your foundational work with more ambitious projects. The combination of solid fundamentals and expansive resources can shorten the learning curve and keep you engaged as you master basic carpentry projects.
Conclusion and next steps
Starting with basic carpentry projects is about building a reliable skill set one project at a time. By focusing on planning, accurate measurements, and clean finishes, you’ll gain confidence that translates into more ambitious builds—without getting overwhelmed. Keep your space organized, your tools sharp, and your projects small but meaningful. Over time, your ability to translate ideas into sturdy, beautiful wood pieces will become second nature.
Next steps: choose one of the beginner-friendly projects listed above, gather a small, budget-friendly toolkit, and schedule a 2-3 hour session for your first build. Track your measurements, note any mistakes, and reflect on how you would adjust a future project. And if you’d like to explore additional ideas and techniques beyond the basics, revisit the recommended articles and consider expanding your toolset as you grow more comfortable with the craft. For ongoing inspiration, remember the internal resources linked earlier, including the beginner-focused DIY woodworking ideas guide and the furniture-focused master techniques guide.
Happy building, and may your projects stay precise, satisfying, and fun. basic carpentry projects are the starting point for a lifelong journey in woodworking.