Introduction
Every woodworker starts somewhere, and a diy 2×4 chair is the kind of project that proves you can turn simple scraps into a functional piece of furniture. This guide walks you through building a basic yet sturdy wooden chair using common 2×4 boards, a forgiving cut list, and joinery that beginners can handle with basic tools. If you’re curious about expanding your repertoire later, there are excellent resources that simplify woodworking for newcomers, and even show you how to scale up to more ambitious builds. By the end, you’ll have not only a comfortable chair but also a solid blueprint for future projects.
What is a diy 2×4 chair and why it works for beginners
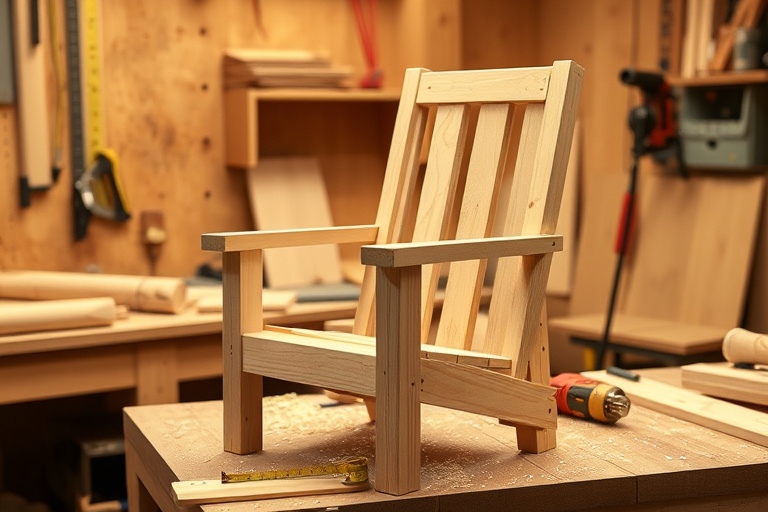
A diy 2×4 chair is exactly what its name suggests: a chair built primarily from standard 2×4 lumber. The appeal is twofold. First, 2x4s are inexpensive, widely available, and forgiving for beginners because their uniform dimensions simplify planning and cutting. Second, the project teaches core woodworking skills—measuring, cutting straight, sanding, joining, and finishing—without overwhelming you with complex joinery or exotic materials. When you master this design, you’ll have a reliable framework to test variations, such as adding a backrest or switching to a different seat height.
Tools and materials
Lumber and cut list for a sturdy chair
- 4 pieces of 2×4 lumber cut to seat width and chair legs (roughly 18–20 inches long for the seat frame; adjust to your preferred seat height)
- 4 cross supports (shorter 2x4s to brace the legs)
- Seat slats or a single laminated plywood seat cut to fit the frame
- Wood glue, exterior-grade or interior wood glue depending on use
- Wood screws (3/4 inch to 1 inch) for securing the seat and braces
- Sandpaper (80, 120, and 220 grit)
- Finish of choice (stain, oil, or clear polyurethane)
Tip: when you’re new to woodworking, select lumber that is straight, free of major knots, and stored in a dry environment to minimize warping as you build.
Essential tools you’ll need
- Circular saw or miter saw for straight, accurate cuts
- Drill/driver with a cordless battery
- Clamps to hold pieces during glue-up
- Square and measuring tape for precise layout
- Orbital sander or sanding block for smooth finishes
- Wood glue and countersink bits for neat screw heads
If you’re just starting out, you don’t need every tool at once. Focus on accuracy with the essential items, then expand your kit as you gain confidence.
Step-by-step guide to building a diy 2×4 chair
Planning and layout
Begin by sketching a simple design and confirming the seat height you want. A common seat height for a dining-style chair is around 17 inches from the floor, but you can tailor this to your body measurements. Create a quick cut list from your sketch. Accurate planning reduces the chance of miscuts and wasted wood later on.
Mark your cut lines clearly on the lumber. When you cut, use a stop block for repeatable lengths so all legs and cross braces align neatly. Consider labeling pieces as you cut so assembly is straightforward.
Cutting the parts
With a straight edge and a sharp blade, make clean, square cuts. Use a rubbing block to prevent tear-out on the faces. Deburr edges with a sanding block after each cut so you don’t develop splinters during assembly. Dry-fit the chair by placing the legs on a flat surface and laying out the seat frame to confirm fit before glue is applied.
Assembly and joinery
Glue and screw the seat frame together first, ensuring the corners are square. A light bead of wood glue on the mating surfaces, followed by clamps to hold the assembly tight while the glue dries, creates a strong base. When attaching the seat, pre-drill pilot holes slightly smaller than your screws to prevent splitting. If you’re using a laminated seat or slats, distribute fasteners evenly to avoid warping the seat under load.
Cross braces beneath the seat add stability. Attach these with screws and glue, aiming for a snug, quiet chair that doesn’t creak when you sit. Finally, sand the entire piece starting with 80 grit to remove rough spots, then progress through 120 and 220 grit for a smooth finish. Wipe away dust between grits for a clean surface that accepts stain or finish evenly.
Finishing touches
Finish is not just aesthetic; it protects the wood and reduces splinters. You can choose a natural oil for a low-sheen look or a polyurethane coat for durability. Apply thin, even coats, letting each layer dry fully and sanding lightly between coats. A final buff with a soft cloth brings out the wood’s natural beauty. If you are planning to use the chair outdoors, opt for an exterior-grade finish and consider sealing all faces to reduce moisture intrusion.
Common mistakes and how to avoid them
New woodworkers often encounter a few predictable issues. Here are practical tips to avoid them:
- Inaccurate cuts: use a stop block and double-check lengths before cutting. Small errors compound quickly in a simple frame like a diy 2×4 chair.
- Warped boards: choose dry, straight lumber and avoid boards with twists. If you must use one with slight warp, compensate by planing or jointing a straight edge first.
- Glue squeeze-out: wipe excess glue promptly to prevent uneven joints and messy finishes. Use clamps to keep joints tight during glue-up.
- Weak joints: ensure adequate screw length and pilot holes. Consider a glue-and-screw method for the best balance of speed and strength.
Take notes as you build. The diy 2×4 chair is a small project, but the discipline you develop—measuring twice, cutting once, finishing cleanly—will translate to bigger projects in the future.
Variations and upgrades to customize your chair
You don’t have to stop with a simple seat. Here are beginner-friendly tweaks that add personality and comfort without overcomplicating the build:
- Add a backrest: a low, angled backrest can be made from a couple of 2×4 slats or a single curved plywood back for comfort.
- Incorporate arms: short arms can be added with hinged or fixed supports. Keep the front legs parallel for a clean look.
- Upgrade to a beveled edge: slightly bevel the seat edges for a softer touch and safer corners.
- Experiment with finishes: water-based poly for easy cleanup, or a rich stain that highlights the grain of the wood.
As you gain confidence, you can reuse the same frame concept to build variations such as a small stool or a compact accent chair. The core skills—plan, cut, join, finish—remain the same, and that consistency is what makes the diy 2×4 chair a valuable stepping stone.
Resources for further learning
Want more beginner-friendly guidance and project ideas? The following resources can help you expand your woodworking journey. The first link is a practical guide to quick beginner-friendly woodworking projects, ideal for building confidence with small, fast projects. The second link walks you through beginner plans in a step-by-step format so you can start your next project with clarity.
Fast and Easy Wood Projects: A Practical Guide to Quick Beginner-Friendly DIY Woodworking
For ongoing access to a broad library of plans and ideas, many hobbyists also explore curated bundles that help with project planning, family-friendly builds, and more intricate designs. If you’re ready to go deeper, there’s a comprehensive resource hub that compiles essential plans and tutorials for beginners and beyond.
How Ted’s Woodworking can help you scale your woodworking journey
If you’re looking to expand beyond the diy 2×4 chair, a well-curated collection of woodworking plans can save you time and reduce decision fatigue. One popular option that beginner and intermediate woodworkers often explore is Ted’s Woodworking, which offers a broad assortment of project plans, step-by-step instructions, and material lists. This kind of resource can complement your hands-on practice by providing proven layouts, cut lists, and project techniques that you can apply to future builds. Ted’s Woodworking can be a valuable part of a long-term plan for building confidence and consistency in your shop.
Remember, the goal is to balance practice with learning. The diy 2×4 chair is a perfect starting point, and as you become more comfortable with measurements and joins, you’ll naturally want more ambitious projects. If you want a structured path, you may also explore additional guides and beginner-friendly plans to ensure you progress steadily while keeping projects enjoyable and achievable.
Conclusion
A diy 2×4 chair proves that you don’t need fancy materials or complex joinery to create a sturdy, useful piece of furniture. With careful planning, accurate cuts, and a clean finish, you can complete a chair that looks great in a dining room, patio, or workbench corner. The real value of this project is in the skill-building—learning to read a cut list, mark a line, clamp a joint, and apply a finish. Those are the building blocks for countless future builds, from simple stools to more ambitious furniture pieces.
If you’re eager to continue growing your woodworking chops, explore beginner-friendly guides and consider expanding your toolkit with curated plans. Whether you’re interested in quick, beginner-friendly projects or step-by-step instruction for more ambitious builds, there are resources that can accelerate your progress while keeping you motivated and excited to create.