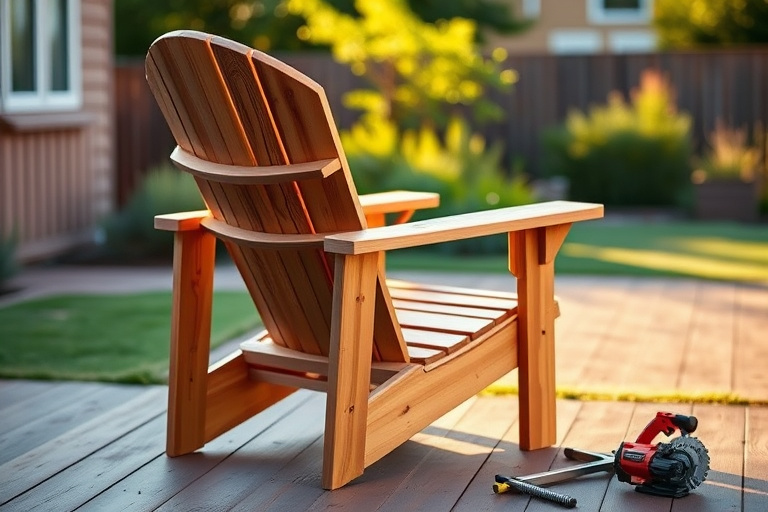
Introduction to diy adirondack chair plans
Outdoor living is more inviting when you can relax in a chair that blends comfort, durability, and timeless style. diy adirondack chair plans make it possible for creative homeowners and hobby woodworkers to build a sturdy, comfortable seating option that withstands sun, rain, and seasonal weather changes. The Adirondack chair has earned its place as a staple of porches and decks because of its generous seat, roomy armrests, and supportive back angle that encourages long, lazy afternoons. By following well-structured diy adirondack chair plans, you gain not only a practical piece of furniture but also a solid foundation in essential woodworking techniques that you can apply to future projects.
When you approach a project like this, the goal is to choose plans that balance comfort, ease of assembly, material efficiency, and durability. The right set of plans will give you precise cut lists, clear assembly steps, and a finish plan that protects wood from sun and moisture. If you’re brand new to woodworking, a straightforward plan can be your best ally. If you’re more experienced, you can use diy adirondack chair plans as a base and customize dimensions, angles, and wood species to suit your space and climate.
For readers who want to explore related approaches to backyard seating and beginner-friendly projects, these resources can be helpful: 2 x 4 chair plans showcase straightforward joinery and cutting lists that help you build a sturdy chair quickly, while Woodshop Crafts: Mastering DIY woodworking for creative, durable projects dives into broader techniques that can elevate any outdoor furniture build. If you’re curious about how a well-structured plan translates to real results, these internal resources can complement your diy adirondack chair plans journey.
For builders who want a curated catalog of detailed patterns and templates, Ted’s Woodworking offers extensive plan sets, including Adirondack-style seating. You can explore the catalog here: Ted’s Woodworking. It’s a practical way to compare plan clarity, cut lists, and recommended finishes as you decide which plan or combination of plans best fits your project goals.
Choosing the right plan for your space
Choosing the right diy adirondack chair plans starts with understanding your space, climate, and woodworking experience. The classic Adirondack chair features a slanted back, a broad seat, and an ergonomic tilt that supports relaxed lounging. However, variations exist, and a good plan will help you tailor the chair to your needs without sacrificing comfort or stability.
Comfort, size, and back angle
Comfort often comes down to seat depth, seat height, and the back angle. Standard Adirondack chairs typically favor a back angle around 15 to 20 degrees from vertical, with a seat depth that allows a comfortable knee bend while keeping the legs from feeling cramped. If you’re building for a taller family or a space with behind-the-chair cushions, look for diy adirondack chair plans that offer adjustable or upgradeable back support and optional leg extensions. A well-drafted plan will include nominal dimensions so you can scale the chair up or down without losing proportion. If you want a cozier look, consider plans that offer a slightly deeper seat and a taller back; for a more compact balcony or porch, search for plans with a shallower seat and a shorter back while maintaining the same ergonomic angle.
Material considerations
Durability begins with wood choice. Cedar, treated pine, and white oak are common options for outdoor furniture. Cedar resists decay naturally and takes finishes well, but it can be pricier and softer than other woods. Treated pine is affordable and widely available but may require more maintenance over time. White oak offers strength and weather resistance but can be heavier and more challenging to work with for beginners. In your diy adirondack chair plans, you’ll see recommendations for piece thickness, typically around 1×4 or 1×6 stock for slats and 2×4 or 2×6 components for the frame, depending on your design. Plan for outdoor-grade fasteners and, if possible, pocket-hole joinery or simple butt joints with glue and clamps. Always account for a finish that seals against UV rays and moisture; the plan should include guidance on sandpaper grits and a multi-step finish schedule to maximize longevity.
Step-by-step build guide
With the right plan in hand, the build starts with careful preparation. Your diy adirondack chair plans should provide a complete cut list and a step-by-step sequence. Following these steps closely minimizes errors and ensures that the final chair sits evenly and feels solid when you lean back.
Preparing cut lists and tools
Start by identifying all boards and slats required. A precise cut list saves material and time. Gather essential tools: a miter saw, a circular saw or table saw, clamps, a drill/driver, wood glue, and a finish applicator suitable for outdoor wood. If your diy adirondack chair plans include curved back slats, you’ll also want a rasp or Rigid sanding block for shaping. A quality plan will specify board widths, thicknesses, and the quantity of each piece. If you’re new to this, you can check beginner-friendly references like the linked resources earlier to build confidence with basic cuts and joints. Remember to predrill screw holes to reduce wood splitting and to keep your joints tight over time. Clear cutting diagrams from the plan are invaluable for ensuring every piece aligns as you assemble.
Assembling the frame
Begin with the base frame: two side rails, front and rear crosspieces, and a seat support rail. The alignment and squaring of the frame are critical for a comfortable chair and stable seating. Use glue and fasteners to secure joints, then clamp while the glue cures. Some diy adirondack chair plans prefer pocket-hole joinery for a clean look; others rely on traditional butt joints reinforced with screws. Regardless of the method, take time to ensure the frame sits perfectly flat on your work surface before moving to the next step. A level surface helps the backrest align properly and prevents wobbly seating over the long term.
Shaping the back and seat
The backrest slats should follow the ergonomic curve of the chair and maintain even gaps for ventilation and aesthetics. Depending on your plan, you’ll cut multiple slats with slight bevels on the bottom edge to nest against the back supports and distribute weight evenly. The seat slats should be evenly spaced and securely fastened to the frame. If your diy adirondack chair plans call for rounded or chamfered edges, take care during routing or sanding to avoid creating heat and tear-out on the wood. Sand through progressively finer grits, ending with 180–220 grit for a smooth, ready-to-finish surface. A well-documented plan will include precise angles for the back slats and seat spacing to ensure both comfort and air flow.
Finishing touches
After assembly, the surface should be free of any glue squeeze-out and dust. Apply a high-quality outdoor finish, such as a penetrating oil or a sealant with UV protection, following the manufacturer’s directions. If your climate is particularly rainy or sunny, consider a finish that offers extra durability against moisture and sun exposure. A good plan will specify whether to apply one coat or multiple coats and the recommended drying times between coats. Sand lightly between coats to maintain a smooth surface. The goal is to create a protective barrier that doesn’t crack or peel with weather cycles. If you want a classic look, a natural wood tone with a satin finish can highlight the grain; for a pop of color, an exterior-grade stain in a muted shade can refresh your outdoor aesthetic without overpowering the wood’s natural beauty.
Finishes and weatherproofing
Weatherproofing is a key step in any outdoor project. The plan should guide you through choosing a finish that suits your wood choice and climate. Cedar often takes finishes beautifully, but even cedar benefits from UV protection and a moisture barrier. If you live in a high-humidity area or near the coast, you may want a marine-grade varnish or an exterior polyurethane with excellent water resistance. Reapplication intervals vary by product, but a typical regimen includes a fresh coat every 1–2 years, with spot fixes as needed. Sand lightly between coats and ensure surfaces are clean before applying the next layer. Poorly finished chairs are more prone to warping, cracking, and color fading, especially in direct sun. Your diy adirondack chair plans should include a recommended maintenance plan and the best order of finishing steps to maximize longevity.
Tools and safety
Woodworking safety should be integrated into every project, and a good plan reminds you to wear eye protection, hearing protection, and dust masks when appropriate. Keep your workspace organized to prevent accidents and lost hardware. If you’re new to tools, start with the basic set described earlier and practice on scrap wood before committing to your chair parts. As you gain experience, you’ll develop a quicker rhythm for measuring, cutting, and assembling without sacrificing accuracy. The right diy adirondack chair plans will offer clear visual guides and dimensioned drawings that help you stay on track from start to finish.
Where to find reliable diy adirondack chair plans
When evaluating plans, look for clear cut lists, a step-by-step build sequence, and high-quality diagrams showing how pieces fit together. A reputable plan will also indicate recommended wood types, finishes, and hardware. If you’re shopping around, you can start with the two internal references below to compare how different plans present essential information and to gauge whether you prefer traditional joinery or modern fasteners. 2-x-4 chair plans illustrate straightforward routing and cutting sequences that work well for beginners, while Woodshop Crafts: Mastering DIY woodworking for creative, durable projects offers broader techniques that can elevate your overall approach to outdoor furniture. Remember, the goal is a plan you can follow with confidence, not just a rough sketch.
Ted’s Woodworking and similar resources
For readers who want a broader catalog of quality patterns and templates, Ted’s Woodworking provides a structured library of plans including Adirondack-style seating. It can be a useful reference if you’re looking to compare layout, joinery options, and finish recommendations across multiple plan sets. You can explore their catalog via this affiliate link: Ted’s Woodworking. Using a reputable plan library can help you expand your diy adirondack chair plans into other outdoor projects with a consistent approach to construction quality and finishes.
Keeping your project durable and safe
Quality execution matters as much as a good plan. Adopting a systematic workflow—measure twice, cut once; dry-fit pieces; check for square; secure all joints with appropriate fasteners—will pay dividends in the chair’s long-term performance. Before applying finishes, ensure all dust is removed and all surfaces are clean. A protective finish can dramatically extend the life of the chair, especially in harsh sun or frequent rain. If you plan to leave the chair uncovered during winter months, consider a storage solution to protect wood from moisture. A properly finished diy adirondack chair can remain a centerpiece for years, and the process of building it, guided by a solid plan, becomes a satisfying learning journey that you can apply to future outdoor projects.
FAQ
Q: What wood is best for outdoor Adirondack chairs?
A: Common options include cedar, treated pine, and white oak. Each has pros and cons in terms of cost, weight, and weather resistance. Always use outdoor-grade hardware and finishes for longevity.
Q: How long does it take to build an Adirondack chair with a good plan?
A: For a beginner, a solid plan can take a weekend or two, including sanding and finishing. More experienced woodworkers may complete the project in a few days, depending on drying times for finishes and any customizations.
Q: Can I scale diy adirondack chair plans for a taller person?
A: Yes, many plans provide clear guidance on how to adjust seat depth, back height, and armrest length while preserving the chair’s proportions. Look for plans that include alternate sizes or an adjustable back option.
Conclusion
With the right diy adirondack chair plans, you can create a durable outdoor seating solution that fits your space, climate, and personal style. The process teaches practical woodworking skills, from precise measuring and cutting to careful assembly and weatherproof finishing. Whether you follow a classic, proven design or customize dimensions to suit a narrow balcony or a sunroom corner, the chair you build will reflect your effort and attention to detail. Remember to evaluate plans for clarity, cut lists, and finish recommendations, and consider using a trusted catalog like Ted’s Woodworking to broaden your project library without sacrificing quality. Most importantly, enjoy the learning journey and the many evenings of relaxation your new Adirondack chair will bring to your outdoor living space.