Thinking about a diy loft bed is more than a DIY project—it’s a smart approach to unlocking usable space in a small room. A well-designed diy loft bed creates a cozy sleeping nook while freeing up floor space for a desk, a reading corner, or storage. If you’re new to woodworking or you’re upgrading a child’s bedroom or a tiny apartment, a loft bed can be a game changer. In this guide, you’ll learn how to plan, build, and finish a durable, safe diy loft bed that lasts for years. You’ll also discover practical ways to add a desk, shelves, and soft lighting beneath the elevated sleeping area, turning a cluttered corner into a productive zone. And if you’re curious about expanding your toolkit, there are excellent resources like Ted’s Woodworking—a curated collection of project plans you can reference for future builds.
Planning a diy loft bed: dimensions, safety, and design choices
Before you reach for the saw, start with a thoughtful plan. The exact phrase diy loft bed is not just about a bed on a platform—it’s about a design that respects room dimensions, ceiling height, and your daily use of the space. Measure the room’s length, width, and, crucially, the ceiling height so that you aren’t surprised by a head clearance issue when you stand up from the bed. A common guideline is to leave at least 36 to 40 inches of vertical clearance under the top bunk for a desk or play area, depending on your tallest user. If you want to explore broader woodworking ideas, you might check woodworking projects for seniors, which offers practical, safe, and rewarding project approaches that translate well to a diy loft bed framework.
Next, consider ladder style and guard rails. A sturdy ladder with wide steps, secure mounting to the bed frame, and a guard-rail height that protects a child from rolling off the bed are essential safety details. If your plan is to use the loft bed in a kid’s room, opt for rounded edges, non-slip paint or finish, and a finish that resists scuffs. If you’re incorporating a work desk or a reading nook beneath the bed, plan for about 28–32 inches of headroom at the desk and a clear path to the ladder. The goal is to keep the transition between sleeping and working areas seamless and safe.
For readers focusing on comprehensive plans and a faster route to a finished project, check out downloadable woodworking plans, a guide to productive planning and efficient project execution. It’s a smart companion resource as you prepare to build a diy loft bed that’s both beautiful and durable.
Step-by-step building guide for a diy loft bed
Now that you’ve outlined the design, it’s time to dive into the build. A successful diy loft bed relies on solid joinery, clean material choices, and careful finishing. Start with a simple, sturdy frame using pine, poplar, or light hardwood. If you’re aiming for a heavier bed with longer legs, consider a thicker side rail and cross-bracing to resist racking over years of use. Outline a cut list and a sequence for assembly to prevent miscuts and ensure everything lines up correctly.
Materials, tools, and safety gear
A practical diy loft bed build typically uses 2x4s for the frame, 1x lumber for slats, wood screws, wood glue, and a finish of your choice (waterbased polyurethane or a low-VOC stain). You’ll also want a stud finder, a drill/driver, a miter saw or circular saw, clamps, a square, and a tape measure. Personal safety matters: wear safety glasses, hearing protection, and a dust mask when cutting. Take your time with measurement checks—measure twice, cut once—and always pre-drill pilot holes to minimize splitting. If you’re new to joinery, you can simplify the process with straightforward butt joints and pocket holes for added strength without complicating the build.
For inspiration and reliable techniques, many builders turn to premium plan resources. One notable option is Ted’s Woodworking, which offers a wide library of project plans you can reference for future builds. While you’re exploring, don’t miss the chance to adapt a loft-bed design to your needs—perhaps adding a small drawer under the desk for art supplies or a filing shelf for school materials.
Cutting, assembling, and joinery tips
Begin with the bed frame perimeter. Use a straightedge and square to ensure the top edges align. When attaching cross supports for the mattress slats, space them evenly (roughly 2–3 inches apart is typical for a bunk-style support). If you plan to add a desk beneath, install the desk supports in advance, ensuring that they won’t interfere with the bed’s legs or the ladder’s rungs. For the ladder, consider a loose standoff or a fixed side rail with wide, rounded steps for safety. Pre-drill and countersink holes to create clean, secure joints. Remember to seal all raw edges if you’re using pine or other soft woods to improve durability and reduce splintering over time.
Finishing touches matter as much as framing. Use a low-VOC finish or a water-based polyurethane to keep indoor air quality high. If you want a warm, natural look, a clear finish that enhances the wood grain works well with most bedrooms. For a more decorative approach, you can apply a soft whitewash to the rails or paint the guard rails in a color that coordinates with the room’s decor. The key is to protect surfaces that will see frequent contact without making the finish too glossy, which can show fingerprints and scuffs more readily in a child’s room.
Finishing, sealing, and safety checks
After finishing, let the project cure fully before putting a mattress on top. Then perform a thorough safety check: inspect for loose screws, wobble in the legs, and any sharp edges or splinters. A simple test is to push against all sides and gently wiggle the frame to catch loosened joints or misaligned boards. If you hear creaks or see shifting, disassemble and re-tighten. Finally, if you install a desk or shelf under the loft, ensure there’s enough clearance to use those features without head bumps or interference with the ladder. A common best practice is to use hardware with locking washers or thread-locking compound to reduce gradual loosening over time.
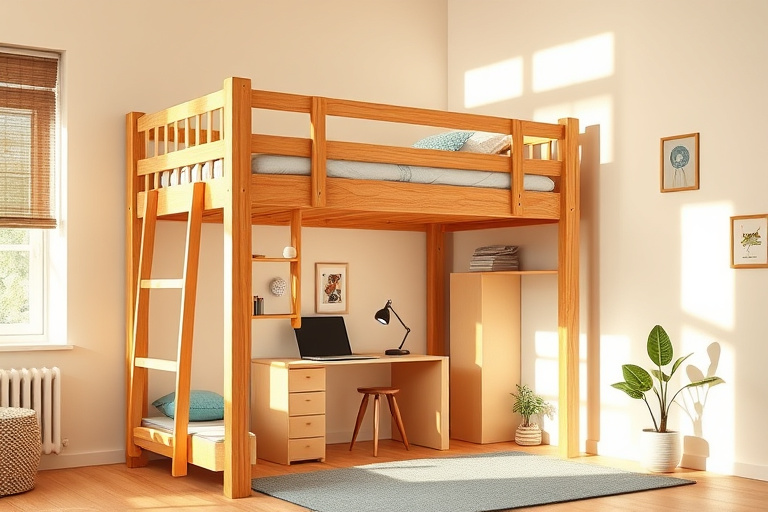
Under-loft functionality: desks, storage, and lighting ideas
The area beneath a diy loft bed is a blank canvas. A compact desk creates a dedicated study zone, while built-in shelves and drawers offer smart storage for notebooks, art supplies, and gaming gear. Think modular and scalable: a small desk with a couple of shelves on casters can be rearranged as needs change. Lighting is essential to make the workspace inviting—consider a flexible arm lamp or LED strip lighting along the underside of the loft. A soft night-light near the ladder can help midnight trips to the bathroom without a bright overhead light disturbing sleep.
Integrating a compact desk and shelves
Design the desk to fit exactly beneath the loft without encroaching on the ladder’s footprint. Use a simple rectangular desk top with slim legs or a wall-mounted desk to maximize legroom. If space is extremely tight, mount a floating shelf for a laptop or textbooks and use a small rolling cart to hold supplies. With a diy loft bed, you can optimize the vertical space while keeping the area underneath accessible for daily use.
Lighting, power, and cable management
Plan for outlets near the desk and bed—ideally two outlets to handle a lamp, a charging station, and a small fan for airflow. Cable management can be simple: use adhesive cable clips along the desk edge and a cable raceway along the wall to keep cords out of the way. A warm, even lighting scheme will reduce eye strain during late-night study sessions and help create a cozy, inviting space for reading before bed.
Finding great plans and woodworking resources
While a diy loft bed is a manageable weekend project for skilled DIYers, having a few solid plans can reduce mistakes and speed up the process. Resources like Ted’s Woodworking provide comprehensive project collections that can inspire future builds—especially if you’re planning more furniture for kids’ rooms or multi-use spaces. Paired with careful measurements and a good cut list, these plans help you stay on track and avoid common stumbling blocks.
For readers who want broader, senior-friendly project guides as part of their woodworking journey, the senior-focused guide mentioned earlier is a helpful companion: woodworking projects for seniors. It emphasizes safety practices, easy-to-follow steps, and rewarding outcomes that translate well to a diy loft bed project. Additionally, if you’re after a deeper dive into efficient planning, the guide to downloadable woodworking plans can help you streamline your approach and reduce build time without sacrificing quality.
Where to find more detailed plans and guides
If you’re ready to level up, explore premium and downloadable plan resources. These guides can be especially useful when you want to reproduce a similar loft-bed arrangement in multiple rooms or adapt the design for different ages. The combination of step-by-step instructions, detailed cut lists, and recommended hardware can prevent guesswork and increase the likelihood of a clean, durable finish. And because safety is paramount in a child’s room, always tailor the height, ladder spacing, and guard-rail design to the user’s age and abilities.
To keep your options open, you can reference the two internal resources mentioned earlier for broader context and dependable approaches to woodworking. The senior-friendly projects guide and the downloadable plans guide are excellent starting points for expanding your toolkit and staying organized as you take on new projects, including future diy loft bed iterations or related bedroom furniture builds.
Maintenance, safety considerations, and kid-proofing tips
Like any long-term furniture investment, a diy loft bed requires periodic inspection. Check for loose screws, worn finishes, and any movement in the frame after heavy use, especially if you have energetic sleepers or frequent rearrangement of the desk beneath. Re-tightening fasteners and reapplying sealant as needed can extend the life of the bed considerably. For households with small children, consider step-stools with non-slip feet and secure ladder attachments to prevent accidental detachment. If your loft bed is going to see daily use, a durable finish that resists moisture, fingerprints, and scuffs is a practical choice. Regular vacuuming and occasional wipe-downs will keep dust levels down and protect the wood’s surface from grime, especially around the desk area where pencils and markers tend to accumulate.
Conclusion and next steps
A diy loft bed is more than a clever space-saving solution; it’s a creative platform that grows with your family. With careful planning, precise cutting, and thoughtful finishing, you can build a loft bed that is safe, attractive, and durable. The under-loft workspace you create will become a dedicated zone for study, art, and organization, helping kids develop good habits while preserving precious floor space. If you’re just starting, gather your measurements, sketch a rough design, and begin with a simple frame to test fit and ergonomics. As you gain confidence, you can add features like a fold-down desk, built-in shelves, or hidden storage compartments to maximize functionality. And when you’re ready for more, resources like Ted’s Woodworking can provide additional ideas and plans for future projects that complement your loft-bed build.
Remember: the best diy loft bed projects balance creativity with careful safety planning. Start with accurate measurements, invest in quality lumber, and finish with a protective, kid-friendly coating. With patience and attention to detail, you’ll create a space that serves as a restful retreat at night and a productive workspace by day—proof that thoughtful design can transform even the smallest rooms into comfortable, organized havens.