Embarking on a project to craft your own diy wood adirondack chairs is a rewarding way to upgrade your outdoor living space. These iconic chairs blend timeless design with practical comfort, inviting you to linger on warm evenings, share conversations with friends, or simply enjoy a quiet book under a shade tree. This guide walks you through the nitty-gritty of planning, building, finishing, and maintaining your own set of Adirondack chairs, using solid woodworking techniques and durable materials that stand up to the elements. Along the way, you’ll discover practical tips, recommended tools, and resources that help you stay on track, whether you’re a seasoned woodworker or just starting out.
Pro tip: If you’re looking for plan libraries and curated techniques, consider resources that offer comprehensive plans and project ideas tailored to outdoor furniture. A robust plan library can save time and reduce guesswork as you translate a sketch into a sturdy finished chair.
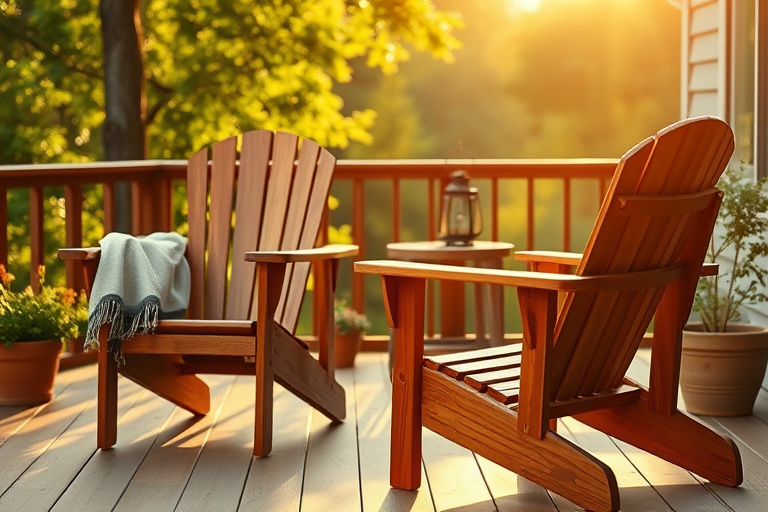
Why DIY Wood Adirondack Chairs Matter
Comfort, Style, and Outdoor Living
The diy wood adirondack chairs style is instantly recognizable: broad slatted back, wide seat, sculpted armrests, and a gently reclined posture that invites relaxation. Building your own chairs gives you control over dimensions to fit your space, the wood choice for durability, and the finish that withstands sun, rain, and seasonal temperature swings. When you tailor height, seat depth, and back angle, you create a seating arrangement that feels custom-made for your porch, deck, or lakeside dock.
Durability and Wood Choices
Planning Your Adirondack Chair Project
Sizing, Spacing, and Layout
Begin by measuring your outdoor space and noting sightlines with sunlight patterns throughout the day. Adirondack chairs typically have a tall back and a wide seat, which is comfortable for most adults but may overwhelm tight porches. Plan for a comfortable aisle width between chairs and ensure there’s space to slide cushions in and out. Write down target dimensions for seat width, seat depth, back height, and armrest height. A well-planned layout reduces surprises during assembly and helps you select the right lumber stock in one go.
Wood Types for Outdoor Use
Consider woods that age gracefully outdoors. Cedar and redwood offer natural resistance to decay and insects, while teak provides superior durability if you want to maximize longevity with less maintenance. If you choose a softwood like pine or fir for budget reasons, pairing it with a solvent-based or high-quality exterior finish can dramatically extend its life. Always plan for a weatherproof sealant and a maintenance schedule to refresh protection every 1-3 years depending on the climate.
Finishes and Fasteners to Consider
Avoid basic nails in favor of corrosion-resistant screws for long-term stability. Stainless steel or brass hardware minimizes rust marks that can mar the finish. For finishes, you’ll typically choose an exterior-grade stain or paint plus a sealant. Stains can highlight the wood grain and provide UV protection, while paints offer bold color choices. Regardless of your finish, apply a protective sealant to all faces, ends, and cut edges to reduce moisture absorption.
Tools, Materials, and Resources
Essential Tools for the Project
To build durable diy wood adirondack chairs, you’ll need a solid set of basics:
- Table saw or circular saw with a guide for straight cuts
- Jigsaw or bandsaw for curved back slats
- Square, measuring tape, and marking gauge
- Drill/driver with a variety of bits
- Orbital sander or sanding blocks with repeated grits
- Clamps, screws, wood glue, and finishing supplies
Investing in a capable toolkit pays off in cleaner joints and a smoother finish. If you’re starting from scratch, a beginner-friendly tool kit can help you gain confidence as you tackle the project.
Materials List and Where to Source Them
Plan to buy lumber in lengths that minimize waste. For a standard two-chair setup, you’ll typically need boards for the legs, armrests, back slats, seat slats, and a few extra pieces for reinforcement. Don’t forget hardware: stainless screws, weatherproof glue, and corner braces if you want added rigidity. When shopping, consider pre-kilned stock to keep dimensions consistent. If you’re uncertain about wood certifications and treatment, consult local lumberyards or reputable suppliers that specialize in outdoor-grade timber.
Helpful Guides and Starter Resources
Whether you’re new to woodworking or looking to refine your technique, a solid starting point helps you stay on track. For a practical guide to crafting plans and projects that inspire, visit this wood projects guide. If you want confidence in your tool choices and basic operations, the woodworking tools starter kit is a great reference for a beginner who wants to build skills quickly.
Step-by-Step Build Guide
Cutting and Joints
Start with accurate templates or cutting patterns for the back slats, seat slats, legs, and armrests. A simple rabbet or dado joint can improve the chair’s stability where the back slats join the backrest frame. Label each piece as you cut to avoid confusion during assembly. A clean, square cut ensures even gaps and a professional finish after sanding.
Assembly and Mounting the Backrest
Assemble the backrest frame first, then attach multiple slats with even spacing. The angle of the back is a key element of comfort; a slight recline reduces fatigue. Use clamps to hold pieces while the glue sets, and reinforce joints with screws where appropriate. A dry-fit test before final assembly helps verify alignment and seating depth.
Sanding, Smoothing, and Finishing
Sand through grits from 120 to 220 for a smooth surface that accepts finishes evenly. Round sharp edges on corners to avoid snags and injuries. Finish coats should be applied per the product’s instructions, with light sanding between coats for a glassy, even appearance. Temperature and humidity affect finish drying times, so plan for a dry, well-ventilated workspace.
Cushion Compatibility and Comfort Tunings
Adirondack cushions elevate comfort and can transform the look of your chairs. Measure seat width and depth to choose cushions that fit properly, leaving room for armrests without crowding. If you’re making your own cushions, consider foam density and fabric durability for outdoor use. A simple approach is to start with low-profile cushions and adjust in subsequent builds as you refine your comfort preferences.
Finishing Touches and Maintenance
Stains, Sealants, and UV Protection
A topcoat that resists UV will keep colors vivid and prevent graying. Exterior-grade stains are forgiving, and sealants protect the wood from moisture that can cause swelling and warping. Reapply maintenance coats every 1-3 years depending on exposure. Regular inspection for hairline cracks or loosened joints helps catch issues early before they escalate.
Cleaning and Long-Term Care
Clean chairs with a mild soap solution and rinse with water, avoiding high-pressure jets that can drive moisture into joints. After cleaning, inspect hardware for rust and tighten screws as needed. For winter storage, store chairs in a dry, ventilated space or cover them with breathable furniture covers to prevent mold growth and surface cracking.
Enhancing Comfort with Accessories
Cushions, Arm Rests, and Footrests
Comfort is where Adirondack projects shine. High-quality cushions with fade-resistant fabric transform your seating experience. Consider adding a detachable footrest or a small side table to create a complete lounging setup. If you intend to host gatherings, a matching set of side tables and a weatherproof throw can elevate the entire outdoor living area.
Budgeting, Time Management, and Skill Building
Cost-Saving Tips and Project Timeline
To keep expenses in check, scale your project by starting with one chair and then expanding to a full set. Reuse cut-offs for small components, and source hardware in bulk to minimize per-piece costs. A realistic timeline—planning two to four days for a single chair with finishing, plus another day for a pair—helps you stay motivated without rushing quality. Remember, quality materials may cost more upfront, but they deliver longer life and lower maintenance over time.
Learning Resources to Accelerate Your Skills
Even the best plans benefit from practical tips and iteration. If you’re seeking a guided path, consider resources and communities that emphasize hands-on practice, measured feedback, and real-life project ideas. Regularly reviewing completed project galleries and step-by-step demonstrations can reinforce your technique and confidence with diy wood adirondack chairs.
Smart Ways to Access Ready-Made Plans
Ted’s Woodworking: A Plan Library for Outdoor Furniture
For builders who want a comprehensive set of ready-to-follow plans, a well-curated plan library can be a game changer. Ted’s Woodworking offers a broad collection of woodworking plans, including outdoor furniture, that help you translate ideas into precise cuts and robust assemblies. While browsing plans can spark inspiration, picking a few tested designs can accelerate your progress and improve consistency across your chair set. If you’re exploring plan options, you might explore a trusted library that covers Adirondack-style seating along with step-by-step assembly diagrams and material lists.
You can explore the plan library here: Ted’s Woodworking.
Practical Guide and Beginner Tools for Success
To complement plan-following with practical know-how, you may want to pair your build with targeted guides on crafts and tool handling. For a concise starter reference that aligns with the basic skills needed for diy wood adirondack chairs, check out the two resources mentioned earlier: the wood projects guide and the tools starter kit. Each of these sources provides accessible advice that helps you stay on track while learning essential woodworking techniques.
Real-World Inspiration and Troubleshooting
Common Pitfalls and Quick Fixes
New woodworkers often encounter issues with warping, misaligned joints, or finish problems. Warping can occur if wood is not properly dried or if boards are all seasoned in the same environment. Prevent misalignment by dry-fitting components before final assembly and using clamps to maintain consistent gaps. Finish issues, such as blotching on softwoods, can be mitigated by pre-staining or using a sealer before applying your final stain or paint. If you notice stubborn rushes on surfaces, a light pass with 220-grit sandpaper can rejuvenate the texture before resealing.
Quick Start Checklist and Final Thoughts
- Define your space and chair dimensions before buying lumber.
- Choose a durable wood suitable for your climate and budget.
- Gather essential tools and a solid finish plan to protect the wood.
- Consider starting with one chair to refine your technique and timing.
- Explore ready-made plans if you want a guided path or inspiration for variations.
Building a set of diy wood adirondack chairs is not just about the final product—it’s about the process of learning, building confidence, and creating outdoor seating that lasts. With careful planning, the right materials, and a few proven techniques, you’ll enjoy a comfortable retreat on your deck or patio for years to come. Whether you choose to pursue a self-directed build or supplement your efforts with a curated plan library, this project rewards patience, craftsmanship, and a commitment to quality finish work.
Ready to get started? Gather your lumber, pick a finish you love, and begin with a single chair. As your confidence grows, you can build more pieces that mirror the same design for a cohesive outdoor seating area that invites conversation, rest, and outdoor gatherings.