diy wood plans: The Ultimate Guide to Smart, Satisfying Woodworking Projects
Woodworking enthusiasts constantly chase that perfect balance between creativity and practicality. diy wood plans are the blueprint that make that balance possible, turning raw timber into sturdy furniture, useful storage, and decorative pieces. Whether you’re remodeling a room or building a weekend project, having reliable plans saves time, reduces waste, and elevates the final result. In this guide, you’ll learn what diy wood plans are, why they matter, how to choose the right ones, and how to integrate a robust plan library like Ted’s Woodworking into your workflow.
If you’re looking for specific, craft-ready examples, you can explore a practical project by checking out folding Muskoka chair plans. This resource demonstrates how a well-detailed plan translates into a durable outdoor seating solution. For broad strategy on turning ideas into real wood furniture, see furniture design blueprints, which covers concept-to-cut-list workflows that you can apply across many projects.
What are diy wood plans?
At its core, diy wood plans are a curated set of instructions for building something from wood. They typically include:
- Detailed drawings with dimensions and scale
- A cut list or bill of materials (BOM) to estimate required lumber and hardware
- Step-by-step assembly directions
- Methods and tips for faster or more accurate cuts, joints, and finishes
Having a plan minimizes guesswork. It helps you order exactly what you need, avoids rework, and ensures that each component fits with the next. For a growing woodworker, diy wood plans are not just one-off PDFs; they form a library you can draw from again and again, expanding your capabilities with every project.
Why diy wood plans matter for beginners and seasoned woodworkers
beginners benefit from clear, guided paths. A well-structured plan shows the sequence of operations, the exact fasteners, and the proper sanding steps to achieve a professional finish. For seasoned woodworkers, diy wood plans provide an efficient foundation that can be adapted to available materials or a specific space constraint. They also encourage consistency across multiple projects, making it easier to build a cohesive set of furniture or storage units for a room or home office.
Beyond the practical, diy wood plans promote safety. By laying out step-by-step procedures, including recommended drills, speeds, and clamping strategies, you reduce the risk of mistakes that could injure you or damage material. As you gain experience, you’ll learn to adjust plans for your tools, your shop layout, and your preferred joints without sacrificing alignment or strength.
How to choose the right diy wood plans
Choosing the right diy wood plans starts with a clear goal. Do you want a quick weekend project or a long-term build that requires more planning? Consider these factors:
- Skill level and experience: Look for plans labeled with beginner, intermediate, or advanced difficulty.
- Space and dimensions: Make sure the finished piece fits the intended room or outdoor area.
- Lumber options: Plans that specify common lumber sizes help you avoid specialty cuts or unusual stock.
- Hardware and finishing: Check whether plans include hardware lists and finish recommendations that suit your climate.
When in doubt, start with a simple project to validate your workflow. For example, a sturdy bookshelf or a small outdoor bench can be both satisfying and instructional while you build confidence for larger builds.
Reading cut lists and materials
A cut list is the backbone of any diy wood plan. It tells you exactly what size boards you need and how many pieces to cut from each board. The more detailed the cut list, the less material will go to waste. If a plan only lists rough dimensions, you’ll want to double-check by cross-referencing the assembly steps and the final bracket or joint locations. As you build your library, you’ll notice plans that provide a BOM with material grades, a labeling scheme, and even recommended supplier links—these features save time and prevent costly mistakes.
Understanding difficulty levels
Difficulty is not just about the number of parts; it’s about joinery, precision, and finish. A plan with simple butt joints and a laminated top can still be challenging if the finish requires a flawless surface. Conversely, a plan featuring a mortise-and-tenon joint can be approachable if the scope is modest. Look for plans that explain the rationale behind each joint choice and offer tips on achieving tight tolerances and clean lines. If you’re unsure, start with plans that describe multiple skill-building steps—these become reference points as you tackle more ambitious projects.
Project ideas and categories powered by diy wood plans
One of the greatest strengths of diy wood plans is their versatility. You can tailor them to your space, equipment, and time availability. Below are broad categories where well-structured plans shine, with examples of how you can adapt them to your home.
Outdoor furniture
Outdoor seating, planters, and deck furniture are highly practical and rewarding projects. Outdoor projects often require select weatherproof finishes and careful joinery to withstand the elements. A solid set of diy wood plans can guide you through choosing weather-resistant lumber (like cedar or treated pine), selecting rust-resistant hardware, and implementing simple maintenance routines. For a concrete example, you can explore folding outdoor seating plans, such as the Muskoka chair, by following a detailed guide like the one linked earlier. This kind of plan emphasizes foldable components, alignment, and the use of square stock that holds its shape over time.
Tip: If you’re planning to build multiple outdoor pieces, a cohesive plan library helps you reuse joints and stock sizing, reducing waste and simplifying shop setup. You can also use online references to expand your knowledge about outdoor woodworking projects and how to adapt them to your climate.
Indoor storage and shelving
Storage solutions are a staple in many homes. Diy wood plans for bookshelves, corner units, and modular storage systems give you practical results with clean aesthetics. These projects often benefit from thoughtful dimension choices to maximize wall space and maintain stability against tipping. When selecting plans for storage, look for clear exploded views that show how adjustable shelves align with vertical supports, and ensure there’s a straightforward process for square checks during assembly.
Small projects and decor
Small projects—such as picture frames, cutting boards, and valet trays—are excellent for practicing techniques without investing significant time or material. They’re perfect for testing new finishes or experimenting with different wood species. A well-chosen set of diy wood plans for small items can serve as a stepping-stone to larger builds, building confidence, and enabling you to create a personalized, cohesive set of home accents.
Essential tools, safety, and workspace setup
Having the right tools and a safe workspace is essential to getting the most from diy wood plans. Start with the basics: a solid workbench, measuring tools, a power drill/driver, a circular saw or miter saw, a jigsaw for curved cuts, and a dependable hand plane for finishing. A stable workholding system—such as clamps and a vise—helps you execute precise cuts and accurate joints. When dealing with plan-driven work, dust collection and hearing protection are not optional; they protect your health and improve your comfort during longer sessions. Always read safety notes within each plan carefully, and wear proper PPE when cutting, sanding, or finishing materials.
Ted’s Woodworking: expanding your plan library
For woodworkers who want a broader foundation of plans, Ted’s Woodworking offers an extensive library designed to broaden your project horizons. The catalog covers a wide range of styles and difficulties, from simple shelves to complex joinery projects. While exploring a diverse set of diy wood plans, many builders find that a consolidated resource can accelerate discovery and experimentation. If you’re exploring a wide variety of projects, you might consider pricing options that align with your budget and goal timeline, and then pair those plans with your existing diy wood plans for maximum versatility.
To explore Ted’s Woodworking in a way that complements your diy wood plans, you can check out their catalog here: Ted’s Woodworking. This resource is often used to supplement specific plan details, especially when you’re tackling a sequence of projects that share common joints, finishes, or stock requirements. Remember to compare the project scopes with your current skill level, and use Ted’s library to fill any gaps in your diy wood plans.
How to use Ted’s Woodworking with diy wood plans
Using Ted’s Woodworking alongside your existing diy wood plans helps you build a robust workflow. Start by identifying projects in Ted’s catalog that align with your current interests, then search your diy wood plans for complementary pieces that share lumber types, finishes, or joinery methods. For example, if you’re planning a bookshelf project from a diy wood plan, look for additional shelves or bookcase side panels in Ted’s Woodworking that you can adapt. The key is to maintain compatibility across plans—dimensions, hardware, and finishing sequences should harmonize so you don’t end up with mismatched components. This approach keeps your shop efficient and your projects cohesive across a room or a whole furniture suite.
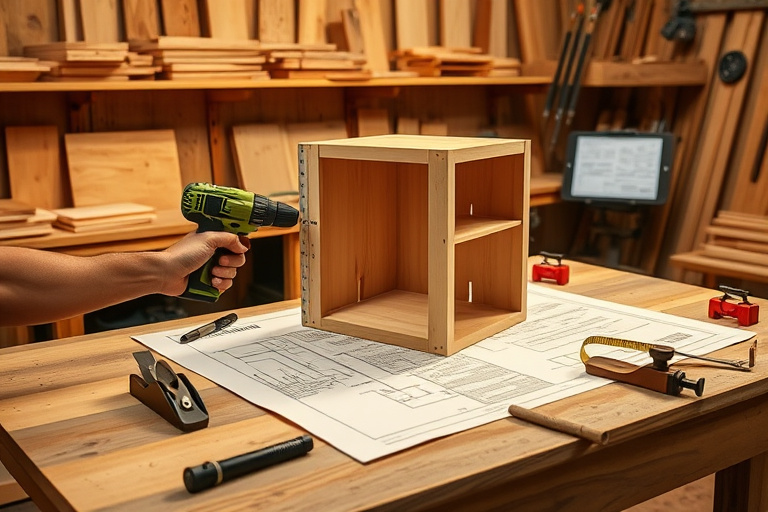
Step-by-step example: building a bookshelf from diy wood plans
Let’s walk through a practical example to illustrate how diy wood plans translate from theory into a tangible piece. This bookshelf project is intentionally simple to demonstrate planning, material selection, and execution with a few common tools.
- Choose the plan and gather materials. Select a diy wood plan for a bookshelf that matches your space and skill level. Create a materials list, including plywood or solid wood for the shelves, and a sturdy frame. Don’t forget shelf pins, nails, wood glue, and a finish such as polyurethane or a water-based topcoat.
- Prepare your shop and safety steps. Clear the workspace, set up clamps, and ensure dust collection is ready. Review the cut list and pre-cut your boards to rough sizes to minimize waste during final dimensioning.
- Make precise cuts and joints. Follow the plan’s cut list to dimension each piece. Use a straightedge or a track saw for long, accurate cuts. Assemble the frame with pocket screws or a traditional butt joint reinforced with wood glue and biscuits if your plan calls for them.
- Assemble shelves and back panel. With the frame square, attach the shelves at indicated heights. If your plan uses a back panel, assemble it separately and screw it to the back of the bookshelf to add rigidity.
- Finish and align. Sand in progressive grits, wipe clean, and apply your chosen finish. A dark-stain or clear coat can highlight the wood grain and protect the piece for years of use. Finally, check for level and adjust feet or shims if necessary.
This step-by-step example demonstrates how diy wood plans guide you from concept to finished product, reducing guesswork and ensuring structural integrity. As you gain experience, you’ll notice patterns in joint types, cut scheduling, and finish approaches that you can apply to new projects with minimal rework.
Leveraging internal resources for better outcomes
Two valuable internal resources can complement your diy wood plans by providing specialized guidance and broader context:
Folding Muskoka chair plans for outdoor seating
Outdoor seating is a popular project that showcases how well-thought-out plans translate into durable, comfortable furniture. The folding Muskoka chair plans provide a blueprint for a compact, foldable design that can be stored easily without sacrificing comfort. If you’re considering outdoor projects, using a plan like this helps you understand how to design joints and braces that tolerate weather exposure, while keeping the folding mechanism reliable over many seasons. See the detailed guide here: folding Muskoka chair plans.
Furniture design blueprints for turning ideas into real wood furniture
For builders who want to translate a concept into a working piece with real dimensions, the furniture design blueprints resource is especially useful. It explains how to move from rough sketches to precise specifications, including joinery considerations, material selection, and finish strategies. This approach aligns perfectly with diy wood plans, enabling you to scale ideas into fully realized furniture. Explore the essential guide here: furniture design blueprints.
FAQ and practical tips
Q: How many diy wood plans should I start with if I’m new to woodworking?
A: Start with 2-3 beginner-friendly projects that cover basic joints and finishes. Build your confidence and gradually add more complex plans as you grow. Q: Are diy wood plans compatible with Ted’s Woodworking designs?
A: Yes. Use Ted’s Woodworking to broaden your plan library and then integrate those ideas into your existing diy wood plans, watching for shared lumber types and joint methods to maintain consistency. Q: How do I avoid wasting material when following a plan?
A: Double-check your cut list before purchasing materials, measure twice, then cut once. If your plan includes a layout diagram, dry-fit pieces before final assembly to ensure everything aligns properly. Finally, consider purchasing extra stock for practice cuts to reduce the risk of damaging project pieces.
Conclusion
diy wood plans empower woodworkers at every level to transform imagination into durable, beautiful pieces. By selecting well-structured plans, understanding materials and joints, and leveraging a broader plan library like Ted’s Woodworking, you can accelerate your progress while maintaining high standards for accuracy and finish. Remember to couple detailed plans with careful shop setup and safety practices, and your projects will become more consistent, efficient, and enjoyable. As you continue to build, you’ll discover that these plans aren’t just instructions—they’re a learning pathway that evolves with your growing skill set.