Diy wood projects for beginners: The ultimate starter guide to build skills, confidence, and real things you can use
If you’ve ever considered a hands-on hobby that rewards patience, precision, and a tangible sense of accomplishment, you’re not alone. diy wood projects for beginners have become a popular gateway into the world of woodworking, offering a low-stakes way to learn, practice, and actually end up with something useful. This guide walks you through practical first steps, safety basics, planning strategies, and beginner-friendly project ideas that build momentum without overwhelming you.
What ‘diy wood projects for beginners’ means and why it matters
At its core, diy wood projects for beginners are small, forgiving tasks that teach fundamental skills—measuring, cutting, sanding, joinery, alignment, and finishing—without requiring advanced machinery or decades of experience. The goal is to create a positive feedback loop: you complete something you can use, you see steady progress, and you gain the confidence to tackle more ambitious projects. This approach is ideal for developing a practical workflow you can repeat across many projects.
Starting with beginner-friendly projects helps you learn tools and technique in a controlled environment. It also reduces the risk of injuries or costly mistakes. As you gain familiarity with hand tools like a bevel gauge, square, and chisel, plus safe uses of a power drill and saw, your capacity expands. In turn, you can plan more intricate builds, experiment with different finishes, and even customize plans to fit your space.
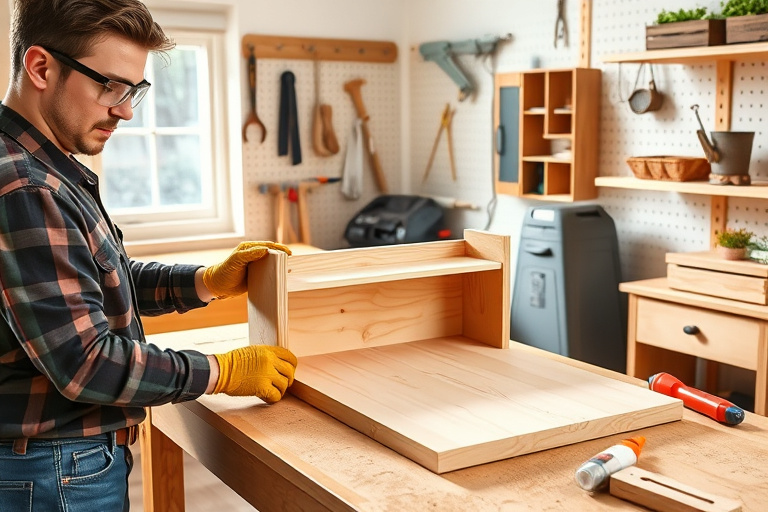
Essential safety and tool setup for beginners
Safety first: PPE and workspace setup
Before you cut a piece of wood, establish a clean, well-lit workspace. A stable workbench, adequate ventilation, a dust mask or respirator when sanding, eye protection, and hearing protection form the baseline for safe practice. Remember to secure your stock with clamps and keep blades sharp—sharp tools are safer because they require less force and stay on the line you mark.
Basic tools you need to start
For many diy wood projects for beginners, you don’t need a huge tool collection. Start with a few essential items: a quality tape measure, a square or combination square, a pencil for marking, a handsaw or miter saw, a drill/driver, chisels, clamps, sandpaper, and a basic router or router bit set if available. As you gain confidence, you can gradually add a few more specialty tools, but most starter projects can be completed with this core kit.
Planning your first project
How to choose a beginner-friendly project
Choosing the right project is critical. Look for plans with clear cut lists, simple joinery (like butt joints, screws, or pocket holes), and straightforward finishing steps. A well-documented plan reduces decision fatigue and helps you stay on track. When you pick a project, match it to your space, your current skill level, and the tools you already own. A small wall shelf, a bird feeder, or a planter box are classic jumping-off points that yield quick wins and tangible results.
One practical path is to explore curated resources that guide you toward beginner-friendly projects and safe, efficient workflows. For a broader overview on building skills and selecting good projects, you can check a complete practical guide to DIY woodworking success, which provides a structured approach to practice and growth: this resource.
The Adirondack chair pathway: links and plans with Ted’s Woodworking
Another highly popular beginner project is the Adirondack chair. It’s a forgiving project with chunky components, accessible joinery, and a finished result that’s both practical and stylish. If you’re looking for printable plans, there are detailed Adirondack chair plans PDFs designed for DIY builders that work well with libraries like Ted’s Woodworking. Learn from dependable guides and use the right plans to stay aligned with your space and skill level: Printable Adirondack Chair Plans PDF for DIY Builders with Ted’s Woodworking.
Step-by-step roadmap for your first project
Example project: Simple wall shelf with measurements and cut list
Let’s walk through a straightforward starter project: a simple wall shelf. This project introduces basic cuts, shelf supports, and a clean finishing touch. Materials can be kept minimal—softwood boards (like pine) at a modest thickness, a couple of shelf brackets, sandpaper, wood glue, and a clear finish. A typical cut list might include two 1×6 boards for the shelf, two 1×2 boards for front trim, and a couple of short pieces for brackets. Create a cutting diagram, mark your measurements with a square, and proceed with careful, steady cuts. Then assemble with glue and screws, sand until smooth, and apply a protective finish that enhances the wood’s natural color.
As you progress, you can vary the design—make the shelf deeper for a heavier load or add decorative elements like small appliques or a contrasting stain. Each variation teaches you new skills (like edge joining or layering finishes) without sacrificing your confidence on the first try.
Project variations: small bird feeder and planter box
To broaden your skill set, consider two more beginner-friendly projects: a small bird feeder and a planter box. A bird feeder teaches you precise cutting for delicate edges and careful assembly to ensure durability against the elements. A planter box introduces you to box joints or simple butt joints, bottom recesses, and drainage considerations. Both projects reinforce measurement discipline, kerf awareness, and finishing technique, and both can be completed with basic tools and a small stock of stock boards.
How to scale up without getting overwhelmed
Size, grain, and finishing considerations
As your comfort level grows, you’ll be tempted to tackle larger pieces. Start by gradually increasing the project size while staying within a repeatable process: accurate measurement, dry-fit before glue, and a deliberate finishing plan. Consider the grain direction of your boards and how it will look after staining or painting. Practical finishing tips include sanding with progressively finer grits, wiping off dust between coats, and choosing finishes (oil, varnish, polyurethane) that suit the wood species and home environment.
Keeping a simple project journal and checklist
Documenting your journey accelerates learning. Create a simple project journal where you record measurements, tools used, mistakes, and what you’d do differently next time. A quick checklist for each project can include: stock prep, cut plan, joinery method, alignment checks, sanding stages, and finishing schedule. This habit not only reinforces learning but also creates a handy reference for future builds.
How Ted’s Woodworking can accelerate your learning curve
What you get with Ted’s Woodworking
Ted’s Woodworking is a popular library of project plans that many hobbyists turn to when they want reliable, detailed instructions. While you don’t need it to start with diy wood projects for beginners, it can provide a curated set of projects, clear cut lists, and organized steps that help you scale up more quickly. If you’re curious, exploring Ted’s Woodworking can broaden your library of ideas and provide templates you can adapt to your own space.
How to pick the right plan and use it safely
When selecting plans, look for well-illustrated diagrams, exact cut lists, recommended stock grades, and notes about finishing. A good plan will also include tolerance guidelines and safety reminders for each step. Treat any plan as a starting point: adjust sizes to fit your space, substitute different woods if needed, and always prioritize safe assembly practices. The process of choosing the right plan becomes a skill in itself, and with time, you’ll confidently pick the best plan for any given project.
Practical resources and ongoing learning
Internal reference: complete practical guide to DIY woodworking success
For a broader, structured approach to mastering woodworking skills, consult the practical guide to DIY woodworking success. It helps you build a learning path that goes beyond a single project and fosters steady improvement: complete practical guide to DIY woodworking success.
Printable Adirondack chair plans for DIY builders with Ted’s Woodworking
If you’re specifically eyeing an Adirondack chair, the printable plans PDF for DIY builders with Ted’s Woodworking can be a great resource. It combines solid plan structure with practical, beginner-friendly steps that you can adapt as you gain confidence: Printable Adirondack Chair Plans PDF for DIY Builders with Ted’s Woodworking.
Special offer and where to learn more (affiliate link)
How to access exclusive deals via the affiliate link
If you’re ready to explore curated woodworking plans and start building more efficiently, you can check out Ted’s Woodworking through this affiliate link. It’s a practical way to access a large database of project plans that can complement the hands-on practice you’re already doing with your starter projects: exclusive offer for Ted’s Woodworking.
Conclusion
Starting with diy wood projects for beginners is a proven path to developing real skills, enjoying a constructive hobby, and producing items you can use around your home. By focusing on safe practices, planning thoughtfully, and choosing beginner-friendly projects, you’ll build proficiency step by step. Consider leveraging helpful resources like Ted’s Woodworking as a way to broaden your plan library, while always grounding your practice in the fundamentals of measurement, joinery, sanding, and finishing. As you gain confidence, you’ll find yourself naturally expanding to larger and more complex builds, all while keeping the process enjoyable and educational.
And remember: learning woodcraft is a journey best taken one project at a time. With the right mindset, the right safety habits, and a steady stream of practical projects, you’ll soon be well into the world of woodworking—with tangible results you can be proud of.