If you love relaxing on a warm summer afternoon or enjoy a shaded nook where you can sip a cool drink while watching birds, a DIY Adirondack chair is the perfect addition to your outdoor space. The keyword in this hobby is simplicity: easy adirondack chair plans that translate to a sturdy seat with classic lines. In this article, you’ll learn how to choose plans that are genuinely easy for beginners, what materials and tools you’ll need, and how to approach the build so your chair is comfortable, durable, and ready for years of use. We’ll also discuss how curated plan libraries, including Ted’s Woodworking, can expand your options without overwhelming a first-time woodworker. For those curious about evaluating plan quality, you’ll find practical tips and two useful internal resources to help you decide if a plan library is right for you.
When you search for easy adirondack chair plans, you’re not just looking for a design—you’re looking for a reliable blueprint that accounts for real-world materials, simple cutting layouts, and straightforward assembly. The Adirondack design is beloved for its bulky seat and upright back, which provides excellent support even for taller individuals. The trick to making the project truly enjoyable is to pick plans that emphasize clarity and repeatable steps. A well-written plan will include a cut list, a materials list, recommended fasteners, and a step-by-step build sequence that minimizes back-and-forth trips to the shop. The goal is to reduce guesswork, not to overwhelm you with jargon or overly clever techniques that complicate an innocent weekend project.
In addition to choosing the right plan, it helps to bring a few plain truths into your project: outdoor furniture needs durable wood, proper joinery, and a finish that stands up to sun and rain. The “easy” part of the equation comes from plan clarity and sensible cutting layouts that reduce waste and frustration. If you’re starting fresh, consider a plan that uses a straightforward two-piece seat and a slat back. It’s a proven configuration that delivers comfort without requiring advanced joinery. As you gain experience, you can customize the chair with different wood species, stains, or decorative touches.
What Makes a Plan Truly Easy?
Choosing an easy adirondack chair plan begins with three core attributes: clarity, practicality, and a forgiving build. Let’s break these down so you can evaluate plans before you buy or print them:
Clarity, Cut Lists, and Realistic Timelines
Clarity means step-by-step instructions that are easy to follow, with labeled diagrams and a complete cut list. A good plan will tell you exactly how many boards you need, their dimensions, and the order in which to cut them. Realistic timelines help you budget your weekend—no plan should promise a two-hour chair if typical builds take a full weekend for a first-timer. Look for plans that explicitly state dry-fitting steps, recommended saw types, and a careful sequence that minimizes mis-cuts.
Materials, Tools, and Skill Level
Simple plans avoid exotic materials or specialized tools. Most easy adirondack chair plans are designed for common wood, such as common pine, spruce, or cedar for outdoor durability. A basic saw, a drill, a sander, clamps, and a measuring tape are usually enough. The more straightforward the plan’s material list, the better it will be for a beginner. A plan that offers alternate material suggestions (e.g., switch from cedar to pressure-treated pine for cost savings) can also be a helpful feature for first-time builders.
Essential Materials and Tools for Beginners
Starting with the right kit helps you stay motivated and prevents interruption while you’re in the middle of a project. Here’s a practical starter list for easy adirondack chair plans:
- Wood: 1×6 or 1×8 boards plus some 2x4s for supporting components. Cedar or pressure-treated pine are common choices for outdoor durability.
- Wood screws, exterior-grade fasteners, and wood glue rated for outdoor use.
- Sandpaper in several grits (80, 120, and 220) to prep surfaces for finishing.
- Outdoor-grade finish such as an oil-based penetrating stain, a spar varnish, or a modern deck sealer.
- Tools: tape measure, carpenter’s square, pencils, a circular saw or miter saw, a drill/driver, clamps, and a random-orbit sander.
The wood you choose can affect both the appearance and performance of your chair. If you expect heavy sun exposure, cedar or tropical hardwoods offer long-lasting beauty, but they come at a higher price. For budget-conscious projects, pressure-treated pine is a common compromise. No matter which wood you pick, make sure it’s dry and free from cracks or warping before you begin cutting. A proper cut list from the plan will help you optimize your board usage and minimize waste.
Step-by-Step Build Overview
Below is a high-level walkthrough that mirrors what a typical easy adirondack chair plan would present. While individual plans will vary in exact measurements, the core sequence remains consistent: cut the parts, assemble with sturdy joinery, and finish for durable outdoor use.
Cutting the Parts
Begin by laying out your parts on the stock material. Follow the cut list precisely, marking each piece with its intended seat slat, back slats, armrests, legs, and supports. A simple technique is to use a scrap board as a template for repeated pieces, ensuring consistent widths and angles. Check each cut for squareness and smooth any rough edges with a sanding block. The key to a forgiving build is ensuring your seat and back pieces align evenly, so take time here and double-check measurements as you go.
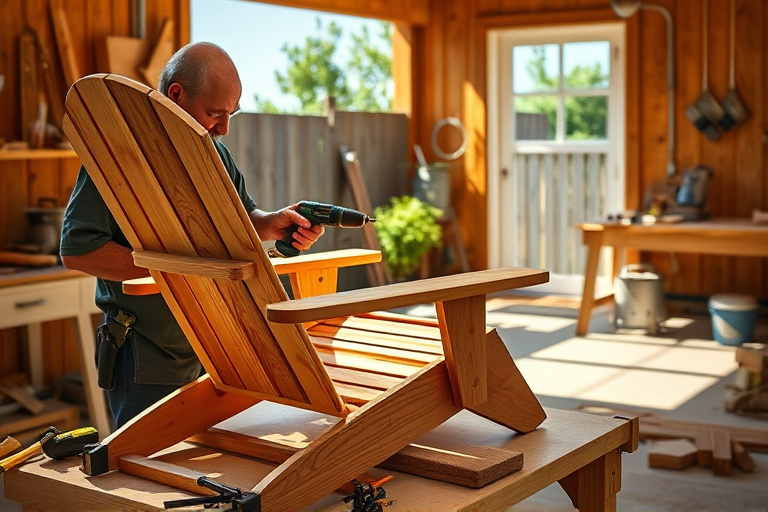
Assembling the Adirondack Chair
Most easy adirondack chair plans use straightforward butt joints or simple pocket-hole screws for the main frame, with more decorative or durable joinery reserved for heavier-use models. Start with the base frame: attach the front and back legs to the seat supports, then bolt on the seat slats. A second assembly step secures the backrest to the rear legs, and the armrests are connected to the front of the chair and the backrest frame. Throughout this process, periodically place the seat in a temporary upright position to verify alignment and comfort. Clamps are your best friend here, helping you hold joints while the glue dries and the screws set.
If you’re new to woodworking, consider a plan that emphasizes simplicity and forgiving joints. It’s not uncommon to re-check your angles with a framing square and to dry-fit major components before applying glue. A clear plan will also specify the exact number and placement of screws, so you don’t over-tighten or strip a hole. Many builders find that taking a slow, deliberate approach yields a better end product and a more pleasant building experience.
Finishing Touches and Comfort Details
Finish is the last mile in creating an outdoor chair that looks good and lasts. Begin with a thorough sanding, working from rough to smooth grits. Remove dust before applying stain or sealant. For comfort, consider adding a sloping seat and a curved back that follows the natural contour of the body. A simple cushion adds plushness without complicating the construction. When choosing a finish, select a UV-protective product designed for outdoor use. Apply at least two coats, allowing proper drying time between coats. Regular maintenance—reapplying a protective finish every 1–3 years depending on climate—will extend the life of your chair substantially.
Using Plans from Trusted Resources
While it’s tempting to start with a free pattern found online, many builders find that a well-curated plan library provides better clarity and longer-term value. When you buy into a reputable woodworking resource, you typically gain access to multiple projects, which helps you build confidence before tackling more ambitious pieces. If you’re evaluating plan libraries, look for clear diagrams, material estimates, and stepwise instructions that match your skill level. A comprehensive plan catalog can be worth the investment as you build confidence and expand your project repertoire.
Evaluating Plan Quality
Quality plans share several hallmarks: precise measurements, a logical assembly sequence, and a well-annotated cut list. They also provide real-world tips, such as how to avoid common mis-cuts or how to adjust the plan for slightly different chair dimensions. When assessing a plan, consider whether the author lists potential substitutions for materials and whether the plan includes troubleshooting notes for typical beginner mistakes. If you’re new to woodworking, you might prefer plans that include beginner-friendly safety reminders and clear diagrams that you can physically refer to while in the shop.
Ted’s Woodworking: A Resource for Plans and Projects
Many woodworkers eventually explore larger libraries of plans to broaden their project options. For readers who want to compare plan libraries, a popular option is Ted’s Woodworking. It offers a wide array of projects, from small backyard furniture pieces to intricate joinery projects. If you’re curious about what Ted’s Woodworking has to offer, you can read an honest customer opinion and see whether the library aligns with your goals here: Ted’s Woodworking review. This overview discusses strengths and potential drawbacks, helping you decide if the toolkit fits your needs before purchasing. Additionally, you can explore broader woodworking topics and project plans in this guide: Mastering woodworking: the ultimate guide to plans, projects, and Ted’s Woodworking.
For builders who want to explore a direct path to discounted plans, there are affiliate offers available that bundle popular project plans in a single purchase. If you’re curious about current deals, you can learn more through this partner link: Ted’s Woodworking – exclusive online offer. While this isn’t a guarantee of quality for every project, it’s a convenient option for those who want to jump-start a growing collection of plans and future builds.
Finishing, Maintenance, and Longevity
Your Adirondack chair’s endurance is as much about its finish as its construction. Outdoor wood finishes are designed to resist UV fading, moisture ingress, and temperature swings. After the chair dries from the final coat, you can place it in a protected outdoor corner or under a deck awning to minimize direct sun exposure. During the first year, inspect joints and fasteners for loosening and re-tighten or re-glue as needed. Annually, plan for a light sanding and a fresh coat of sealant or stain to maintain the chair’s appearance and water resistance. A well-sealed chair can last a decade or longer with only periodic maintenance, making the time invested in following easy adirondack chair plans well worth the effort.
Common Pitfalls and How to Avoid Them
New builders often encounter a handful of recurring issues. By recognizing them early, you can avoid wasted materials and frustration:
- Skipping the cut list and improvising measurements mid-project leads to mis-matched parts. Always start with the plan’s cut list and maintain a scrap-free workflow.
- Using warped or warped boards can ruin alignment. Inspect boards for flatness before cutting and set aside any that show obvious warping.
- Over-tightening screws can crack wood, particularly on softer species. Tighten to snug with a gentle approach and predrill pilot holes when needed.
- Skipping sealant or choosing the wrong finish. Outdoor furniture needs a UV-resistant finish to prevent color fade and water damage. Choose a finish rated for exterior use and reapply per the manufacturer’s schedule.
By anticipating these common mistakes and following a well-structured plan, you’ll find that the easy adirondack chair plans deliver a satisfying, confident build with a chair that’s both comfortable and resilient.
Conclusion: Start Building Today
Choosing easy adirondack chair plans is a smart first woodworking project for beginners and a satisfying addition for DIY enthusiasts. The Adirondack chair blends classic style with practical comfort, and the right plan can turn a weekend project into a longtime outdoor favorite. Start with a plan that clearly lists parts, materials, and steps. Gather a small set of reliable tools, select appropriate outdoor wood, and approach the project patiently. As you gain confidence, you can experiment with wood species, finishes, and even subtle ergonomic tweaks to customize your chair to your outdoor space.
If you’re curious about expanding your plan library or comparing different plan sources, you’ll find helpful information in the two internal resources above. They offer perspectives on evaluating plan quality and how Ted’s Woodworking fits into a broader strategy for project planning. And if you decide to explore an affiliate offer, a concise ClickBank option can help you access a broad catalog of plans and projects in one place. Remember: the best easy adirondack chair plans are those that make your build enjoyable, your results sturdy, and your outdoor space more inviting for years to come.