Starting a new hobby can feel intimidating, especially when the goal is to bring a real, functional piece into your home. If you’re wondering how to get started with woodworking without getting overwhelmed, you’re in the right place. This guide is designed around the concept of first time woodworking projects—carefully chosen tasks that teach fundamentals, build confidence, and yield satisfying results. By following a practical pathway, you’ll develop skills, learn safe habits, and gradually tackle more ambitious pieces with ease.
Why first time woodworking projects matter
For beginners, the best way to learn is by doing. First time woodworking projects are not about perfect masterpieces but about mastering the process: measuring accurately, making straight cuts, choosing appropriate joinery, and finishing a surface that feels good to touch. These projects help you understand wood behavior, tool ergonomics, and how different finishes interact with various species of lumber. By focusing on foundational tasks, you reduce frustration and set yourself up for future success with more complex builds.
Essential tools and safety
Every successful starter project begins with the right tools and a strong safety mindset. You don’t need a full shop on day one, but you do want reliable basics and a plan to use them safely.
Tools for beginners
Here’s a concise starter toolkit that covers most first time woodworking projects:
- Measuring and marking: tape measure, combination square, marking gauge
- Cutting: handsaw or a beginner-friendly miter saw,rip and crosscut blades
- Shaping and smoothing: hand planes (a block plane is great for starters), sanding block, sandpaper in grits 120–220
- Joining: wood glue, chisels (medium size), clamps (couple of PVC or quick-release clamps work well)
- Finishing: rags or brushes, a stable workspace, polyurethane or oil-based finish (as you prefer)
Safety basics
Safety should be part of your routine from day one. Always wear eye protection and a dust mask when sanding. Keep your work area clean to prevent miscuts or slips. Plan your cuts with a clear layout, clamp your work securely, and never rush a task. If you’re unsure about a technique, take time to study a reputable plan or guide. For many newcomers, following a well-structured plan reduces mistakes and speeds up the learning curve.
Planning your first project
Choosing the right first project matters. Pick a task that uses simple joinery, no complex curves, and a surface finish that you can manage with basic tools. A sturdy stool, a small bookshelf, or a wall-mounted shelf are excellent starting points. The goal is to practice accuracy, learn how wood behaves during cutting and finishing, and complete a project that actually gets used in your home.
Selecting a project
When selecting your first project, consider these factors:
- Time commitment: Choose something you can complete in a weekend to avoid burnout.
- Materials: Use readily available lumber like pine or poplar for affordability and straightforward workability.
- Joinery: Favor simple methods such as butt joints with glue and screws, or dowels if you’re comfortable with them.
- Finish: Pick a project that you can sand smoothly and seal well to build your confidence in finishing techniques.
Reading plans
Learning to read woodworking plans is a big part of the process. Look for clear cut lists, labeled diagrams, and a step-by-step sequence. If you’re new, plan to review each step before you cut. A good plan will help you visualize the project, estimate material costs, and anticipate potential mistakes. For those who want to follow proven, beginner-friendly plans, there are excellent resources that curate beginner-friendly projects and provide structured guidance.
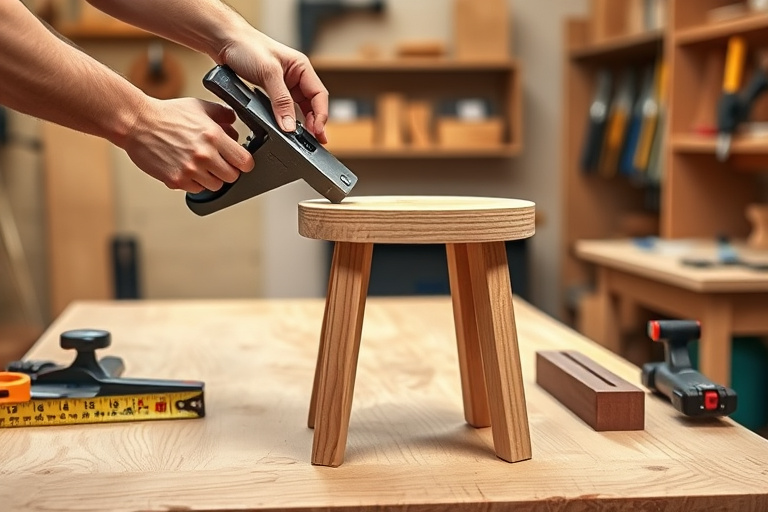
Step-by-step beginner project: a sturdy wooden stool
As a concrete example of first time woodworking projects, a small wooden stool is perfect. It teaches surface prep, precise cutting, and solid joinery, yet remains approachable for a novice. Below is a simplified path to complete a basic 12-inch stool suitable for kids, as a kitchen step stool, or as a decorative piece in a reading nook.
Materials and cut list
Assuming common 1×12 or 2×12 lumber (actual thickness may vary; check your stock):
- Two side rails: 1 piece each, 1×4 or 1×3 (about 12 inches long)
- Top plank: 1 piece, 1×12, 12 inches long
- Four legs: 4 pieces, 1×2 or 2×2, about 9–12 inches long depending on desired stool height
- Glue, several clamps, screws or nails, sandpaper, finish of choice
Cutting and joinery
Follow your plan to mark each piece precisely. A simple way to assemble is to attach the legs to the side rails with screws or nails, then connect the top plank to the rails with a bead of wood glue. If you want a cleaner joint, consider dowels or pocket-hole joinery once you’re comfortable with the technique. The key is to keep pieces square and align edges precisely so the stool sits flat and stable.
Finishing and safety check
Sand all surfaces progressively from 120 to 220 grit for a smooth finish. Wipe away dust, then apply a durable finish suitable for indoor furniture. A finish that’s slightly matte helps hide minor imperfections and is easier to apply evenly for beginners. After finishing, let the stool cure fully before use. Your first time woodworking projects should end with a piece that looks good, feels sturdy, and invites future practice rather than intimidation.
Integrating Ted’s Woodworking resources
As you progress, finding a reliable source of well-organized plans can make a big difference. Ted’s Woodworking is a popular resource offering a wide range of project plans—from simple, beginner-safe builds to more ambitious projects. If you’re exploring structured plans that guide you from material selection to finished piece, you might want to explore the comprehensive plans that many hobbyists find helpful. For readers seeking guided seating projects specifically, there are curated resources that walk you through building comfortable seating with detailed diagrams and step-by-step instructions. Consider exploring the following guides for chair-focused projects:
To access a broader collection of plans, you can also explore this resource on Ted’s Woodworking via the affiliate link below. It’s a convenient way to browse a wide range of projects suitable for first time woodworking projects and beyond:
exclusive Ted’s Woodworking offer
Seating project ideas and chair plan resources
While a stool is an excellent first project, expanding into seating plans can be a natural next step. If you’re drawn to building furniture designed for comfort and daily use, consider chair and seat projects. A solid approach is to study a few guides that lay out the steps for designing ergonomic seating, selecting appropriate wood, choosing the right joinery, and finishing for durability. The two internal resources linked above provide targeted guidance on wooden chair plans and blueprints, which can be excellent complements to your growing toolkit. They offer practical layouts, cut lists, and assembly diagrams that help you translate ideas into tangible pieces.
Whenever you’re ready to broaden your library of projects, incorporating a trusted collection like Ted’s Woodworking can help you maintain momentum. The key is to align your project choices with your current skill level, gradually increasing complexity as your confidence grows. First time woodworking projects will continue to be your stepping stones toward more ambitious furniture builds.
Why Ted’s Woodworking is a good fit for first time woodworking projects
Ted’s Woodworking offers a broad catalog of plans that span simple to advanced designs. For beginners, the structured plans help you learn by following proven methods rather than improvising every step. The value lies not only in the pdfs or blueprints themselves but in the learning process they encourage: precise measurement, consistent joinery, careful layout, and a thoughtful finishing routine. If you’re serious about turning your hobby into a repeatable skill, having access to a curated library of project plans can accelerate your progress and keep you motivated as you tackle more challenging tasks.
Tips for ongoing progress
Here are a few practical tips to keep your momentum going and ensure steady improvement with each new project:
- Set realistic, incremental goals. After completing a stool, try a small shelf, then a simple wall rack.
- Document your process. Take photos of each step, note measurements, and record what you’d do differently next time.
- Refine your technique gradually. Focus on one skill per project—saw alignment, edge jointing, or finish application—before adding another.
- Invest in a few quality core tools. A reliable saw, a square, clamps, and a few sanding blocks will pay dividends over multiple projects.
- Finish early, finish well. A good finish is as important as a good cut; practice sanding and sealing on scrap pieces before applying finish to your main project.
Conclusion
Starting with first time woodworking projects creates a strong foundation for a lifelong skill. By focusing on basic tools, safe practices, and simple, satisfying builds, you’ll gain confidence and competence without feeling overwhelmed. Remember that every expert began as a beginner—your journey is not about perfection on day one, but about steady improvement, curiosity, and consistent practice. As you build a small library of completed pieces, you’ll discover that woodworking is as much about process as it is about product. Stay curious, stay patient, and enjoy the steady progression from your first cut to your next ambitious project.