Creating a full size loft bed plans free project is one of the smartest ways to add functional space to a small room. Whether you’re outfitting a kid’s bedroom, a teen’s sanctuary, or a compact guest room, a well-designed loft bed can free up valuable floor space for study desks, play areas, or storage. The phrase full size loft bed plans free captures a common desire: to find reliable, workable plans without paying for them. In this guide, you’ll learn how to approach a loft bed project with confidence, even if you’re newer to woodworking. We’ll cover planning, materials, safety, and practical build steps, with pointers to beginner-friendly resources and trusted plan libraries that can help you as you scale up from simple projects to more ambitious builds.
Before diving into the build, it helps to understand why a full size loft bed is a standout option in many rooms. A loft bed isn’t just about cutting a larger, taller frame; it’s about reorganizing vertical space to create a more versatile living area. With a sturdy loft bed, you can place a study desk, a seating nook, or a storage wall beneath the bed, making every square foot count. The concept becomes especially powerful in shared rooms where siblings may have different needs or in studio apartments where every inch matters. If you’re just getting started with woodworking and want a clear path toward more ambitious builds, consider checking out practical beginner resources like this step-by-step guide to stepping into projects with confidence: Step-by-step woodworking projects: a complete beginner’s guide, which walks through foundational skills, safe tool use, and project planning. It’s a great way to build the skill set you’ll rely on when you tackle full size loft bed plans free someday soon.
Why choose a full size loft bed?
Benefits for kids’ rooms, shared spaces, and guest rooms
A full size loft bed offers substantial advantages. Kids can have a private little den up top while the area beneath becomes a homework nook or play zone. In shared bedrooms, lofts create distinct zones for siblings, reducing nighttime disputes and encouraging neatness. For guest spaces, lofts provide a comfortable sleeping area with extra storage or a small desk beneath for a home office corner. With a properly scaled plan, the bed feels welcoming, not cramped, and you avoid the common issues that arise when a bed is too tall or too heavy for the frame design.
Design flexibility and storage opportunities
When you use full size loft bed plans free, you’re often starting with a framework you can customize. The extra vertical clearance lets you add built-in drawers, a shelving wall, or a curtain for privacy. A well-thought-out design can incorporate a rolling dresser underneath, a folding desk, or a compact storage system that keeps toys, books, and clothes neatly organized. This flexibility is part of what makes loft bed projects appealing, especially for families seeking durable, long-lasting furniture that serves multiple purposes.
Key planning considerations before you start
Dimensions, clearance, and weight capacity
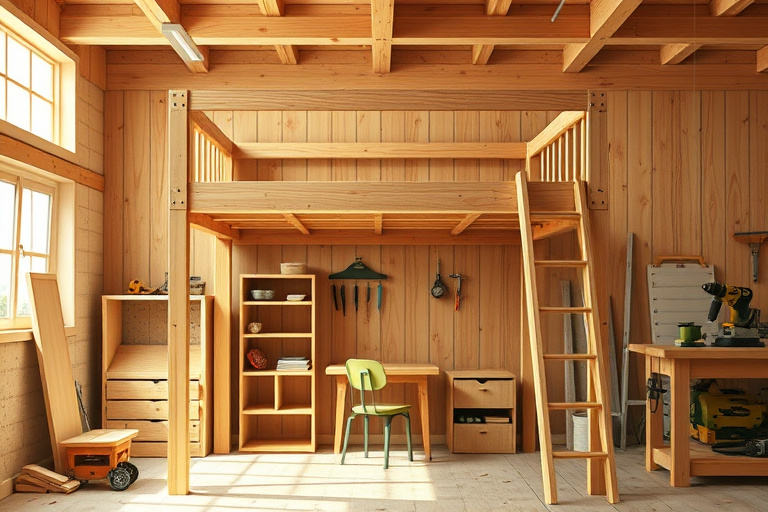
One of the first questions is: how tall should your loft be? A common target is to maintain at least 60 inches (about 1.5 meters) of headroom under the bed to accommodate a desk or seating area, plus comfortable room to move around. Check your ceiling height and window placement early in the planning phase. The weight capacity is another critical factor. A full size loft bed should support the mattress plus occupants, with a safety margin for jumping or rough play. The exact numbers depend on your chosen lumber, joinery, and hardware. A robust, well-braced frame will outperform lighter designs in long-term durability, especially for active kids.
Staircase vs. ladder options and safety tips
Ladders are space-efficient but can be challenging for younger children. A staircase with closed risers or a small platform can be easier to navigate and safer for daily use. If you choose a ladder, consider a curved or angled design with wide, slip-resistant rungs. Regardless of the access method, install guard rails and ensure the frame is anchored to studs or a solid wall to prevent wobble. Always incorporate finishing that reduces splinters and keeps nails and screws flush for a kid-friendly surface.
Ventilation, lighting, and access
Loft beds can feel cavernous if the under-space is poorly lit or stuffy. Plan for lighting under the bed—LED strips or a small desk lamp can illuminate the space without creating glare on the top bunk. Ventilation matters too; if the loft is near a window, ensure it doesn’t trap heat or moisture under the bed. Thoughtful cable management and outlets for charging stations help keep the space tidy and functional, which is a major win for any child’s room or compact living area.
Getting started with credible plans
Free sources vs. curated plans (how to compare)
Many crafters begin by searching for free full size loft bed plans free designs. While free plans can be helpful, they vary in detail, cut lists, and hardware recommendations. For a successful build, you want plans that clearly label each piece, provide a complete cut list, and specify joinery methods that match your skill level. When comparing options, look for a clear assembly diagram, a materials list with quantities, and notes on safety and finish recommendations. If you’re unsure where to start, it can be worth investing time in a curated library that packs a wide range of designs—like the Ted’s Woodworking catalog mentioned later in this guide. For beginners, it’s often practical to begin with a basic loft bed plan, then gradually upgrade to more ambitious configurations as confidence grows.
Beginner-friendly stepping stones (link to internal guides)
New to woodworking? Build a solid foundation before tackling a full-size loft bed. A couple of well-structured guides can help you ramp up the necessary skills. For step-by-step basics, check out Step-by-step woodworking projects: a complete beginner’s guide, which covers fundamental techniques, tool safety, and project planning. If you want to shore up your carpentry chops with essential joints, measurements, and material considerations, the Basic carpentry projects guide is an excellent companion resource. These two internal guides align well with the goal of using free loft bed plans as a stepping stone toward more complex builds.
Useful resources and how to use them
Step-by-step woodworking projects guide
The first resource above provides a broad primer on project planning, material selection, and safe tool handling. As you approach full size loft bed plans free, you’ll appreciate having a solid framework for estimating material needs and sequencing tasks. The guide helps you translate rough sketches into a practical list of parts and steps, reducing back-and-forth during the build.
Basic carpentry projects guide
The second guide focuses on core carpentry skills that bear directly on loft bed construction—precise measuring, square joints, and efficient use of saws and clamps. It’s especially valuable if you’re aiming for tight tolerances and a clean finish. Together, these resources form a practical foundation that complements a free loft bed plan by giving you the confidence to adapt the plan to your space and equipment.
Materials, tools, and a realistic budget
Common lumber types and finishes for sturdy loft beds
Choosing the right lumber is crucial for a loft bed that’s safe and durable. Popular options include pine for affordability, poplar for stability, or hardwoods like maple or birch for a premium finish and long-term durability. For most home builds, 2x4s and 1x3s or 1x4s can form the backbone of the frame, while plywood or medium-density fiberboard (MDF) can serve as the platform and panels. Finish considerations are important when children’s furniture is involved. Clear finishes, water-based polyurethane, or non-toxic sealants help protect the wood while keeping the surface safe for contact with skin and bedding.
Essential tools and safety gear
A solid toolset makes the build smoother. You’ll typically want a circular saw or miter saw, a drill/driver, a square, a carpenter’s pencil, clamps, and a sander. Don’t skip safety gear: safety glasses, ear protection, a dust mask, and sturdy work gloves are essential. If you’re aiming for a durable, long-lasting result, consider investing in quality bits and fasteners and taking the time to scheme a practical cut list and joinery plan. When you feel ready to explore broader plan libraries, a resource like Ted’s Woodworking offers a wide range of project plans that can complement your loft bed design and provide inspiration for future builds. You can explore it here: Ted’s Woodworking.
Estimating quantities and avoiding waste
Plan ahead by calculating number of boards, screws, and fasteners, then add a contingency for mistakes and saw kerf. A practical approach is to cut material to size with a single, well-marked cut list, labeling pieces as you go. This reduces confusion during assembly and minimizes waste. If you’re looking for a broad library of cut lists and project layouts beyond loft beds, the Ted’s Woodworking catalog can be a helpful reference for future projects and a good source of planning ideas, accessible through the affiliate link above.
A practical, beginner-friendly build plan (high-level workflow)
Designing around a mattress size and use case
Start by measuring your mattress and determining the bed’s internal clearance. Consider whether you’ll use a standard full-size mattress or an extra-deep variant. If you anticipate storage or a desk beneath, sketch a rough layout that maximizes the under-space without compromising headroom. A simple, scalable design tends to work best for beginners: a rectangular frame, a straightforward ladder or a staircase, and minimal decorative elements that could complicate assembly or increase weight.
Cut list essentials and joinery choices
For a robust frame, use a combination of pocket screws and metal brackets to secure joints. This approach offers strong joints while keeping the assembly approachable for beginners. Create a cut list that includes all bed rails, supports, ladder rungs, and cross braces. Mark each piece during cutting to prevent mix-ups—precision on day one saves hours of troubleshooting later. If you want a broader library of plan ideas beyond the free loft bed ideas, exploring a curated plan library can be a smart next step. A well-curated option is Ted’s Woodworking, which offers a wide range of projects and templates suitable for both beginners and advanced woodworkers; you can consider it here: Ted’s Woodworking.
Assembly sequence and safety checks
Assemble the frame on the floor first, then raise the loft bed onto its final position. Use temporary supports as needed and double-check that all joints are tight. After you stand the frame, add the mattress platform, guard rails, and the ladder or staircase. Finally, conduct a safety check: ensure there are no sharp edges, all screws are flush, and guard rails are secure. A clean, well-finished surface reduces the risk of splinters and makes the bed safe for daily use.
Integrating storage and workstation options
Under-loft storage ideas
The space below a loft bed is a gold mine for storage. Consider installing a shallow dresser, a modular bin system, or hanging organizers along a wall beneath the bed. If you’re feeling ambitious, a full-length wardrobe or a set of drawers that slides on casters can transform under-bed space into a functional closet area. The key is to keep the footprint tidy so the area remains accessible and visually light rather than cluttered.
Built-in desk or study space under the loft
Pairing a desk under the loft creates a compact study zone. A fixed desk with integrated lighting, a corkboard or whiteboard backdrop, and a small bookshelf on the side can make a cozy, efficient workspace. When planning, think about cable management—keep cords away from the ladder and ensure outlets are within easy reach. This approach to space planning aligns with the goal of maximizing usability in smaller rooms.
Troubleshooting and optimization tips
Common pitfalls with loft bed builds
Common mistakes include underestimating the weight, using weak joinery, and failing to plan for ventilation and lighting. To avoid these, choose durable hardware, double-check measurements, and ensure the ladder or stairs are comfortable to use. Reading through community feedback on similar projects can reveal practical tweaks that improve safety and usability, such as adding a small cross brace or increasing headroom under the bed.
Finishing for durability and kid-friendly finishes
Finish choices should prioritize safety and ease of cleaning. Water-based polyurethanes and low-VOCs stains are generally preferable for children’s furniture. Sand between coats for a smooth finish and remove all dust before applying the next layer. If you’re unsure which finish to pick, a simple, clear protective coat will often be enough to guard against spills and daily wear while keeping the wood’s natural beauty visible.
Leveraging expert plans and communities
Ted’s Woodworking as a comprehensive plan library (affiliate)
For builders who want a broad range of ready-to-build plans, a curated library like Ted’s Woodworking can offer inspiration, thorough cut lists, and tested joinery approaches. This resource can complement your free loft bed plans by providing design variations, alternative hardware recommendations, and other project ideas to grow your woodworking skills. If you decide to explore, you can access it here: Ted’s Woodworking.
How to pick the right set of plans for your space
When evaluating plan libraries, look for clarity in the cut list, material specs, and the assembly sequence. A good plan should include a materials list with exact quantities, recommended fasteners, and an exploded diagram showing how components fit together. For beginners, it can be helpful to start with a basic loft bed plan and then expand to more elaborate variations, using the library as a guide for future projects.
Additional learning and references (internal)
Beginner woodworking and carpentry primers (internal)
To reinforce your foundation while pursuing a full size loft bed plans free, you may want to revisit foundational resources. For a step-by-step entry into woodworking projects, see Step-by-step woodworking projects: a complete beginner’s guide. For essential carpentry skills that tighten your accuracy and efficiency, consult Basic carpentry projects: a comprehensive guide for beginners.
Final considerations and next steps
Safety reminders and maintenance schedule
After completing a loft bed build, establish a simple maintenance routine. Periodically inspect the frame for loosened fasteners, check guard rails for stability, and re-seal the wood as necessary to protect against wear and environmental changes. If you intend to move or modify the bed down the line, make sure all components are secure and aligned before reassembly. A well-kept loft bed remains a reliable centerpiece for years of use and growth in your space.
Conclusion
Whether you’re after a practical space-saver for a kid’s room, a shared bedroom setup, or a compact guest area, a full size loft bed plans free project can be the gateway to a calmer, more organized space. The key is to start with solid planning, choose appropriate joinery and hardware, and then layer in storage or a study area beneath the loft to maximize utility. If you’d like a broader library of plans to explore beyond the free options, consider accessing Ted’s Woodworking for a curated selection of designs, accessible here: Ted’s Woodworking. Remember to lean on the beginner-friendly guides linked earlier to build your confidence and ensure your loft bed project is safe, sturdy, and stylish for years to come.