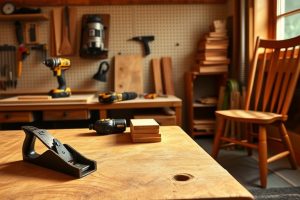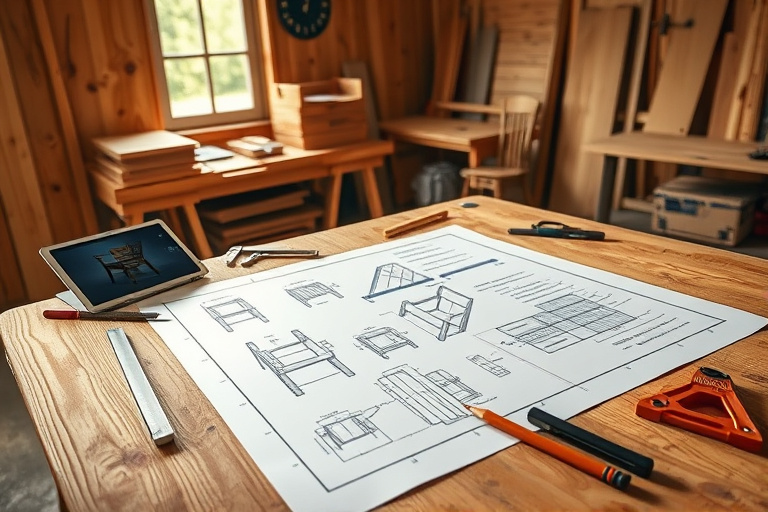
Whether you are a hobbyist building a first coffee table or a professional designer crafting custom furniture for clients, the cornerstone of successful woodwork is a clear, precise plan. When people talk about running a shop or completing a commission, they often reference furniture design blueprints as the map that keeps everything on track. These blueprints go beyond little sketches on scrap paper; they are detailed schematics that translate a concept into measurable, buildable instructions. mastering furniture design blueprints gives you the confidence to visualize, communicate, and execute projects with consistency and quality.
In this guide, you’ll learn what makes a good blueprint, how to read and interpret the plans, and how to move from concept to cutting board with a repeatable process. If you’re looking for structured, ready-to-use blueprints and project ideas, Ted’s Woodworking provides a broad library of plans that can complement your own drafting practice. You can explore those plans through an option tailored for woodworking enthusiasts and professionals alike. Ted’s Woodworking helps you access a wide range of project blueprints, step-by-step instructions, and material lists that integrate into your workflow.
What are furniture design blueprints?
At its core, a blueprint is a detailed plan that communicates every critical aspect of a build. For furniture design blueprints, you will typically find a combination of technical drawings, dimensions, material specifications, joinery details, and assembly instructions. These documents are designed to minimize ambiguity and to ensure that anyone in the shop can recreate the piece with consistent results. In practice, you will encounter several components that together form a complete blueprint set:
- Plan views: top, side, and front elevations that show the overall shape and silhouette.
- Sections: cross-sectional views that reveal internal construction and how pieces fit together.
- Dimensions: precise measurements for each component, including thicknesses, radii, and offsets.
- Materials and finishes: species selection, veneer options, and surface treatments.
- Joinery and hardware details: type of joints, fasteners, screws, dowels, and hinges.
- Exploded views: a visual breakdown of how a piece goes together, useful for assembly order.
When you combine these elements, the plan becomes a concrete blueprint for production, not just an artistic sketch. This is why furniture design blueprints are essential for achieving reproducible quality, saving time, and reducing waste in the shop.
Why furniture design blueprints matter
Blueprints serve several critical functions in woodworking and furniture design. They provide a common language between designer and maker, guide material selection and stock requirements, and ensure that joints, tolerances, and finishes align with the intended look and function. Here are a few reasons why you should invest time in creating and studying furniture design blueprints:
- Accuracy and consistency: precise measurements minimize errors during cutting and assembly.
- Communication: blueprints convey complex ideas clearly to clients, fabricators, and shop staff.
- Cost control: detailed bill of materials and finish specs help you estimate costs accurately and avoid waste.
- Iterative design: a solid blueprint makes it easier to test variations and compare outcomes without starting from scratch.
Even if your current workflow is largely hand-drawn, embracing the blueprint mindset can elevate your projects. It doesn’t mean you must draft like a CAD technician overnight; rather, you should aim to capture essential details with enough clarity to reproduce the piece reliably. If you’re seeking structure and a library of proven plans, consider resources that curate ready-to-build projects, which can complement your own designs. For example, exploring curated plans from Ted’s Woodworking can provide practical templates and inspiration as you refine your own furniture design blueprints.
Reading and interpreting blueprints
Understanding a blueprint starts with getting comfortable with the language of plans. You will encounter abstract symbols, dimension lines, tolerances, and material notes. Here are practical strategies to improve your reading:
Scales, dimensions, and tolerances
Most blueprints use a scale, such as 1:2 or 1:1, to fit the drawing onto a publishable page while preserving accuracy. Always verify the scale, then cross-check critical dimensions against the actual material stock you intend to use. Tolerances tell you how much a finished part may deviate from the nominal dimension. For furniture, tolerances matter when you mate elements like legs to aprons or tabletop edges to rails. If the blueprint lacks explicit tolerances, you should add your own conservative allowances in your build notes to avoid binding or misalignment later in the process.
Materials, joinery, and hardware
The blueprint should indicate not only what to cut but what to use. Material notes guide you toward appropriate species, thickness, and finish. Joinery details reveal the most reliable connections for the design, whether it’s mortise-and-tenon, dowel, dovetail, or hardware-based joints. Pay attention to grain direction and orientation notes; these influence both the strength and the aesthetic of the final piece. Hardware notes—such as drawer slides, screws, and fasteners—should align with the intended use and weight requirements of the furniture item.
As you practice reading blueprints, you’ll notice that good plans often include alternative assembly methods. This flexibility allows you to adapt to material constraints or equipment availability without sacrificing the final outcome. If you’re expanding your library of plans, you may find it helpful to compare a few different blueprint sets to understand how different designers solve the same structural challenges.
From blueprint to build: the workflow
The journey from blueprint to a finished piece typically follows a repeatable sequence. Establishing a workflow helps you stay organized, minimize errors, and ensure that every stage aligns with the plan. Here’s a practical, industry-standard progression you can adapt to your shop:
Drafting, modeling, and prototyping
Start with a clear concept and sketch variations. If you work with digital tools, you can build 3D models or renderings to validate proportions and ergonomics before you cut any wood. Digital models let you test thicknesses, clearances, and joint placement with quick iterations. For many woodworkers, prototyping a miniature or scaled version provides a hands-on sense of balance and function that can be difficult to gauge from a page alone. Regardless of your method, the goal is to resolve any conflicts between parts before material is committed.
Production planning and iteration
Once the design holds up in prototype form, translate it into a full production plan. Create a cut list, a hardware checklist, and a sequence of steps that minimizes tool changes and maximizes accuracy. In this phase, the blueprint becomes the instruction manual for the shop. Keep in mind that wood movement and seasonal changes can affect fit over time; consider this in your assembly notes and, if needed, add short-term testing steps to your process. If you find yourself regularly tweaking joints or proportions, it may be worth revisiting the blueprint to tighten tolerances or adjust joinery methods.
Tools and resources for creating blueprints
Developing high-quality furniture design blueprints doesn’t require a single perfect toolset. It’s about building a reliable workflow and choosing tools that fit your style and budget. Here are two categories worth exploring:
Software and drafting tools
Many woodworkers blend traditional hand-drafting with modern software. CAD programs can produce precise plans, while simpler drawing tools can help you visualize angles and proportions quickly. If you’re new to drafting, start with basic sketching methods and gradually incorporate digital solutions as your confidence grows. Regardless of the medium, ensure your blueprints present clear plan views, sections, and detail drawings that someone else can follow exactly. This discipline translates into better outcomes and fewer miscommunication issues in the shop.
Books and courses
Expanding your knowledge through well-structured resources can dramatically improve your blueprint quality. For example, exploring wood project books offers a comprehensive foundation in techniques, materials, and project planning. A great starting point is a guide that covers everything from fundamental joinery to finishing methods. For a curated set of woodworking plans and ideas, these sources can complement your practice and help you build confidence in your own designs. If you want a broader library of proven plans and inspiration, Ted’s Woodworking provides an extensive collection of project blueprints and step-by-step instructions that can integrate into your design process. You can access it here: Ted’s Woodworking.
Additionally, you might find value in dedicated project idea compilations that inspire blueprint creation. For practical, beginner-friendly concepts and a structured approach to building, consider resources like what these articles cover: wood project books: your complete guide to mastering woodworking skills and carpentry project ideas: 25 inspiring projects to transform your workshop. These internal resources can help you broaden your blueprint vocabulary and cultivate a library of reliable patterns to adapt for future builds.
Ted’s Woodworking and why it can help
In an ever-expanding field, having access to a broad catalog of ready-to-build plans can accelerate your learning curve and expand your repertoire. Ted’s Woodworking offers a curated collection of furniture plans, each with detailed measurements, material lists, and suggested joinery. Even if you prefer to draft your own blueprints, this resource can provide design templates and practical ideas that you can adapt to your own projects. It can be especially useful when you are learning the discipline of translating a concept into precise furniture design blueprints that can be built in a real workshop. If you want to explore a reputable library of plans, consider checking out the Ted’s Woodworking offer through the affiliate link above and see how it aligns with your goals.
Practical projects to practice with blueprints
The best way to internalize furniture design blueprints is to apply them to real projects. Start with simple pieces that emphasize accurate dimensions and solid joinery, such as a streamlined coffee table, a bookshelf with evenly spaced shelves, or a compact bedside table with hidden fasteners. As you gain familiarity, introduce more complex profiles, curved components, or built-in features like drawers and pull-out trays. Each project helps you refine your ability to read plans, select materials, and anticipate potential problems before cutting wood. When you practice, keep a habit of comparing your work against the blueprint; note any deviations, then adjust the plan or your technique to improve accuracy in the next iteration.
Additional resources and internal links
To deepen your understanding of woodworking and blueprint creation, consider exploring curated guides and project idea catalogs. For a broader overview of wood project books and the skills they teach, visit wood project books: your complete guide to mastering woodworking skills. If you’re seeking inspiration and a variety of practical projects to build your skills, check out carpentry project ideas: 25 inspiring projects to transform your workshop.
Conclusion
Mastering furniture design blueprints is a core skill for anyone serious about woodworking. It bridges the gap between creative concept and tangible results, enabling you to communicate clearly, optimize material usage, and produce furniture with consistent quality. Whether you draft every line by hand or leverage digital tools, a blueprint-first mindset will transform how you approach each build. If you’re looking for a comprehensive resource to expand your plan library, Ted’s Woodworking can complement your practice with a broad range of pre-made plans and templates. From there, you can tailor blueprints to your own style, pushing the boundaries of what you can create in wood.