Introduction
When people ask about the most important tools for woodworking, they’re really asking, “What should I invest in first to see real progress?” The short answer is: a smart, focused toolkit that matches your space, your projects, and your budget. The best outcomes come not from chasing every shiny tool, but from understanding which tools contribute to accuracy, safety, and efficiency, and then building competence with them over time. In this guide, you’ll learn about the most important tools for woodworking, how to choose them wisely, and how good plans and guided projects can accelerate your learning. And if you’re looking for an expansive library of plans to fuel your growth, Ted’s Woodworking is a resource many hobbyists and pros rely on to jump-start new projects with confidence.
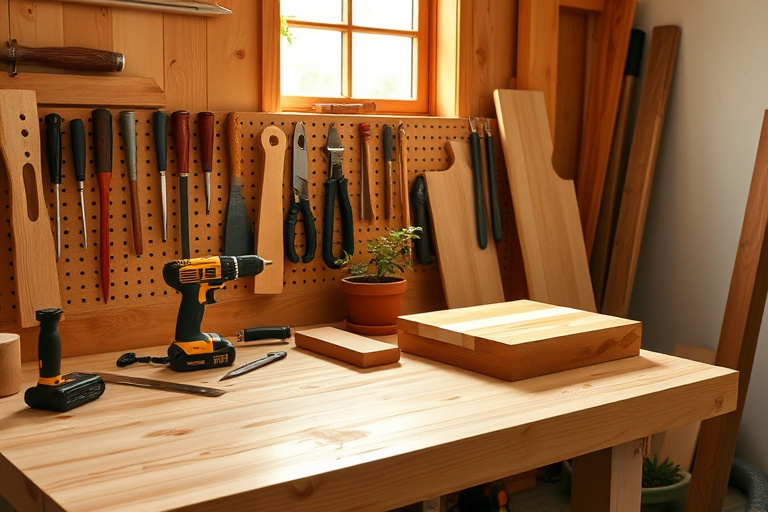
Core categories of the most important tools for woodworking
Measuring and marking tools
Precision starts with measurement. A reliable combination square, a good tape measure, a marking gauge, and a marking knife are foundational. These tools help you lay out joints, cuts, and drilled holes with accuracy, reducing guesswork and waste. When you plan a project, take a moment to map out the pieces on scrap stock and double-check dimensions before making any saw cut. The most important tools for woodworking in this category are the ones that keep lines true and repeatable, which translates into better fits and stronger assemblies in the final piece.
Cutting tools
Classic hand saws, back saws, pull saws, and a quality circular saw or miter saw form the core of most woodshops. The key is to pick a few versatile blades and maintain them properly. For beginners, a versatile handsaw and a mid-range miter saw can cover most framing and assembly tasks. As you gain experience, you’ll appreciate blades with clean, smooth cuts that leave less cleanup for finishing. If you’re working with solid wood versus plywood, the kerf, tooth geometry, and blade width all influence how quickly you can complete a cut and how clean the edge will be. The right cutting tools also help you stay safe by reducing kickback and chatter during the cut.
Shaping and finishing tools
Shaping tools include chisels, rasps, and planes that help remove waste, smooth surfaces, and create tight joinery. A sharp bevel-edged chisel set, paired with a faithful block plane or rebate plane, allows you to true edges and produce snug joints. Finishing tools—sandpaper, sanding blocks, and, for more advanced work, power sanders—are equally important. The finishing stage is where a well-executed project truly shines, and having the right grits, a steady hand, and a plan for sanding progression makes a big difference in the final look and feel of the piece.
Power tools and safety
Power tools expand your capabilities and speed, but they also demand respect for safety. A cordless drill/driver is a cornerstone for assembly, drilling, and driving fasteners. A compact router or a spindle sander opens up edge profiles and curved work. A dependable jigsaw helps with curved cuts, while a mid-range plunge router adds versatility for joinery and inlays. Safety gear—eye protection, hearing protection, and a dust mask or respirator—should be non-negotiable. The goal isn’t to win a tool battle but to create safer processes that let you work longer and learn faster.
Sharpening and maintenance
Even the best tools go dull without proper maintenance. Sharpening quality matters just as much as the tool itself. A honing guide, a sharpening stone, and a strop can keep blades and chisels shaving sharp, which makes every cut more accurate and comfortable. Regular maintenance—cleaning, lubricating moving parts, and storing tools properly—extends the life of your kit and reduces the risk of rust and misalignment. The most important tools for woodworking aren’t only used in projects; they include the habits you adopt to keep your tools performing at their best.
How to choose tools when starting out
Budget, space, and project goals
Your shopping list should reflect your space and the projects you plan to tackle. If you’re just beginning, prioritize a few multipurpose tools that will serve many projects rather than chasing specialized devices that you’ll seldom use. A small but capable starting set might include a quality tape measure, a few combination squares, a sharp chisel set, a handsaw, a cordless drill, a compact router or sander, and a sturdy work surface. Consider whether you’ll be building furniture, cabinetry, or outdoor projects, and allocate space for a workbench or sturdy table where you can clamp, measure, and work safely. Remember, the goal is steady progress, not perfect gear from day one.
Prioritizing a starter toolkit
Start with tools that improve accuracy and safety most quickly. For many woodworkers, the first upgrades are a reliable square, a crisp marking tool, a solid saw with a clean kerf, and a versatile drill. As skills grow, you can add a router for shaping edges, a random orbital sander for smooth finishes, and a compact dust collection solution to keep the workspace clean and healthy. When you invest gradually, you avoid buyer’s remorse and you learn what you actually use—two factors that influence long-term satisfaction with your toolkit.
The role of plans and guided projects
Ted’s Woodworking as a resource
Guided plans can dramatically shorten the learning curve by showing how a project should come together, from material selection to joinery details and finishing steps. Ted’s Woodworking is one widely used resource that offers a broad library of projects and step-by-step plans. For woodworkers who want a reliable source of project data, experimenting with well-structured plans can be a smart way to expand your toolkit without guessing at every step. If you’re curious about how a large, curated collection of plans can support your craft, consider exploring this resource as part of your learning journey. Ted’s Woodworking
Practical project pathways to build skill
Simple beginner projects
Beginner-friendly projects are where you translate your tool knowledge into real results. A well-made cutting board, a small planter box, or a straightforward bench teaches measurements, clamping, and assembly while giving you a tangible reward. These projects can be completed with a modest toolset and a handful of common materials. As you complete these pieces, you’ll gain confidence in layout, marking, and execution, which primes you for more challenging builds later on.
Intermediate projects that teach essential skills
Once you’re comfortable with basic cuts and joinery, you can tackle more complex builds that introduce new techniques and tool use. Consider projects that involve mortise-and-tenon joinery, drawer construction, or curved components. Each new project is a chance to refine accuracy, improve finish quality, and learn how to plan work sequences. If you prefer guided paths, look for plans that outline materials lists, cut lists, and step-by-step assembly sequences. These resources help you stay organized and reduce waste, which is the cornerstone of efficient woodworking.
Integrating tool knowledge with good plans
Outdoor seating projects
Outdoor furniture presents its own set of challenges—weather resistance, sturdy joints, and eye-catching designs. If outdoor projects are on your horizon, it’s helpful to study plans that account for weather sealing and frame stability. For example, exploring outdoor chair plans can give you insight into material choice and joinery that withstands the elements. Even if your first pieces aren’t outdoor-ready, understanding these design considerations improves your overall woodworking literacy.
Free furniture plans woodworking
Budget-friendly projects and growing skill sets often go hand in hand. If you’re looking to practice with little risk, the free furniture plans woodworking resource can be a practical starting point. These plans typically emphasize clear cut lists and straightforward joinery, helping you refine technique and build confidence before investing in more complex designs or premium plan libraries like Ted’s Woodworking. Using a mix of free plans and curated projects can accelerate your learning while keeping costs reasonable.
Maintenance and longevity: care for tools to stay sharp
Protecting your tools is as important as selecting the right ones. Store blades and bits in a dry, organized space to prevent rust. Keep chisels sharp with a honing guide and stone, and regularly refile or replace worn parts. Clean and lubricate movable joints on power tools to maintain smooth operation. A small investment in tool maintenance saves money over time and keeps you productive. Regularly inspecting your kit, re-sharpening blades, and maintaining alignment ensures that your tools stay as accurate as your growing skill set demands.
Conclusion: investing in your toolkit pays off
Understanding the most important tools for woodworking is less about collecting a catalog of gadgets and more about building a practical, capable toolkit that grows with you. Start with measuring and marking tools, then layer in cutting, shaping, and finishing gear as your projects demand. Pair these tools with solid plans and guided projects—whether from Ted’s Woodworking or other reputable resources—and you’ll notice a meaningful uptick in accuracy, efficiency, and project satisfaction. Remember to use resources like outdoor chair plans and free furniture plans woodworking to broaden your experience, while keeping upgrades measured and deliberate. Your future projects will thank you for the thoughtful toolkit you assemble today.