Introduction: Why small wood work projects unlock big satisfaction
If you’re drawn to the warm scent of freshly cut wood and the quiet focus of a hands-on hobby, you’ll love small wood work projects. These bite-sized tasks let you practice essential skills without committing to a large, time-consuming build. They’re perfect for weekend sessions, teach the fundamentals of measurement, layout, cutting, sanding, and finishing, and they add real value to your home—think stylish coasters, neat shelves, or a charming box that holds memories. The goal here is steady progress: learn a technique on a tiny piece, then apply that same skill to bigger, more ambitious projects later.
Starting with manageable projects lowers the barrier to entry. You’ll gain confidence from completing repeatable steps, reduce frustration from over-ambitious plans, and gradually expand your toolkit with purpose. This approach aligns with a smart learning curve: practice small, improve quickly, and scale up as you grow comfortable. For many woodworkers, this sequence becomes a reliable rhythm that sustains momentum and enjoyment over time.
The Why: Benefits of starting with compact projects
Small wood work projects offer tangible benefits beyond a tidy bench. They teach precise measuring, how to maintain a steady pace, and the importance of finishing techniques that protect your work and extend its life. Each project is an opportunity to practice a single skill—say, perfecting a straight cut or improving dust collection during sanding—without the overwhelm that can accompany larger builds. As your proficiency grows, you’ll notice improvements in accuracy, speed, and finish quality, which naturally translates into bigger projects with greater confidence.
Another advantage is cost control. When you start with small pieces, you’re less exposed to expensive mistakes. Mistakes become meaningful learning moments rather than discarded waste. And because small projects are often fast to complete, you’ll see a sense of progression and achievement that keeps you motivated to keep going.
Tools and Setup: Building a comfortable, efficient workspace
Your toolkit and workspace shape the ease with which you embark on small wood work projects. A well-organized bench, a few reliable tools, and a simple safety routine can dramatically improve your results and your enjoyment.
Hand tools vs. power tools
Begin with a solid set of hand tools. A sharp$ gouge or chisel, a backsaw or sash saw, a block plane, a marking gauge, and a combination square cover most beginner tasks and keep the cost low. The advantage of hand tools for small wood work projects is that you can be precise, quiet, and mindful—ideal for learning layout and cutting accuracy. Once you’re comfortable, you can complement with basic power tools such as a compact router, a handheld drill/driver, and a small Random Orbital Sander. Remember: the goal is progress, not perfection, so start with what you can manage and expand thoughtfully.
For readers curious about the broader tool landscape, a concise guide on essential tools can be a great starting point. See this resource for a focused overview of the instruments most critical to mastering small wood work projects and beyond: essential woodworking tools.
Workspace and safety basics
A dedicated, well-lit workspace makes a big difference. Clear your bench of distractions, secure clamps and offcuts within easy reach, and keep a simple dust control habit. Safety should be your first priority: wear eye protection, use clamps to secure workpieces before cutting or sanding, and store sharp tools safely when not in use. With small wood work projects, setup quality matters just as much as technique—an orderly space reduces errors and makes it easier to pick up where you left off next time.
Planning Your Projects: From idea to execution
Planning is the invisible driver of success in small wood work projects. A clear plan reduces waste, speeds up your workflow, and helps you stay motivated as you watch a simple idea come to life on the bench.
Design considerations for small wood work projects
Before you cut a single piece, sketch a quick concept. Consider the finished size, grain direction, joint type, and finish. For beginner-friendly pieces, favor straightforward joints like simple butt joints or pocket-hole connections, which are forgiving and quick to execute. When the project involves decorative elements, decide early which details matter most—whether it’s a smooth, rounded edge, a decorative inlay, or a particular type of grain highlight. Laying out the project on paper or using a simple sketch app helps you spot potential issues before you touch the wood.
Estimating materials, cost, and time
Estimating is a practical discipline. Start by picking a target project and listing every part you’ll need: boards, screws, glue, finishing oil or varnish, sandpaper grits, and clamps. Then add a small contingency for waste and miscuts. For many beginners, a well-chosen starter project can be completed in a weekend, giving you a concrete sense of what you can achieve in a set period. Tracking your time on a simple worksheet helps you understand how long different steps take and informs future project planning.
Starter Project Ideas: Quick wins that build confidence
Here are a few approachable, small wood work projects that deliver visible results with a limited time investment. Each is perfect for building skills and momentum as you progress from one project to the next.
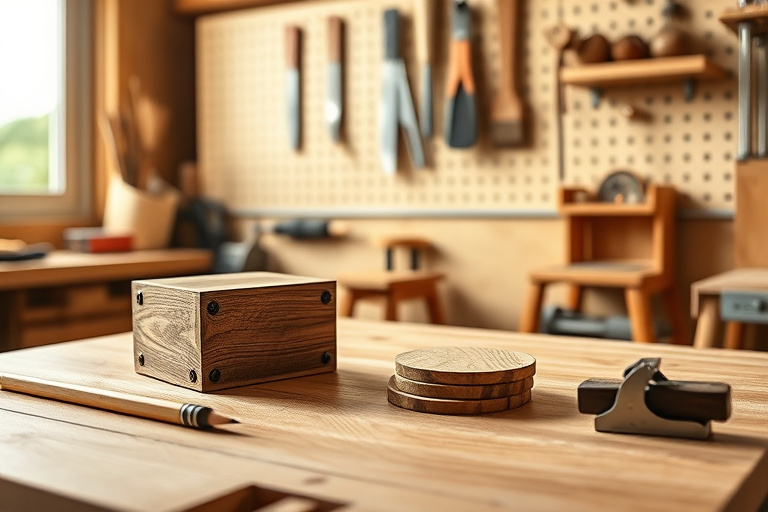
Wooden coasters
A classic starter piece, wooden coasters teach accurate cutting, sanding, and sealing. Start with a simple rectangular shape, round over the edges with a router or sanding block, and finish with a clear protective coat. For added challenge, try a pocket-hole join on a simple frame backing and a decorative veneer stripe. These small pieces accumulate quickly and are handy for gifting or personal use, reinforcing your confidence with each completed set.
Simple wall shelf
A wall shelf teaches layout, fastenings, and finishing in a compact footprint. Start with a straightforward L-shaped bracket and a shallow shelf plank. Use a level to mount the bracket, then secure the shelf with screws and a small dab of wood glue. Finish with a light sanding and a durable topcoat. As skills improve, you can add a second or third shelf, experiment with different profiles, or introduce a hidden mounting system for a cleaner look.
Small keepsake box
Whether for jewelry, mementos, or desk staples, a small keepsake box introduces you to precise layout and joinery. A simple box with a hinged lid uses a basic butt joint or a rabbet join for a stronger, more refined look. Focus on square corners, smooth edges, and a seamless lid. Finishing with a satin oil or varnish brings out the wood grain and elevates the perceived quality of even a modest project.
Bird feeder or herb planter
Outdoor-friendly (small wood work projects that still feel substantial) options like a bird feeder or a compact herb planter challenge you to think about weatherization and finishes suited for exterior use. You’ll gain experience with routing, drilling pilot holes, and applying durable finishes that resist moisture. A small project with a big practical payoff, you’ll enjoy watching birds perch on your own handiwork or herbs thrive on a sunny windowsill.
Step-by-Step Guide: A sample, beginner-friendly project
To illustrate how a typical small wood work projects comes together, here’s a concise, beginner-friendly walkthrough for a keepsake box. Use this as a template for future builds, adjusting dimensions and materials to suit your available wood and the look you want.
- Design and dimension: Decide the external dimensions, the height of the sides, and the thickness of the lid. A simple 8x6x3 inch box makes a practical, easy starting point.
- Material and cutting: Cut four sides and a bottom from a single board if possible to maintain color consistency. Use a crosscut saw for clean ends and a chisel or router plane to square up joints.
- Joinery: Use butt joints reinforced with wood glue and small nails or screws. For a neater finish, consider a rabbet joint on the lid or a splined corner for added strength.
- Sanding: Start with 80-grit, progress to 120, then 180 for a smooth surface. Round over all edges slightly for a comfortable touch.
- Finishing: Apply a wipe-on finish or a light oil to bring out the wood grain. Consider a satin or matte sheen for a classic look that hides fingerprints and wear well over time.
- Final assembly: Glue the bottom, attach the sides, and fit the lid. Check for smooth operation and a snug lid fit that doesn’t bind.
This template demonstrates how a small, well-scoped project translates an idea into a tangible, satisfying outcome. Each step reinforces fundamental skills—measuring, cutting, joining, and finishing—that transfer to more ambitious builds later on.
Resources to Level Up: Tools, plans, and communities
As you gain momentum with small wood work projects, you may want more guided plans, a broader library of ideas, or a structured learning path. Some woodworkers turn to curated plan collections that offer a broad range of designs and step-by-step instructions. If you’re exploring a larger library of plans, a well-known resource in this space is Ted’s Woodworking. You can explore a curated selection of project plans and learning materials by visiting the affiliate offer here: Ted’s Woodworking.
In addition to paid plans, there are free and low-cost insights that boost confidence with small wood work projects. For readers seeking practical, beginner-friendly guidance, the essential guide to easy beginner projects provides a structured path aligned with a smart plan approach. Check out this resource for more accessible projects and step-by-step instructions: beginner woodworking projects.
For a broader context on tools and fundamentals, you’ll also find value in the tool guide mentioned earlier. It highlights the core tools that reliably support any small wood work projects you tackle, from measuring to finishing, helping you build a solid foundation before expanding into bigger builds.
How Ted’s Woodworking can help: A curated library of plans
Even with a clear plan and a solid set of skills, you may crave a structured library of projects to fuel your weekends. Ted’s Woodworking is designed for woodworkers who want access to an extensive catalog of plans and ideas, including many projects suitable for beginners and for refining skills through repetition. The value here isn’t just the plethora of designs; it’s the way organized plans map out materials, cut lists, and step-by-step workflows, which can dramatically reduce decision fatigue when you’re staring at a blank piece of wood. If you want to explore this kind of curated plan library, you can learn more by following the affiliate link above and reviewing the plan options that align with your small wood work projects goals.
FAQ and Troubleshooting: Common challenges and quick fixes
Q: I’m new to working with wood. How do I prevent tear-out when routing or planing edges of small pieces?
A: Start with sharp blades, use a backer board for tear-out-prone cuts, and make multiple shallow passes rather than one deep cut. Clamping the piece firmly also reduces chips and errors. Keep your sanding progression consistent and avoid rushing the finish coat to prevent uneven sheen.
Q: My finish looks milky or streaky. What went wrong?
A: Milky or streaky finishes often result from excessive moisture, dust on the surface, or applying finish too thickly. Wipe off excess and ensure the surface is dust-free between coats. A light sanding with 320-grit between coats can smooth out imperfections and deliver a professional look.
Q: I’m unsure which project to start with. How do I choose?
A: Start with a project that matches your current toolset and space. A simple coaster set or a small wall shelf is typically a good first project—low risk, high satisfaction, and quick results. As you complete more small wood work projects, gradually increase the complexity and complexity of joins or finishes to maintain momentum.
By leaning into small, repeatable tasks and gradually expanding your toolkit and plans, you’ll build a durable skill set that serves you well across a wide range of projects. The combination of hands-on practice, a steady workflow, and the right reference materials can transform a casual interest into a rewarding hobby or even a small, steady stream of projects you’re proud to show off.
Final thoughts: Grow your skills with intention and patience
Small wood work projects aren’t just about making cute trinkets. They’re a practical, repeatable path toward mastery. Each completed piece teaches a skill, reinforces good habits, and builds the confidence you need to tackle bigger challenges. Whether you’re crafting coasters for the family, assembling a compact shelf for a kitchen nook, or turning a keepsake box into a cherished gift, the discipline of starting small pays off in dividends of competence and satisfaction. As you continue, consider pairing your hands-on practice with curated plans or community guides that keep you inspired and on track. If you’re curious about planning libraries and structured guidance, exploring Ted’s Woodworking can be a worthwhile step on your journey, and the accompanying resources can complement the two internal guides referenced here.