Introduction to wooden chair plans blueprints
If you’ve ever looked at a beautifully crafted wooden chair and wondered how to recreate that balance of comfort, style, and durability, you’ve probably thought about the value of wooden chair plans blueprints. A well-designed blueprint turns guesswork into a clear, repeatable process. It helps you choose the right materials, determine correct dimensions, and lay out joinery that holds up over years of use. Whether you’re a weekend woodworker or someone who wants to start a long-term hobby, starting with solid blueprints is the quickest way to avoid common mistakes and frustration.
In this guide, we’ll explore what makes effective wooden chair plans blueprints, how to choose the right set of plans, and how to execute a small chair project with clarity and confidence. Along the way, you’ll discover how a reputable resource like Ted’s Woodworking can provide comprehensive plans and templates, so you don’t have to reinvent the wheel. If you’re looking for additional ideas or broader project inspiration, you can explore ideas at this DIY wood project ideas page, which showcases practical projects you can start today. You can also broaden your skillset by checking out this guide to backyard and outdoor plans that feature Ted’s woodworking projects—another solid reference as you plan future builds (master your outdoor plans).
Understanding the basics of chair design
Before you dive into measurements and cut lists, it helps to understand the core considerations behind chair design. The most successful wooden chair plans blueprints address three intertwined aspects: ergonomics, materials, and joinery.
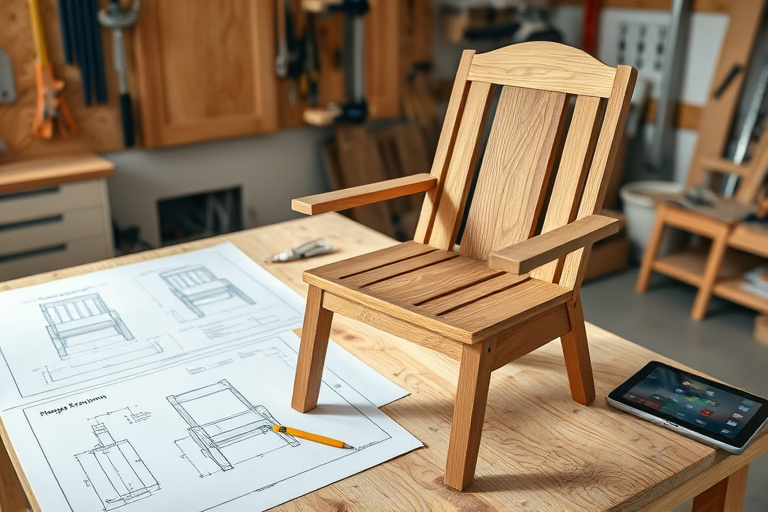
Ergonomics and seating geometry
Comfort starts with seat height, depth, and backrest angle. A typical dining chair or desk chair has a seat height around 17 to 19 inches from the floor, with a seat depth of about 15 to 18 inches. The backrest should support the user’s lower back in a gentle curve, not force them into a rigid posture. When you study wooden chair plans blueprints, you’ll see these dimensions called out explicitly, along with recommended tolerances that ensure smooth joint alignment during assembly.
Materials, joinery, and hardware considerations
Wood selection drives both appearance and durability. Hardwoods like maple, cherry, or oak look refined and hold screws well, while softwoods like pine are friendlier for beginners on small projects. The joinery method matters just as much as the wood species. Mortise-and-tenon joints, dowel joints, and box or lap joints are common in chair frames. The blueprint should specify joinery details, including cut sizes, routing depths, and hardware (screws, nails, or dowels) that maintain strength without compromising aesthetics.
Finding the right plans: Ted’s Woodworking
New woodworkers often wonder where to start when they want a trusted set of plans for wooden chair plans blueprints. Ted’s Woodworking is a popular resource that aggregates a broad library of woodworking plans, including seating designs, which you can adapt to your skill level and available tools. The advantage of a well-curated plan set is consistency: you get precise dimensions, cutting diagrams, and step-by-step instructions that translate a concept into a finished chair more reliably than improvisation alone.
What Ted’s Woodworking offers for wooden chair plans blueprints
Within Ted’s Woodworking, you’ll find chair plans that cover a spectrum from straightforward dining chairs to more complex lounge seating. Plans typically include:
– Full cut lists and material estimates
– Punch lists for each stage of the build
– Detailed drawings, sometimes with exploded views for clarity
– Finishing recommendations and care instructions
If you’re ready to explore the full library and start turning your ideas into tangible projects, you can access the resource via the affiliate link provided here. It’s a convenient way to obtain authoritative plans that align with your wooden chair plans blueprints goals.
For readers who are seeking broader inspiration before committing, consider visiting the DIY project ideas page mentioned earlier, and for broader outdoor and backyard project guidance that complements indoor seating projects, explore the outdoor plans guide linked above. These resources complement your chair project by expanding your practical woodshop knowledge.
Step-by-step project workflow
Turning wooden chair plans blueprints into a finished chair involves a repeatable workflow. Here’s a practical step-by-step approach that keeps you aligned with the blueprint, avoids rushed assembly, and results in a chair you’ll be proud to own.
Planning and purchasing materials
Start with a clear list from the blueprint: the number of legs, rails, seat slats or panel, back slat(s), and any decorative elements. If you’re new, choose a simpler design with straightforward geometry—straight legs, a flat or gently curved back, and a solid seat. From there, estimate material quantities and summarize costs. It’s smart to buy a bit more wood than you think you’ll need to account for grain direction, planing, and any mistakes. If you’re unsure about the exact species, use the blueprint’s guidance and then select a wood type you can source locally and work with comfortably.
Tools and shop setup
Essential tools for most wooden chair plans blueprints include a sturdy workbench, a good back saw or circular saw, chisels, a drill/driver, clamps, a square, measuring tape, and a router for precise edge work or decorative details. A sanding block or random-orbit sander helps achieve a smooth finish, which is critical for both aesthetics and comfort in seating. Organize your shop so that cut pieces stay clean and straight—from stock prep to final assembly. Following the blueprint’s plan views and notes will prevent misalignment and ensure longevity of the chair.
Cutting, shaping, and joinery
Careful, precise cuts are the backbone of a solid chair frame. If your plan calls for mortise-and-tenon joinery, practice on scrap stock first to dial in your mortise width, tenon shoulders, and depth. Doweling or pocket-hole joinery can be a good alternative for beginners, but ensure the joints provide enough glue surface and mechanical strength. When you cut the parts, label them clearly and keep track of orientation to match the blueprint’s assembly sequence. The goal is to have components that fit together with minimal persuasion and a consistent glue surface for strong joints.
Assembly, finishing, and testing for comfort
As you assemble, dry-fit the joints before applying glue to confirm alignment. Use clamps to hold parts securely while the glue cures. Sand between assembly stages to remove ridges and ensure a seamless transition between leg, rail, and seat components. When applying finish, consider a protective coating that suits the chair’s use: a wipe-on polyurethane for durability, a rubbed oil for a natural look, or a stain that highlights the wood grain. Finally, test the chair for stability and comfort. Sit in the chair at different angles and with different seating positions to verify that the ergonomics align with the blueprint’s intended dimensions.
Budget, time, and skill level
One of the practical advantages of following wooden chair plans blueprints is that they help you estimate time and budget accurately. A straightforward dining chair can be completed in a weekend for a hobbyist, while more complex designs with curved backrests or carved accents may require additional sessions. Material costs vary, but you can optimize by selecting a mid-range hardwood or an attractive veneer over plywood for the seat and back panels. If you’re pricing out a project, include clamps, sandpaper grits, finish materials, and hardware—even small items like corner braces or foot glides can affect the total.
Estimating costs and timelines
Start with a rough bill of materials from the blueprint. Then add a 10–15% buffer for millwork adjustments, glue, tape, and sandings. A conservative estimate is to budget a few hours for planning and layout, several hours for cutting and joinery, and another half day for finishing and curing time. For beginners, it’s wise to treat the project as a multi-weekend build to avoid fatigue and ensure accuracy on each step.
Managing expectations as a beginner
Beginner builders should choose simpler designs and gradually advance to more complex chair styles. Don’t rush the assembly; the most common issues—loose joints, misaligned backrest, or an uneven seat—usually stem from rushed cuts or insufficient clamping. Abiding by the blueprint’s sequence and taking time to test-fit joints before gluing will produce cleaner results and a chair you’ll want to show off in your dining room or workshop.
Customization ideas and optimization tips
While a blueprint provides the framework, you can tailor a wooden chair plan to reflect your style and space. Consider these customization ideas to elevate your project while staying true to the original blueprint:
- Modify leg styles: tapering, turned details, or squared-off modern profiles can dramatically affect the chair’s character.
- Seat options: switch from a solid wood seat to a woven cane or a slatted design for visual interest and comfort.
- Backrest shaping: a curved backrest can add ergonomics and flair; ensure the curve aligns with the user’s spine.
- Finish choices: experiment with stains, oils, or paints. A protective wipe-on finish enhances durability for everyday use.
- Hardware accents: decorative screws or wooden plugs can add a personal touch and hide fasteners for a cleaner look.
When customizing, revisit the wooden chair plans blueprints to verify that your changes maintain structural integrity. If you’re unsure about how to adapt the plan safely, it helps to study a variety of projects—like those in the mentioned resources—to see how different builders handle similar constraints. For broader inspiration, you can browse more DIY ideas on the DIY wood project ideas page and explore outdoor and backyard plan guidance that also leverages Ted’s woodworking resources (master your outdoor plans). If you’re looking for a deeper, library-style set of plans, Ted’s Woodworking can be a good fit to streamline your customization work and ensure you’re following proven methods.
Resources and further reading (internal links)
To expand your toolkit beyond chair-specific plans, check out this curated collection of practical projects that can sharpen your carpentry skills: DIY wood project ideas. This resource offers a range of bite-sized projects you can complete in a weekend, helping you gain confidence with measurements, joints, and finishes. For homeowners who want to bridge indoor seating projects with outdoor projects, the ultimate guide to backyard plans that feature Ted’s woodworking resources is a practical companion (master your outdoor plans).
How to act on this guide: next steps and affiliate offer
If you’re ready to take the next step and access ready-to-use, thoroughly tested plans for wooden chair plans blueprints, consider exploring Ted’s Woodworking. The platform provides detailed, scalable plans that can help you speed through the harder parts of building and give you a reliable reference for future projects. As you invest in your craft, you’ll also benefit from a growing library of templates, measurements, and finishing strategies that can be reused across multiple chair designs. For convenient access, you can click through the affiliate link below to review the available plans and purchase the package that best fits your ambition:
View Ted’s Woodworking plans and start your wooden chair plans blueprints today.
Frequently Asked Questions
Q: Are wooden chair plans blueprints suitable for beginners?
A: Yes, there are beginner-friendly chair plans that emphasize simple joinery, straightforward cuts, and a forgiving finishing process. Start with a basic dining chair or a straight-legged design and gradually move to more complex curves and details as your comfort level grows.
Q: How important is the finish on a wooden chair?
A: The finish protects the wood and enhances beauty. For high-traffic seating, choose a durable coating such as polyurethane or a robust oil finish that can withstand daily use and cleaning.
Conclusion and encouragement to start
Wooden chair plans blueprints are more than just diagrams; they’re a practical workflow for turning an idea into a sturdy, comfortable piece of furniture. By combining ergonomics, solid material choice, and reliable joinery, you’ll create seating that stands up to daily use and looks great in your space. Remember to study the blueprint carefully, plan your stock and tools, and progress through the steps with patience and precision. If you’re ready to access comprehensive, expertly crafted plans and templates, exploring Ted’s Woodworking through the affiliate link above can be a wise next step. With the right blueprint in hand and a little patience, you’ll be able to craft a chair that blends form, function, and personal style for years to come.