Introduction: Why woodworking furniture matters
Woodworking furniture unites practical function with expressive design. From a sturdy dining table to a cozy reading chair, the projects you craft become part of daily life, aging gracefully with memories and use. For hobbyists and serious makers alike, the discipline of woodworking furniture teaches patience, precision, and an eye for detail. If you’re ready to turn raw timber into timeless pieces, this guide will walk you through planning, building, and finishing with confidence—and it naturally weaves in trusted resources to broaden your toolkit.
Whether you’re starting with a small bedside table or scaling up to a dining set, the core ideas stay consistent: accurate planning, appropriate material choices, clean joinery, and a durable finish. Along the way, you’ll discover practical approaches to save time, reduce waste, and achieve professional-looking results—even if you’re working in a compact shed or a crowded urban studio. And for those who want a broader library of plans to pull from, there are curated resources that complement hands-on practice without replacing your own experimentation.
Planning your pieces: design, materials, and goals
Great woodworking furniture begins with a clear plan. Start by defining the function, scale, and environment of the piece. Consider your space constraints, the user’s height and reach, and how the furniture will be used in daily life. These factors influence dimensions, proportions, and the kind of joinery that makes sense for longevity.
Choosing the right materials is as important as choosing a design. Hardwoods such as maple, oak, cherry, and walnut offer distinct grain patterns and durability, while softwoods like pine can be excellent for budget-friendly projects. Your choice will affect weight, finish absorption, and surface hardness. In addition, keep hardware and fasteners in mind—bolts, hinge mechanisms, and non-marring foot pads all contribute to a professional result.
Sketching is your friend here. Start with rough outlines and quick scale drawings, then move to precise cut lists. The goal isn’t to reinvent every technique on the first try, but to establish a repeatable workflow that minimizes errors and waste. If you’re new to these steps, consider buffering your learning with referenced guides that walk you through the planning phase and provide tested templates for common pieces of furniture. And as you grow, you’ll build confidence to adapt designs to your space and skill level.
Tools, safety, and shop setup
A productive woodworking furniture journey requires a well-tuned toolkit and safe workshop habits. Core tools include a reliable saw (handsaw and power saw), a sturdy workbench, clamps, a chisel set, measuring tools, and a smoothing plane or random-orbit sander. Don’t overlook safety gear: eye protection, hearing protection, and dust control are essential for comfortable, long-term work sessions.
Smart shop setup minimizes time wasted chasing measuring tapes or misaligned pieces. Organize clamps within easy reach, store finishes and sandpapers by grit level, and designate a clean area for assembly. When working with hardwoods, acclimate your stock to your shop environment for several days or weeks to prevent warping after construction. If you’re curious about streamlined, home-friendly projects that don’t require a full-time woodshop, you’ll find practical examples in curated guides linked below.
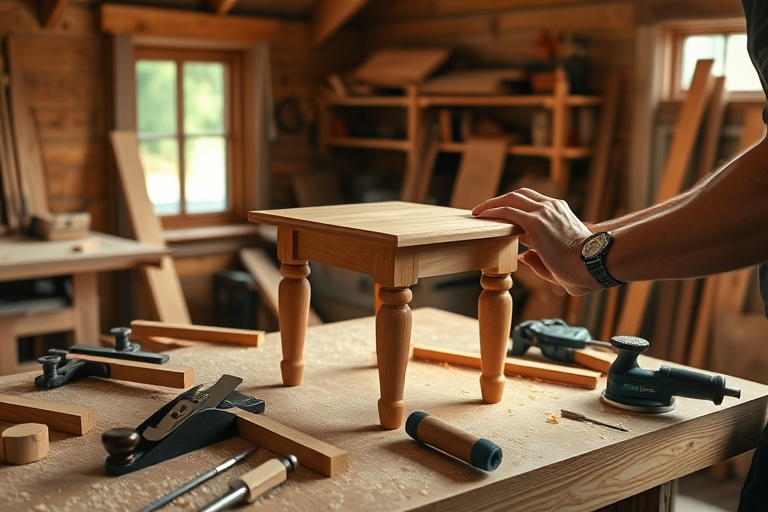
A step-by-step approach to building your first piece
Let’s walk through a simple, functional project—an end table—that embodies the core principles of woodworking furniture: solid design, precise execution, and a durable finish. This blueprint is adaptable for different styles and wood choices, so you can personalize it while maintaining structural integrity.
Design and cut lists
Start with a compact footprint for a bedside or living room table: a top roughly 18 by 24 inches, a lower shelf, and sturdy legs. Create a cut list that includes panels for the tabletop, rails, legs, and the shelf supports. Include dimensions for all pieces and a careful plan for grain direction to maximize strength and beauty. If you’re new to cut lists, reference templates from reputable guides and tailor them to your wood and hardware choices.
Joinery, assembly, and finishing
For a beginner-friendly but durable build, consider simple joinery such as through- or pocket-hole screws, reinforced with wood glue. This approach minimizes clamp time and simplifies alignment. Sand progressively from 120 to 220 grit before applying a finish, which will protect the wood and enhance the grain. A well-applied finish not only looks great but also improves resistance to daily wear, spills, and scratches. If you’re unsure about the right finish for your wood type, pre-finishing test samples are a quick way to avoid surprises on the final piece.
Troubleshooting common challenges
— Warping or twisting: acclimate wood and store properly; use flatness checks during assembly.
— Misaligned panels: double-check your square and clamps before final assembly.
— Finish blotching: apply sealer or conditioner when working with soft woods or open-grain species.
These are routine hurdles, but with a calm, methodical approach you’ll overcome them and keep moving toward a polished result.
Learning paths and curated resources
As you develop your craft, it helps to follow guided resources that reinforce practical skills while showcasing diverse furniture styles. Two well-regarded options provide structured, project-based learning without overwhelming you with generic theory. They’re designed to complement hands-on practice, not replace it, and they pair nicely with the step-by-step approach outlined above.
Easy wood shop project ideas and at-home builds — internal resource1
For readers who want to start small and build confidence quickly, Easy Wood Shop Projects offers masterful, simple builds you can tackle at home. These projects emphasize clean finishes, precise measurements, and repeatable processes, which are essential for consistent results in woodworking furniture. By following these projects, you’ll gain experience with stock preparation, measurement discipline, and finishing—fundamental skills that carry into more ambitious furniture-making adventures.
UK-focused planning, building, and finishing guides — internal resource2
If your space or supply chain is influenced by regional considerations, the UK-focused guide on planning, building, and finishing DIY pieces provides practical, localized advice that can keep your projects on track. Check out Woodworking Projects UK for plan-specific tips, material recommendations, and finishing strategies tailored to common British hardwoods and hardware availability. These resources help you translate design ideas into real, buildable furniture that suits your climate and tools.
Integrating Ted’s Woodworking into your process
Beyond in-depth project plans and tutorials, many woodworkers turn to comprehensive plan libraries to spark new ideas and accelerate progress. Ted’s Woodworking is a well-known resource that offers a vast collection of project plans, cut lists, and technique guides. While it’s an affiliate resource, it’s useful to think of it as a curated toolbox that can expand your repertoire of woodworking furniture ideas, especially when you’re ready to tackle more ambitious pieces or experiment with new joinery styles. If you decide to explore, you can learn more about the program here: Ted’s Woodworking on ClickBank.
When evaluating plans from any library, look for clear measurements, material recommendations, and step-by-step assembly diagrams. Adapt plans to your own workshop constraints, and don’t hesitate to simplify or modify joinery to suit your skill level. The key is to practice in a repeatable way so that each new piece of woodworking furniture reflects added precision, efficiency, and confidence.
Finishing touches, maintenance, and long-term care
A good finish does more than beautify; it protects your work from daily use, moisture, and abrasion. Start with a clean sand to 220 grit, then apply your chosen finish in thin, even coats. Common choices include oil finishes that highlight the wood’s natural grain, polyurethane for durable protection, and water-based finishes for faster drying and easier cleanup. For a furniture piece that remains functional for years, consider multiple coats with light scuffing between applications to ensure adhesion and a smooth surface.
Maintenance is simple but essential. Wipe dust regularly, avoid prolonged exposure to direct sunlight, and use appropriate felt pads under furniture to prevent scratching. If you ever need a quick refresh, a light sanding and a new coat of finish can revive an older piece and extend its life. With consistent care, your woodworking furniture can become heirlooms that get passed down through generations.
SEO-friendly tips for woodworking furniture enthusiasts
To help your content reach fellow hobbyists and potential customers, incorporate related keywords and synonyms naturally. Terms like cabinetmaking, furniture making, joinery, workbench, wood shop, and finishing can reinforce your topic without sounding repetitive. When writing about projects, focus on actionable steps, measurable outcomes, and clear benefits. This approach not only improves search visibility but also builds trust with readers who are evaluating their next project.
Conclusion: your next step toward creating beautiful woodworking furniture
Whether you’re building a simple end table or tackling a more complex dining set, the essentials remain the same: plan carefully, measure precisely, choose the right materials, and finish intentionally. With a steady workflow, a well-equipped shop, and access to reliable resources, you can progress from curious beginner to confident woodworker capable of producing furniture that blends function with aesthetic appeal. Use the internal guides to deepen your knowledge, explore diverse project ideas, and refine your technique. And if you’re ready to broaden your library of plans, consider the Ted’s Woodworking program as a resource to inspire your next project and accelerate your growth as a furniture-maker. For curious readers who want a curated starting point, the linked guides offer straightforward paths to practice and mastery.
Next steps
Start with a small, well-defined project to build momentum. Practice precise measuring, then document your process with photos and notes. As your confidence grows, gradually increase project complexity and attempt new joinery methods or finishes. Remember, woodworking furniture is as much about the journey as the final piece. Each build teaches a little more about wood, tools, and your own preferences, ultimately helping you craft pieces that are not only functional but also deeply personal.